Deprecation of “Projects with My Experiments” Filter
We are in the process of deprecating the Project with My Experiments filter from the Projects listing. Currently, using the filter will return nothing. In the near future, this filter option will be removed entirely.

New Move Steps Feature
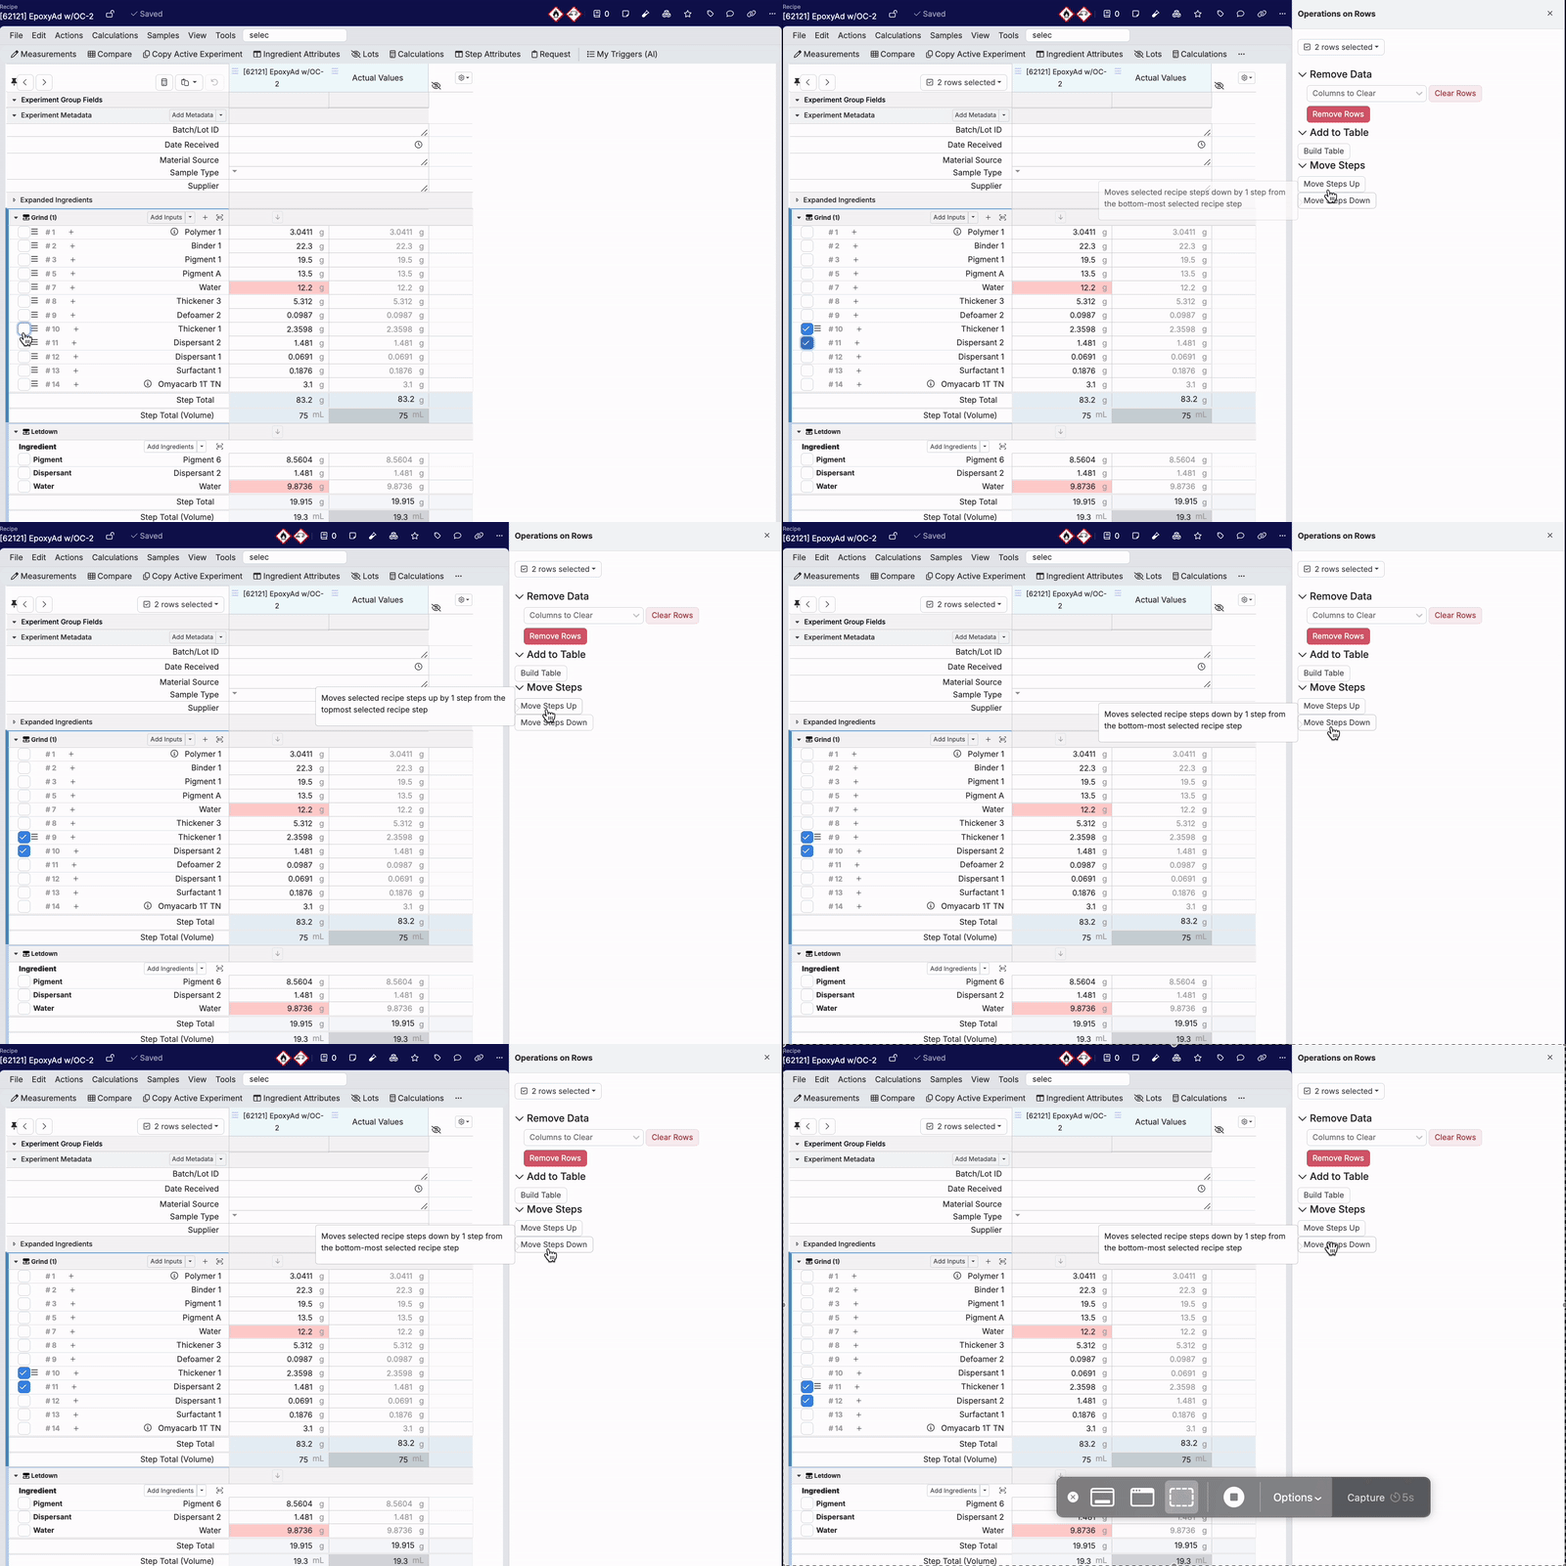
A new Move Steps section has recently been added to the Operations on Row sidepanel, improving how Uncountable users manage recipe workflow steps. Before this update, steps could only be moved one at a time using drag-and-drop. With this improvement, users can now move multiple steps simultaneously, saving time and effort.
To access this feature, use the Search Action bar and look for “Select Input Rows” to open the Operations on Row sidepanel. From there:
- Select the steps to move.
- Use the Move Steps options to shift the steps up or down.
- When moving multiple steps, movements are based on the relative position of the selected steps, ensuring precise reordering.
New Flag Added to Solver/Locks Sidepanel
We’ve recently enhanced the Solver/Locks sidepanel on the Enter Recipe page to make managing expanded lock logic more intuitive. A new “Autoconvert Subcomponent Locks to Compounded” flag has been introduced to improve how users view and interact with locked ingredients and intermediates.
When this flag is enabled:
- Locking a subcomponent (A) will automatically convert the subcomponent lock to an expanded lock, meaning that all instances of that subcomponent across the recipes will be locked. This is indicated by the pink lock symbol in the Solver/Locks sidepanel (B) and wherever the subcomponent appears within the recipe.

When this flag is not enabled:
- Locking a subcomponent (A) will result in only a subcomponent lock, indicated by a yellow lock symbol in the Solver/Locks sidepanel (B). Other instances of the subcomponent within the recipe will remain unlocked and editable.

Additionally, the Scope column on the Solver table, which previously only displayed the expanded quantity, now displays exactly where the ingredient is being pulled from (i.e. the intermediate or recipe step). This change was also introduced to improve the visibility of expanded ingredients.

Analyze Experiments “Bulk Prediction” Exports
Uncountable users now have the ability to generate predictions for large sets of experiments using the Bulk Predictions feature on the Analyze Experiments page. Previously, users could only get predictions for recipes shown on the Enter Recipes page, limited by the number of visible recipes. Now, using Bulk Predictions, users can generate predictions for up to 20,000 recipes at a time.
To use this feature:
- Navigate to the Analyze Experiments Bulk Predictions section, select a model, and apply filters to define the experiments to include.
- Click “Export Predictions” to trigger an asynchronous export.
- Once complete, the export will provide a detailed output of variables, variable types, values, and any associated errors for all selected experiments.
This update makes large-scale predictions more efficient, improving workflows for high-volume experiments.


Expanded Voice Agent Capabilities for Global Navigation
The Uncountable Voice Agent has been updated to support global navigation across Uncountable. From the Voice Entry sidepanel, users can now use the voice agent to navigate between pages or issue page-specific commands such as “show the input categories column” or “show the audit log modal.”
Additionally, the Command + K search menu has been integrated with the global voice navigation tool. Click the microphone and give commands such as “go to the Dashboard” or “go to the Ingredients page” to efficiently navigate the platform.


Introducing the Notebook Revision History Sidepanel
The Uncountable Notebook now includes a Revision History sidepanel, providing users with an intuitive way to track changes made to Notebook cells. Once enabled, the sidepanel can be accessed via the File menu by selecting “Version History.”

Snapshots are automatically created each time a cell is updated, capturing a detailed record of edits. Snapshots are nested by minute, hour, and day, allowing users to navigate and review changes. When viewing a version, additions are highlighted in green and deletions are highlighted in red.
Currently, versions can only be viewed. Future updates to the sidepanel will include the ability to copy or restore previous versions to provide more control over Notebook content.

This feature is hidden by default but can be enabled within the Platform Config tab of the Company-Wide Settings page (”Enable Notebook Version History”).

Introducing the Scratch Pad
The new Scratch Pad tool offers an easy way to take and organize notes within Uncountable. Functioning as an abridged version of the Notebook, the Scratch Pad allows users to record text notes within tabs which can be transformed into Notebook pages. The modal also remains open as users change pages, allowing for uninterrupted note-taking across the platform.
When enabled, the Scratch Pad can be accessed by clicking the icon on the Navigation Bar. From the modal, users can:
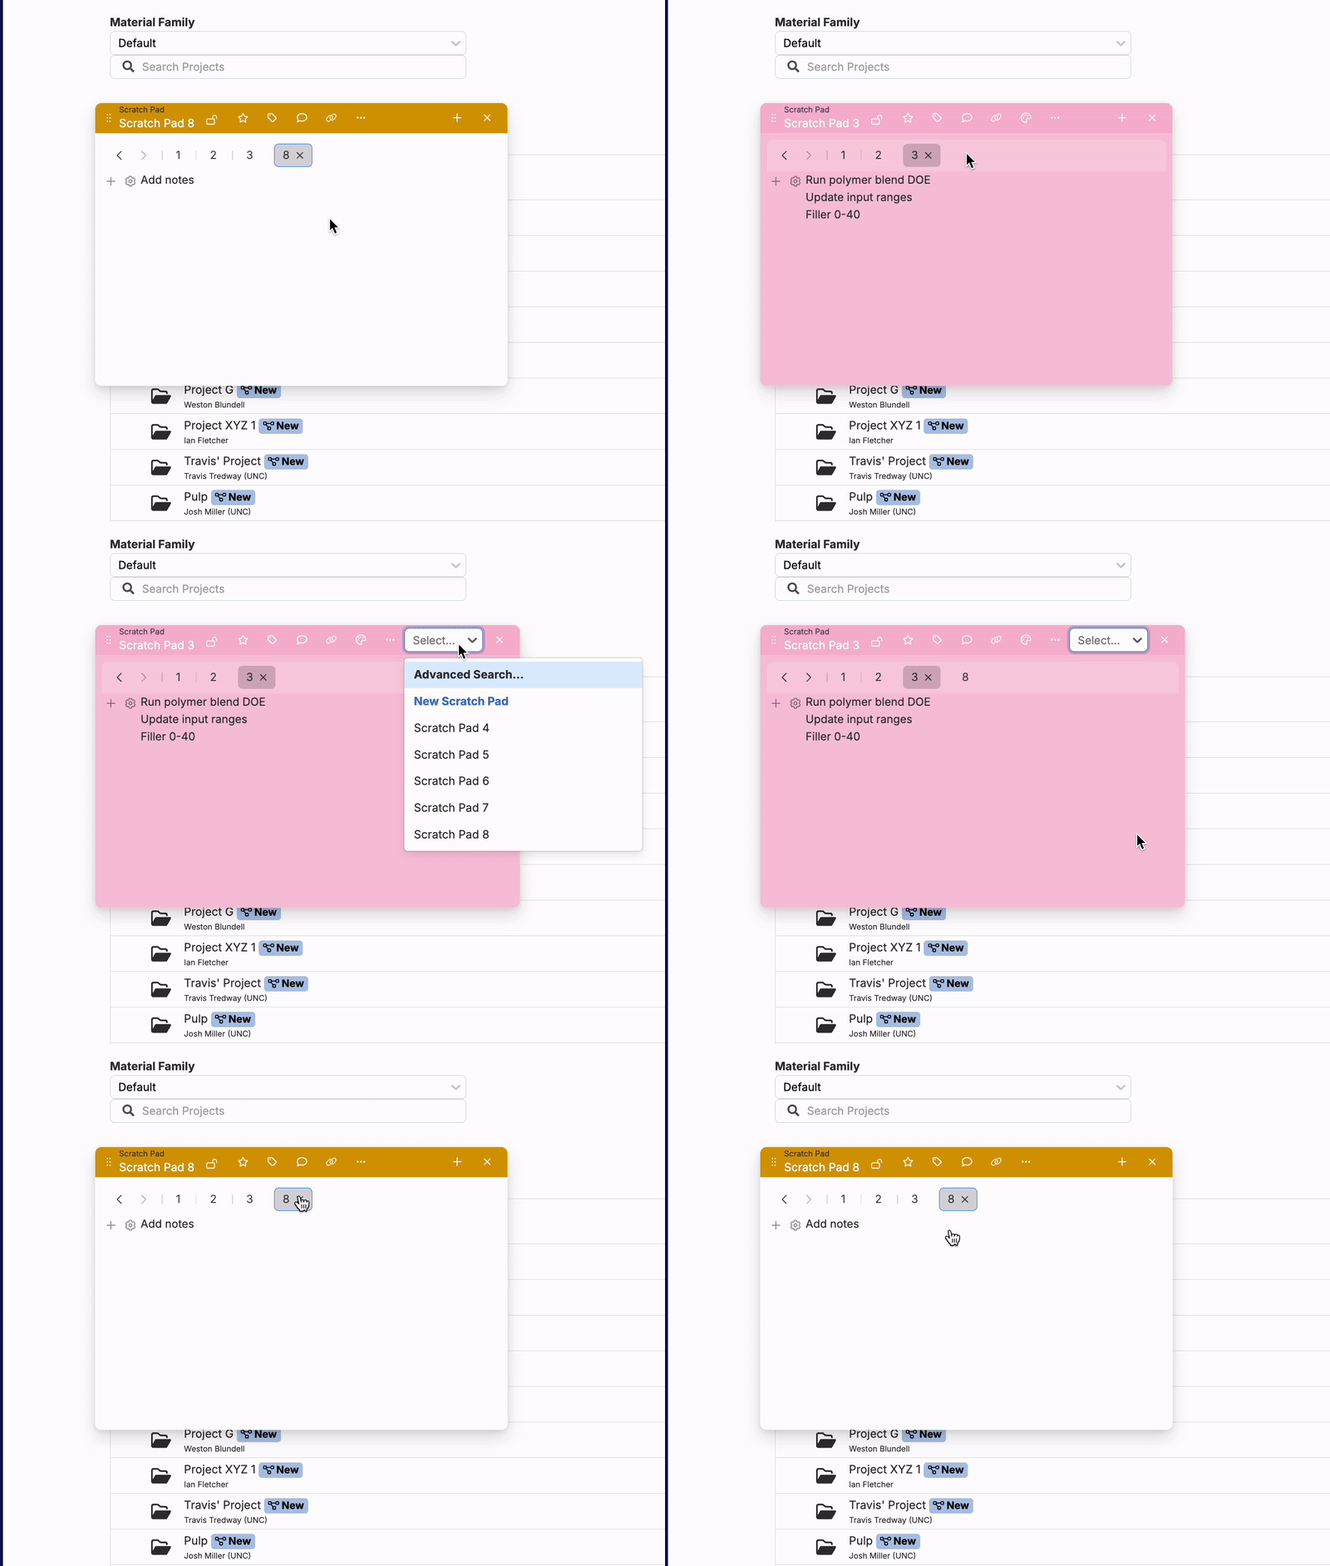
- Create New Pads: Create new pads by clicking the + icon and selecting “New Scratch Pad”, which are added to the modal as tabs.
- Record Notes: Add text notes and configure text font, size, format, color, or highlighting.
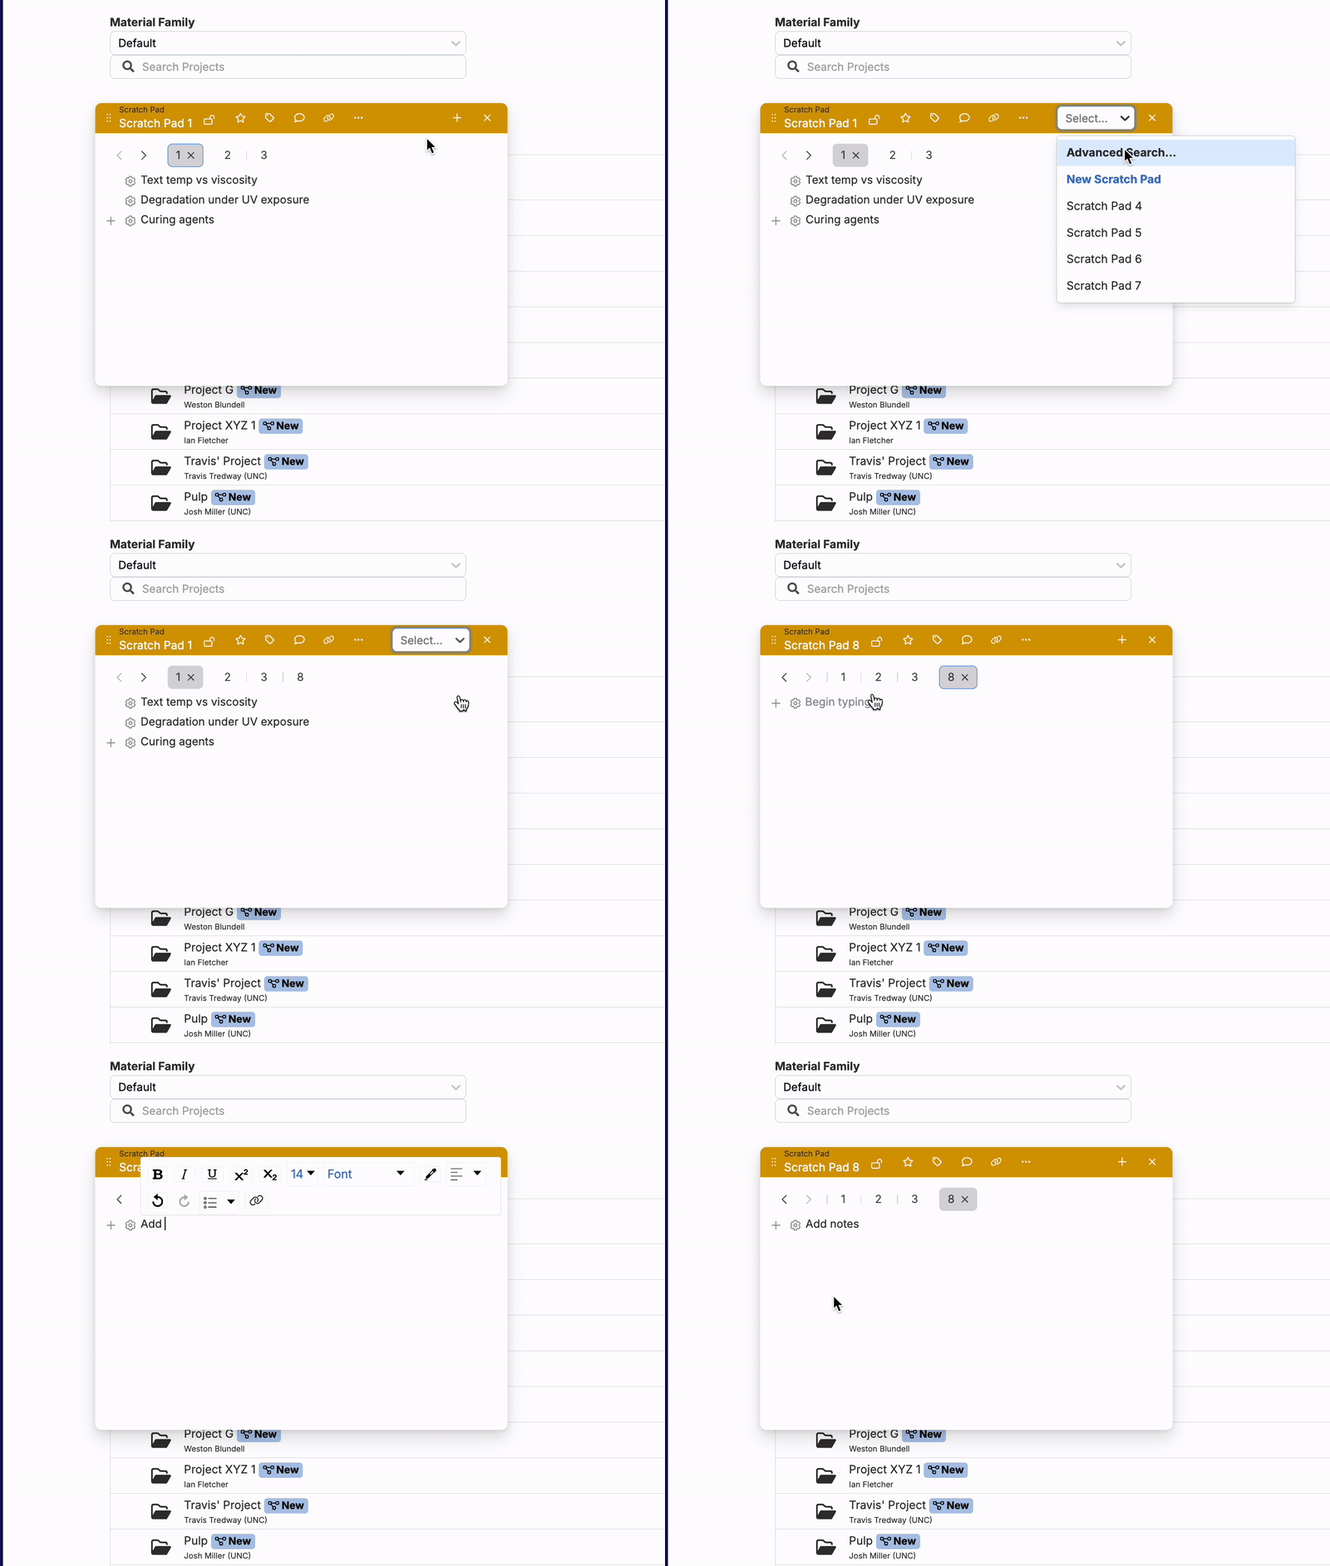
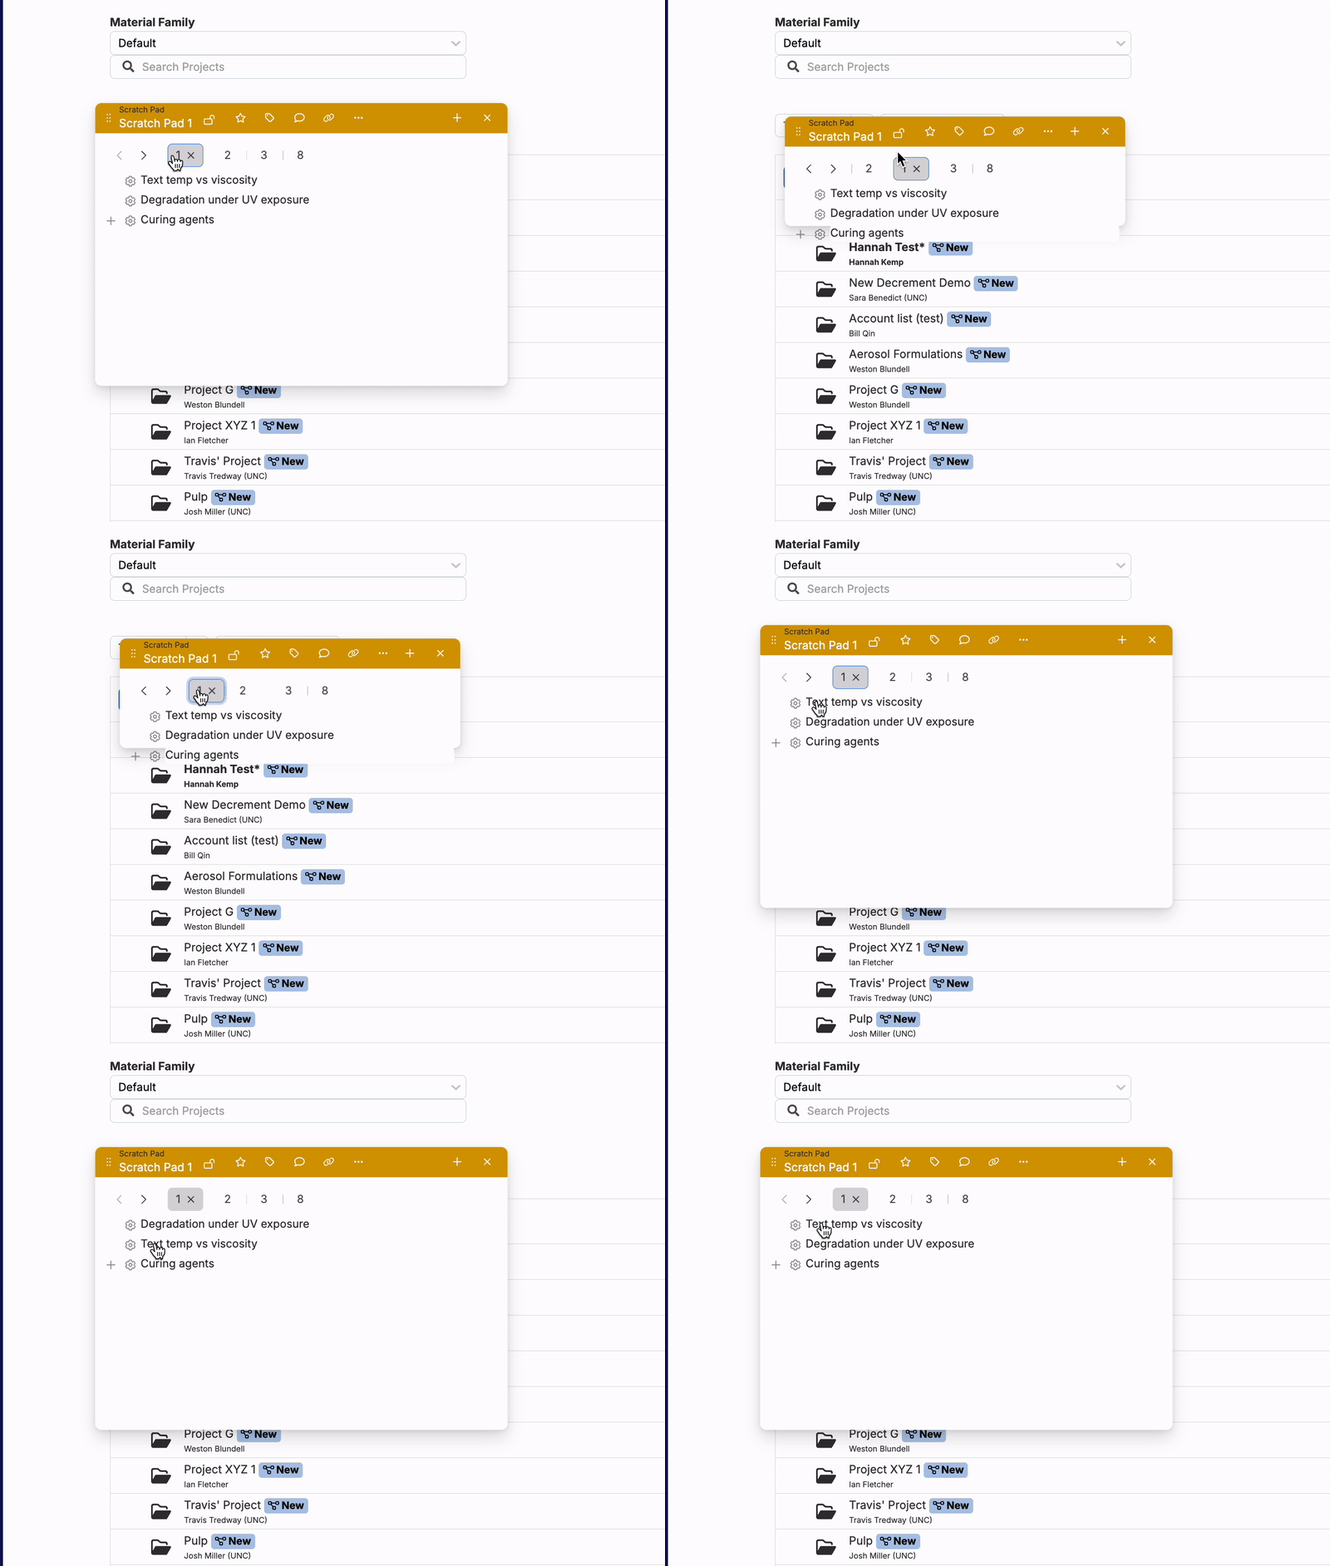
- Reorder Text/Tabs: Reorder text blocks or tabs by clicking and dragging.
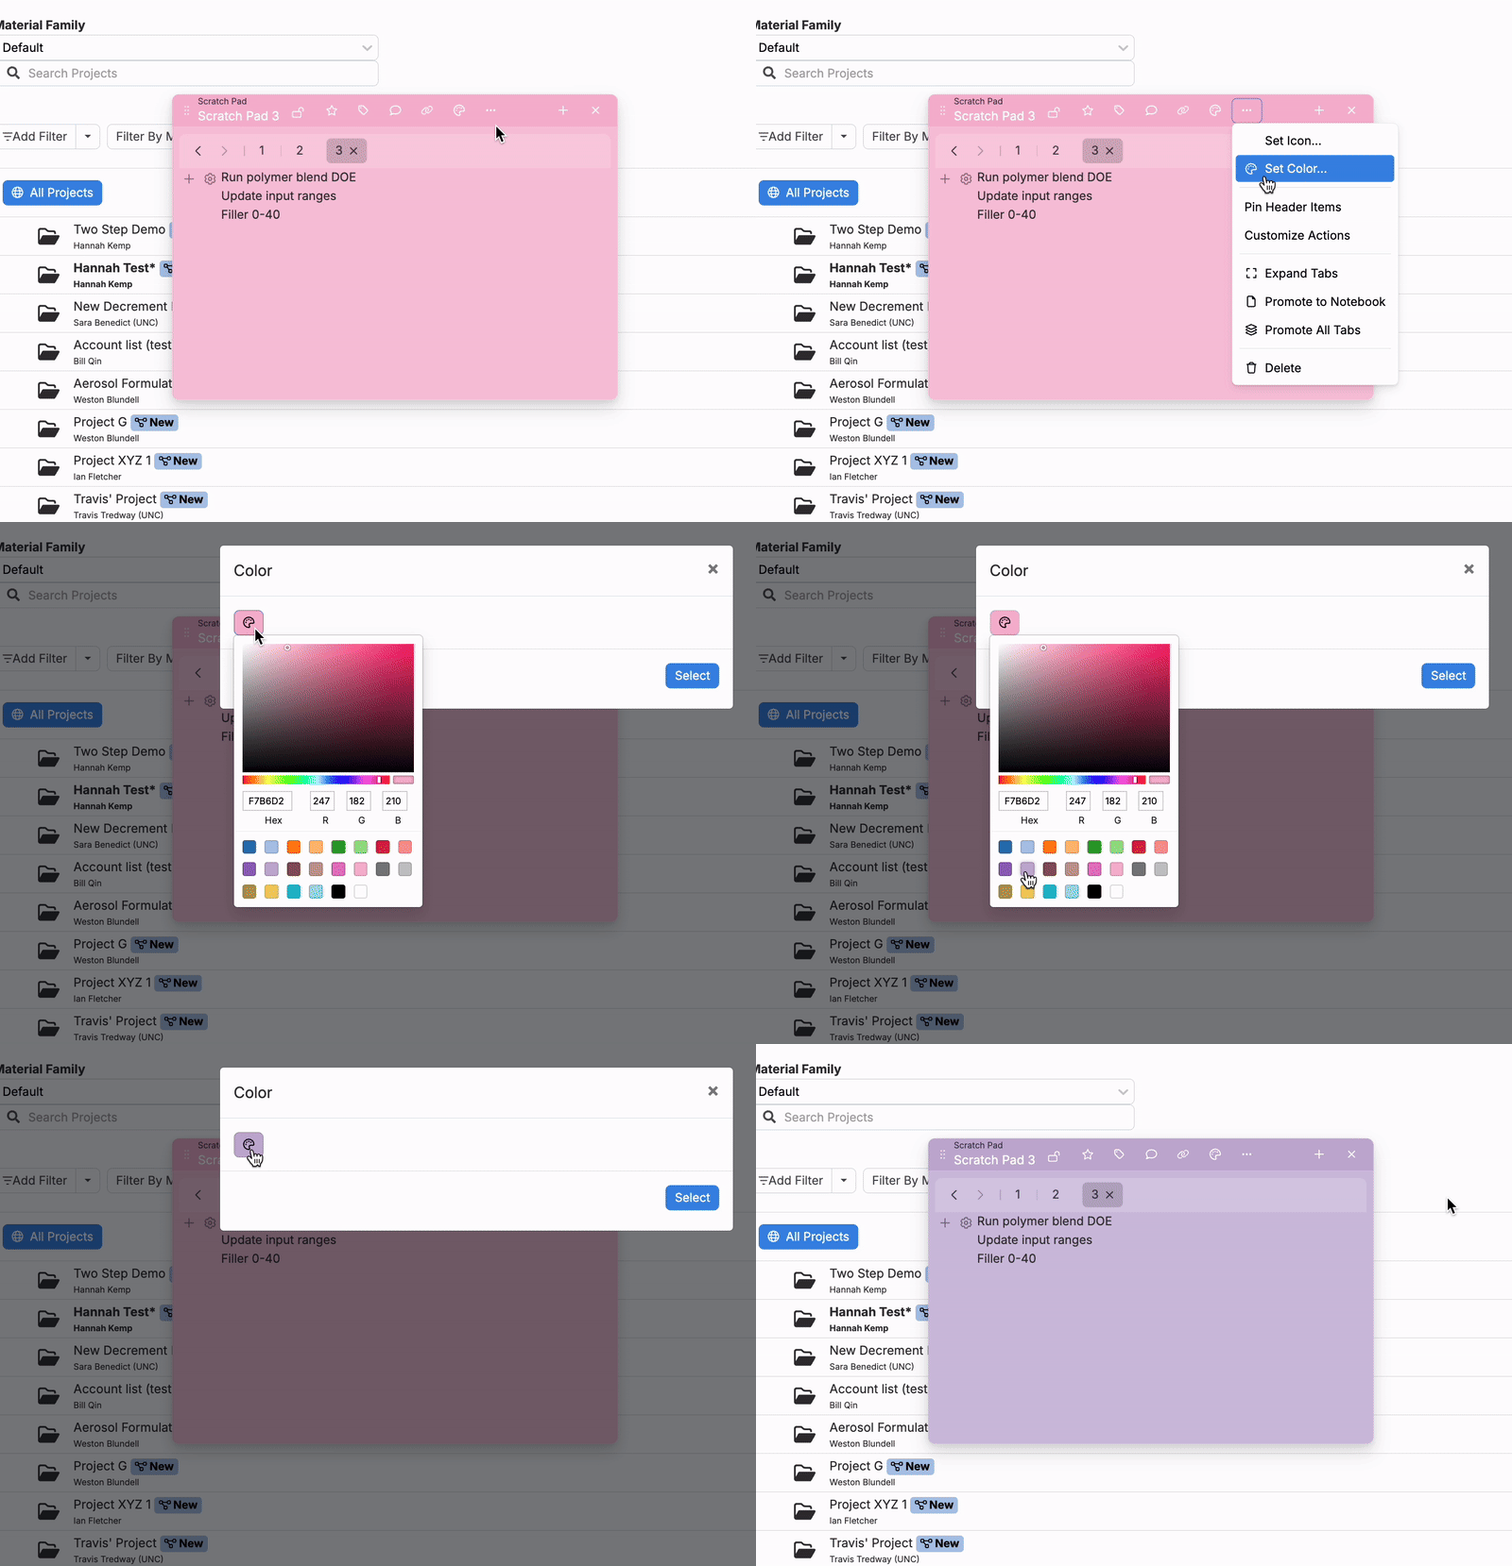
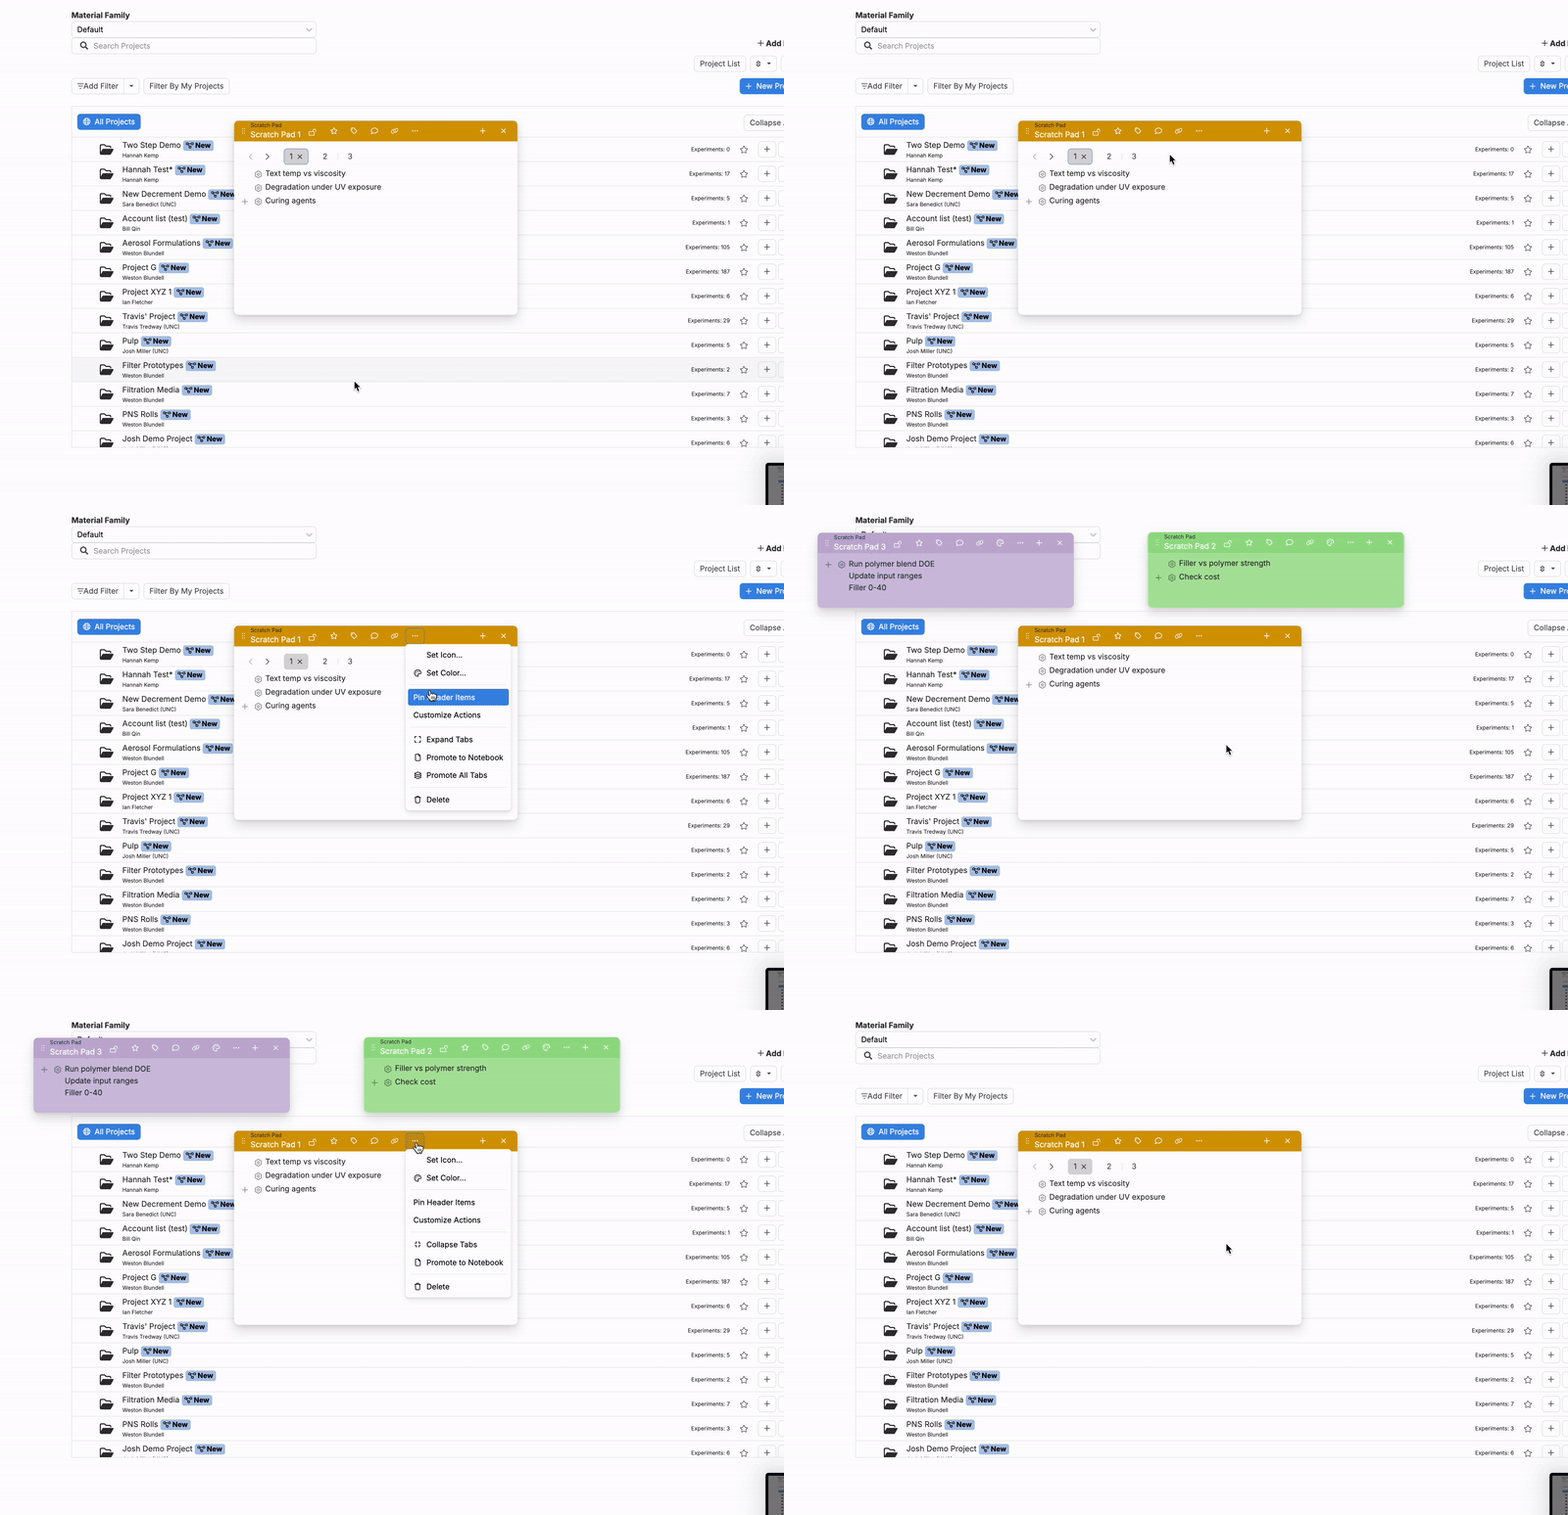
- Customize Tab Colors: Change individual tab colors by clicking … and selecting “Set Color”.
- Remove Tabs: Remove tabs from view in the modal by clicking the x icon.
- Restore Tabs: Restore previous tabs by clicking + and selecting from the list.
- Expand Tabs: To view all Scratch Pads at once as individual modals, click … and select “Expand Tabs”.
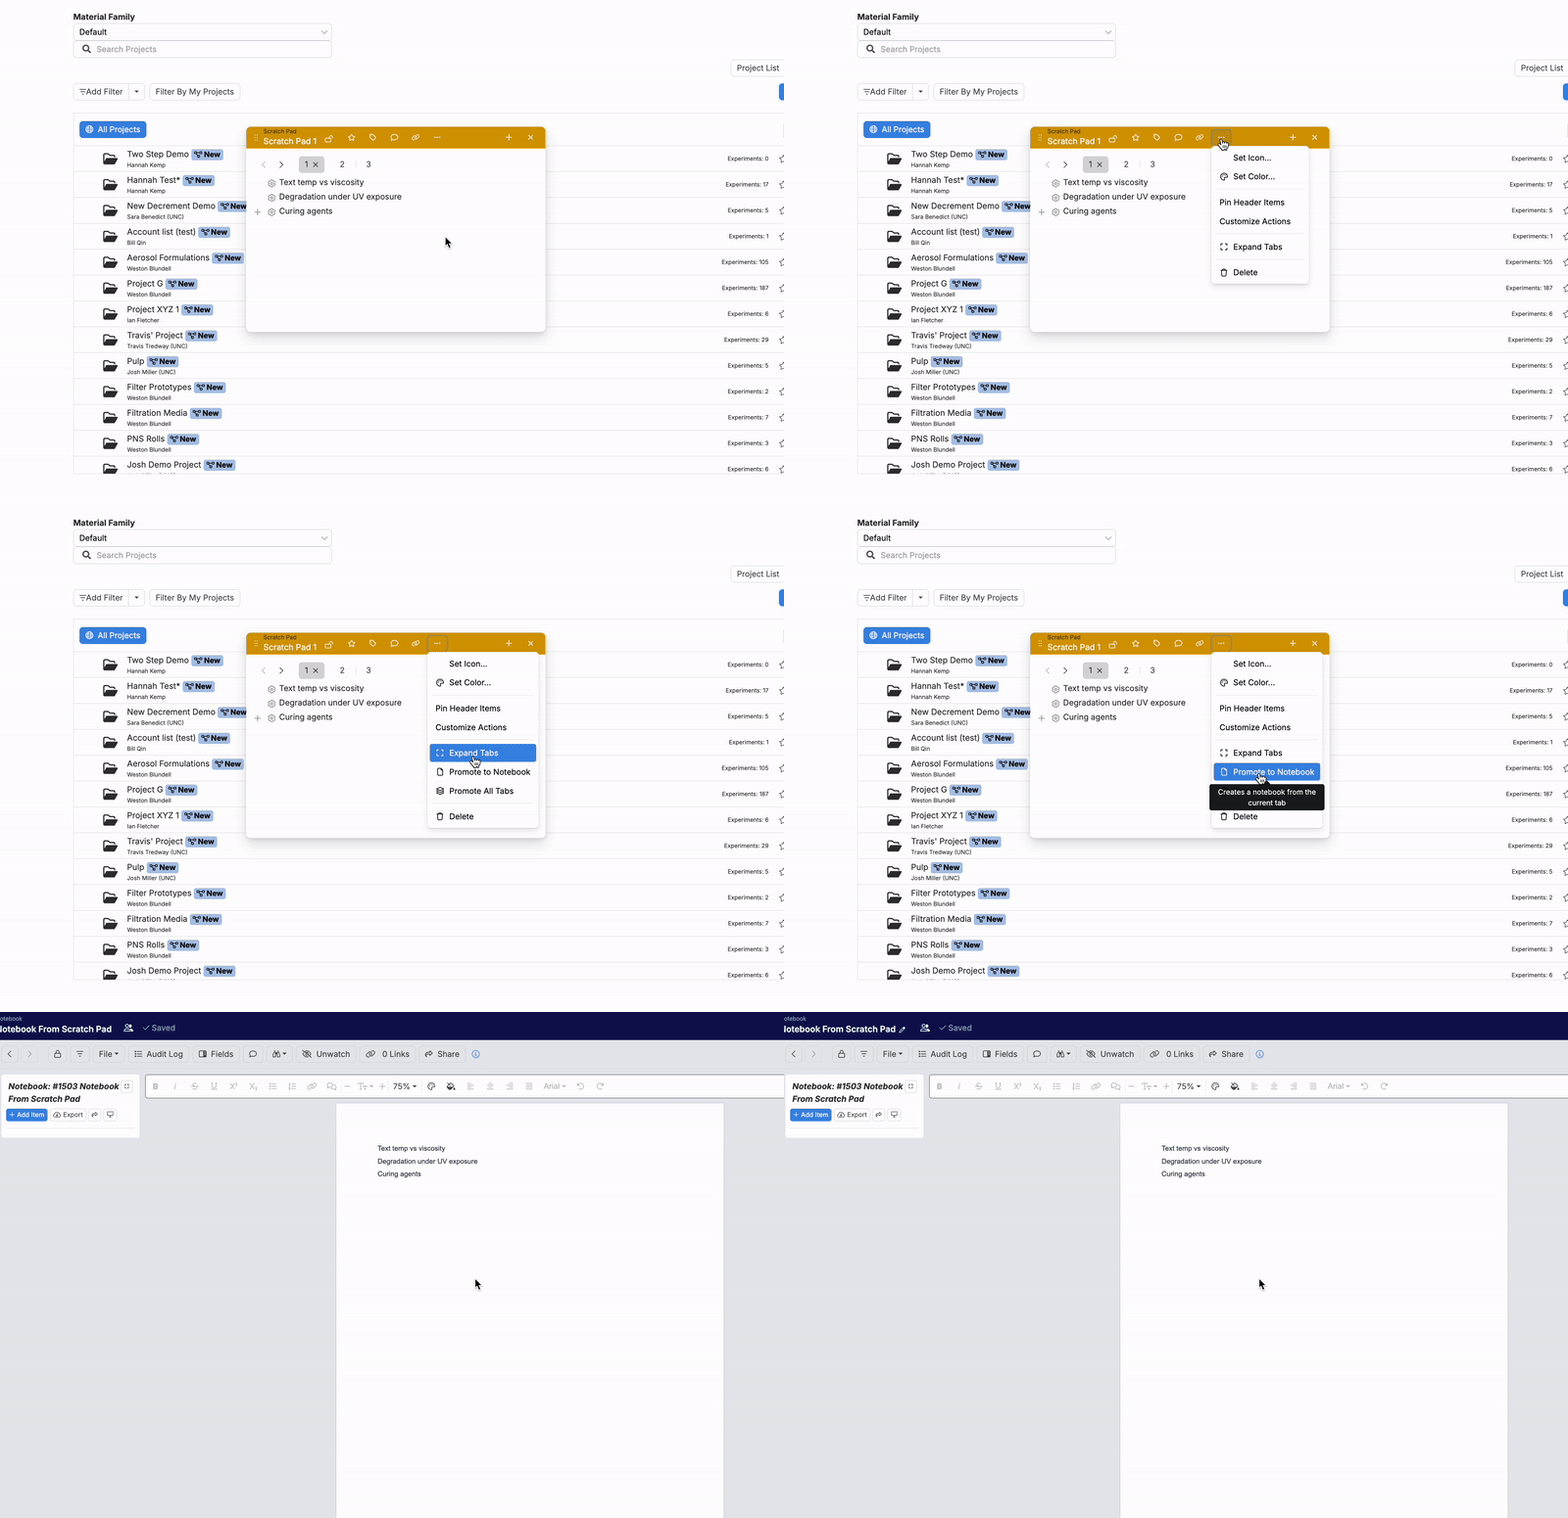
- Promote to Notebook: To turn a Scratch Pads into a Notebook, click … and select “Promote to Notebook”. Selecting “Promote All Tabs” adds all text from each tab in view to the new Notebook.
Currently, the Scratch Pad is hidden by default and can be enabled in Company-Wide Settings Platform Config (“Enable Scratch Pad”).

Support for Intermediate Attribute Calculations in Suggest Jobs
We’ve enhanced Suggest Experiments functionality by adding support for Weighted Sum calculations involving intermediate attributes.
Previously, calculations using intermediate attributes as fallback attributes were not permitted in Suggest jobs in constraints. With this update, you can now use these calculations under the Advanced Constraints section of the Suggest Experiments page.
This means that if an experiment includes intermediate ingredients, and their intermediate attributes (measurements) are used as fallback values in a Weighted Sum calculation, those calculations can now be utilized in Suggest Experiments advanced constraints.


Advanced Constraint Detection for Suggest Experiments Jobs
The Suggest Experiments page now includes support for advanced constraint detection when running experiment suggestions. If a job includes advanced constraints, the system can identify which specific constraints caused the job to fail.
Now, when a job fails, the system will return an “Unfeasible Advanced Constraints” error message. This message pinpoints the exact constraint causing the issue and provides guidance on relaxing constraints to make the job satisfiable.
Please note that change increases the runtime for suggest jobs, as the system spends additional time analyzing and identifying the cause of failure.

Improving Chart Color Consistency
Currently on Explore visualizations, some chart types use the first colors in a palette while others apply alternating colors. When users customize their color palettes, this can cause inconsistencies in visualizations across different chart types— for example, scatter plots use every palette color sequentially and bar charts use every other color.
This approach was initially designed to create a visual distinction when filtering data points. However, these inconsistencies can make reports less cohesive. To address this, plans are underway to update the charting code so that all visualizations will consistently use the same method— applying every palette color sequentially, as currently seen in scatter plots.


New Weighted Sum Filter for Workflow Step Filtering
A new filter type for Weighted Sum or Average calculations is now available to enhance workflow step filtering. This feature can be accessed within the Edit Calculation modal, where users can add filters and specify the workflow step for ingredient selection.
By adding a workflow step filter, users can ensure that ingredients are filtered based on the selected workflow step, allowing for more precise ingredient selection in calculations. This update improves flexibility and control, enabling users to tailor their calculations more effectively by filtering ingredients at specific stages in the workflow.

New Filter Type for Recipe Input Fields in Calculations
A new filter type has been added to calculations, allowing users to filter based on recipe input fields. By adding this filter, users can specify to only calculate for ingredients with specified recipe input field conditions (conditions include “equals,” “not equal to,” and “exists”).
Add a filter by clicking the “Add Filter” button within the Edit Calculation modal. For example, if a filter is applied to the “Batch Size” input field with the condition “equal to 4,” the calculation will only show for calculations with a batch size of 4. Any rows where the batch size is not equal to 4 will not display a calculated value in the respective calculation column.
For more information, refer to Recipe Input Attributes.


New “Reorder Experiment Group Members” Option
Uncountable users can now reorder experiment group members directly from the Experiment Dashboard. To reorder, simply select “Reorder Experiment Group Members” from the “View Recipes” dropdown. This will open a modal where users can choose from the list of experiments. Within the modal, users can reorder members by clicking the stacked lines icon or choose to display or hide specific experiments using the eye icon.
Changes made in the modal will be reflected on the Experiment Dashboard, and any group members not manually reordered will appear after the manually ordered members. These unaltered members will respect the existing sorting applied to the page.


Quick Conversion for Unstructured Rows
Unstructured rows can now be quickly converted into ingredient rows during uploads.
For example, if you type a name in an unstructured row, the system will provide a recommendation. Clicking the arrow icon to instantly convert it into an ingredient row with the suggested ingredient. This feature also works with other input types, improving the process of handling unstructured data. If no recommendations are available, the row will remain unchanged.


Enhanced Voice Entry Features
The voice entry sidepanel on the Enter Measurements and Enter Recipes pages has been upgraded for greater functionality and ease of use. New features include:
- A new dropdown menu lists available commands, making it easier to understand and use voice inputs effectively.
- Synthetic voice support is now available. Configure synthetic voice settings via the sidepanel cog icon to enable browser-generated voice responses for agent interactions.
- Users can now navigate to arbitrary inputs using voice commands. For example, users can now use voice entry commands such as:
- “Move to carbon black.”
- “Move to Calcium Oxide 2 in the second experiment.”
- “Record a note for this experiment saying I need to record this measurement again.”

New Calculation Type: Chemical Reaction
Support for a new Chemical Reaction calculation type has been added to the platform. This calculation enables users to define reactant and product roles for ingredients and display that in chemical reaction format, with future support planned for catalysts and solvents.
Chemical structures are sourced from a list of attributes, set by the user during calculation configuration. This list can include ingredient attributes, recipe input attributes, lot attributes, and intermediate attributes. The system applies a fallback logic, using the next available structure source if one isn’t found.
During calculation configuration, roles are assigned to designate ingredients as reactants or products. On the Enter Recipe page, ingredients inherit these roles based on the calculation setup. For instance, if “Tibet’s first ingredient role” is associated with reactants, any ingredient assigned this role will appear as a reactant within the Chemical Reaction calculation. Roles can be updated directly on the Enter Recipe page by selecting a new option from the “Role” dropdown menu, allowing for flexible adjustments.


Preview Recipes on the Advanced Screening Design Page
A new preview section has been added to the Advanced Screening Design page, allowing users to visualize recipes before finalizing their design. This preview reflects the number of ingredients in the base recipe and incorporates ingredients generated from the parameters set in the design. With this feature, users can review recipe configurations and ensure accuracy before creation.

Support for Multiple Ingredients of the Same Type in Multi-Input Uploads
Uploading files with multiple ingredients of the same type is now supported.
From the Upload Data modal, first upload a multi-input file. Next, navigate to the Multiple Inputs tab. Scroll down to Input Step Strategy and select “Append to Mix Order”. This setting will add all ingredients as individual steps within a mix order rather than as separate recipe steps. This functionality works, even if mix order is not currently enabled on the recipe.


Write Recipe Input Fields During Upload
The uploader also now supports writing directly to recipe input fields (also known as recipe ingredient attributes). This improvement simplifies data entry and ensures accuracy when importing values.
From the Upload Data modal, first upload a multi-input file. Then, navigate to the Multiple Inputs tab and select a Target Recipe Input (”Batch Size (g)”) and Source (”unnamed 2”). Doing so will map the source column to the values from the parsed upload file and will automatically populate the “Batch Size” field when uploaded.”


New Display Options for “Quantity Used” in Decrement Inventory Panel
The Decrement Inventory sidepanel now allows users to select how the Quantity Used column is displayed: either in “Inventory Units” or “Original Units”. Previously, this column always defaulted to Inventory Units.
To adjust the display type, access the Decrement Inventory sidepanel and use the Units dropdown to select preferred units:
- Inventory Units (default): Maps to the “Quantity Available” column and displays values in inventory-specific units.
- Original Units: Maps to the units used for normal quantities on the Enter Recipe page.

Objective Search UI Change
The Objective Search page has been updated to improve handling of required condition parameters for test group samples. Previously, required fields were highlighted in red for missing required inputs or yellow for optional warnings. Now, in addition to these highlights, the Submit button will now be disabled until all required fields are filled.
This change ensures that searches cannot be submitted without meeting all necessary condition parameter requirements, enhancing accuracy and consistency in search results.


New Advanced Case Mapping Options for Recipe Checks
Recipe checks now account for the number of measurements applied when evaluating outcomes, offering a more nuanced analysis of recipe performance.
When creating a recipe check from the Recipe Check page, users can configure advanced options for case mapping. Previously, the platform supported a limited set of outcomes—Pass, Fail, and Mixed—based on valid and failing goals. With this update, additional outcomes have been introduced to reflect the measurement status. These include:
- Not Started
- Incomplete Pass
- Incomplete Fail
- Incomplete Mixed
Incomplete indicates that not all measurements have been applied to a given goal.

Consider an example recipe check with goal ranges set for both Compression Set 3 and Modulus of Elasticity. If the recipe includes only one of these outputs and it meets its goal, the result is classified as an incomplete pass. Whether the overall recipe passes the recipe check depends on the case mapping settings in the advanced options.

If Incomplete Pass is mapped to “Pass,” the overall recipe check will pass. If it is mapped to “Fail,” the overall recipe check will fail, even though the single included goal was successfully met.

Lot Metadata Columns Now Supported on the Default Runsheet
When exporting a default runsheet, lot metadata columns are now included. Previously, there was no support for lot metadata columns when exporting runsheets.
Now, when a user selects lots on a recipe that have associated metadata, and this metadata is displayed in columns on the Enter page, it will also be visible when exported to the runsheet. This ensures that important lot-specific details are consistently displayed across both the Enter page and the runsheet, improving data accessibility and traceability.


New Options for Line Graphs in Entity Charts
Line graphs in Entity Charts now offer a range of new customization options. Users can now:
- Switch the chart type to a bar graph.
- Adjust or hide point styles and sizes.
- Hide lines for a simplified view.
- Customize chart colors and line thickness.
To access these settings, click the cog icon next to the chart and select “Edit Chart Configuration”. In the Configure Chart modal, expand the settings by clicking “EntityChartSettings <>” to reveal the new options.


Shared Entities Trigger Sets
The new Shared Entities Trigger Set simplifies entity action management across definitions with the same entity type. To subscribe to a definition, navigate to its Triggers tab and select “Subscribe to Trigger Set” under the Shared Entities Trigger Set section.
Subscribing similar definitions to a shared trigger set streamlines the configuration of new definitions and ensures consistency. For example, if a user subscribes two lab request definitions to the same trigger set, both will share the same entity actions. Any new lab request definition created with the same entity type will automatically adopt the shared trigger set.
Note: Definitions with default entity actions have been migrated to shared trigger sets, while non-default configurations remain unchanged to avoid altering existing setups.

Improved Control with Listing Configuration Locks
Listing Configurations on the Form Admin page now respect lock settings, ensuring greater control over edits. If a configuration is locked, it will open in read-only mode. While users can still make local adjustments for their view, any changes made won’t be saved to the locked configuration.
To lock or unlock a configuration, click the lock icon on the Listing Config definition. This change ensures selected configurations remain protected.


“Initialize with Blank Recipes” Field Added to Plates
A new Initialize with Blank Recipes field is now available for all experiment group definitions in Uncountable, enhancing flexibility when creating new plates. Previously, this setting was hardcoded within specific schemas, limiting customization. Now, users can control whether the feature is activated for each schema individually.
When this field is set to “true,” plates will be initialized with a blank recipe in each well. This field has been added to all relevant definitions with a default value aligned to the schema’s existing behavior. Currently, it is enabled by default for only a select few schemas.

Enhanced Uploads with Row Conditions
We’ve recently introduced the ability to upload files with customizable row conditions, improving the data import process. In the Upload Data modal, users can now edit row-specific conditions by selecting “Table Options” > “Edit Toggle Row Conditions”. From there, click the “Edit Row Conditions” button next to a row to define its specific conditions.
Once the file is uploaded, these conditions will automatically appear on the Enter page, ensuring integration of detailed, row-level data directly into your recipes.


Weighted Sum Calculations with Arbitrary Basis
Users can now select “Arbitrary Sum” as the quantity basis for custom calculation Weighted Sum entities. This feature is particularly useful for summing process parameters rather than ingredients, enabling more precise calculations that focus on process conditions. When the “Arbitrary Basis” option is selected, the “Sum Process Parameters Instead of Ingredients” setting is automatically enabled, and vice versa.
For example, in a calculation configured to sum Process Conditions, a recipe with process conditions Temperature 2 (3°C) and Temperature 4 (4°C), would have a Weighted Sum of 7.


Advanced Condition Parameter Filters for Output Calculations
For output calculations, we’ve updated the advanced condition parameter filters. For numeric condition parameters, users can now apply “greater than or equal to” or “less than or equal to” filter types.
In the example below, an output calculation is configured to take the average of modulus of elasticity for a range of angles. Using the new filter options, users can set the range to only include modulus of elasticity values within specific angles (13 to 50°C.). On the Enter Measurements page, only outputs within the specified range will included in the calculation (20 and 21°C).


OR-Filter Groups (Beta)
Filtering listing tables (like experiments, ingredients, inventory, etc) in Uncountable has improved with the introduction of OR-Filter groups. With this new filter type, users can now create conditions where only one group needs to be met, enabling more complex data filtering.
This feature is currently in Beta and must be enabled in the Company-Wide Settings Platform Config tab by selecting “Allow OR-Filters (Experimental)”. Once enabled, users can add multiple filter groups by selecting “Add Group”, with each group connected using OR logic.
While the core filtering functionality is fully supported, some integrations, like Quick Filters, are still being refined. Future updates to compatibility and user interface are in progress.


Equation Columns Now Available for Listings
Support for equation columns has been added to Uncountable listings, allowing users to use variables and formulas to create columns. This new column type enhances data analysis by displaying key calculations directly on the listing page.
Equation columns are set up within the new “Equation” tab of the Select Columns modal. First, add variables by clicking “Add Variable” and making a selection. Then use the equation editor to create a custom equation, referencing the variables with a $ symbol.

Once saved, variable columns and the equation column will appear on the listing.

Equation columns also work with aggregated data. When adding an equation to an aggregated listing, the variables used in the equation are aggregate columns. For example, you might use variables like $max_value or $min_value from an aggregate column to calculate the difference between them.


Updated Error Handling
We are in the process of updating how users report issues during API errors. Currently, an error message prompts users to email “[email protected]”. With this update, the error message will include a Submit a Support Ticket button. Clicking the button opens the support ticket modal, allowing users to report issues directly within the platform.
If network connectivity issues prevent the modal from functioning, the platform will fall back to the previous error message, directing users to email our support team. This ensures a reliable way to contact us, even when platform responsiveness is limited.

Recipe Step Alignment
Recipe Step Alignment aids in comparing workflows with mix order enabled by automatically aligning steps across recipes based on a specified criteria (such as ingredient ID). This feature resolves issues with misaligned steps, common in industries like coatings where mix order is critical.

To align mix order steps, use the Search Action bar to access the Recipe Workflow Step Alignment sidepanel. The recommended configuration is displayed in the image below.

Once the configuration is applied, missing steps are filled with blank rows, creating a consistent view that simplifies identifying ingredient placements and spotting differences.

Admins can share alignment configurations across users within a schema using the “Apply Configuration” button dropdown menu. For more information, refer to Recipe Step Alignment Configuration.
