New Color Options for Numeric Progress Bars
In Uncountable, number fields can be configured with different render types to improve readability and highlight key metrics. One such option is the Numeric Progress render type, which displays numeric values as progress bars—useful for visualizing percentages, completion status, or other ratio-based data.
Previously, all Numeric Progress bars appeared in a standard gray color. With a recent update, users can now choose from three visual styles when configuring these fields:
- Gray (default): A neutral, low-emphasis progress bar.
- Primary: Styled to match Uncountable’s core color scheme.
- Colorful: A multicolor gradient with red (0–33%), yellow (34–66%), and green (67–100%) to visually indicate progress or status.
These options give teams more flexibility in how they present critical values.

How to Adjust Color of Numeric Progress Bars
- For any listing column using a numeric field, edit its Format Overrides.
- Click “Render” and select Numeric Progress as the Render Type.
- Choose your preferred style from the Color Scheme dropdown.

Edit ID Source for Fixed List Outputs
Fixed List outputs are a type of output in Uncountable that allow users to select from a predefined set of options, shown as a dropdown menu. These options are pulled from a source called the ID source, which references a list configured in the Field Options tab of the Form Admin page.
Previously, once a Fixed List output was created, its ID source couldn’t be changed—users would need to create an entirely new output to use a different option set. With this update, you can now edit the ID source directly from the output’s details page, making it easier to adapt outputs as needed.
How to Edit Fixed List Output ID Source
- Navigate to the output’s details page.
- Locate the Type section, click the lock icon to unlock editing.
- Click the pencil icon next to Field Options to adjust the ID source.
Any changes made here will apply automatically across all instances of the output within the schema.


Creating Child Entities from Listings Using Fixed Filters
In Uncountable, some entities (i.e. Constraints or Goals) delegate their security permissions to a parent entity. For example, a Constraint inherits permissions from its associated Constraint Set. Previously, when viewing a listing of one of these child entities, the Create button wouldn’t appear even if you had write access to the parent.

With this update, the Create button will now appear if the listing applies a fixed filter on the parent entity’s ID and you have Write permissions on that parent. For example, if you have a custom listing of Constraints filtered to a specific Constraint Set, and you have Write access to that Constraint Set, you’ll now see the Create button and can add new Constraints directly from that view.

Steps to Configure
- On the child entity listing page, add a default view by selecting List → Views → (Admin) Configure Defaults.
- Click the Add Default button at the top of the listing.
- Access the Fixed Filter tab and create a Fixed Filter for the Parent Entity ID.


Automatic Peak Detection in Spectroscopy Tools
Uncountable’s Spectroscopy analysis tools now offer a new Detect Curve feature, making peak identification faster and more intuitive. Users analyzing any curve type can now click the “Detect Curve” button beneath a curve to automatically identify and highlight peaks.
Detected peaks are visually marked on the curve and listed in the data table below. Previously, users had to manually select and label each peak, which could be time-consuming—especially for complex curves.
Currently, peaks that are close together are grouped as a single peak. We’re exploring additional customization options for peak detection in future updates to give users more control over how peaks are identified.


Improved File Menu UI on Mobile Devices
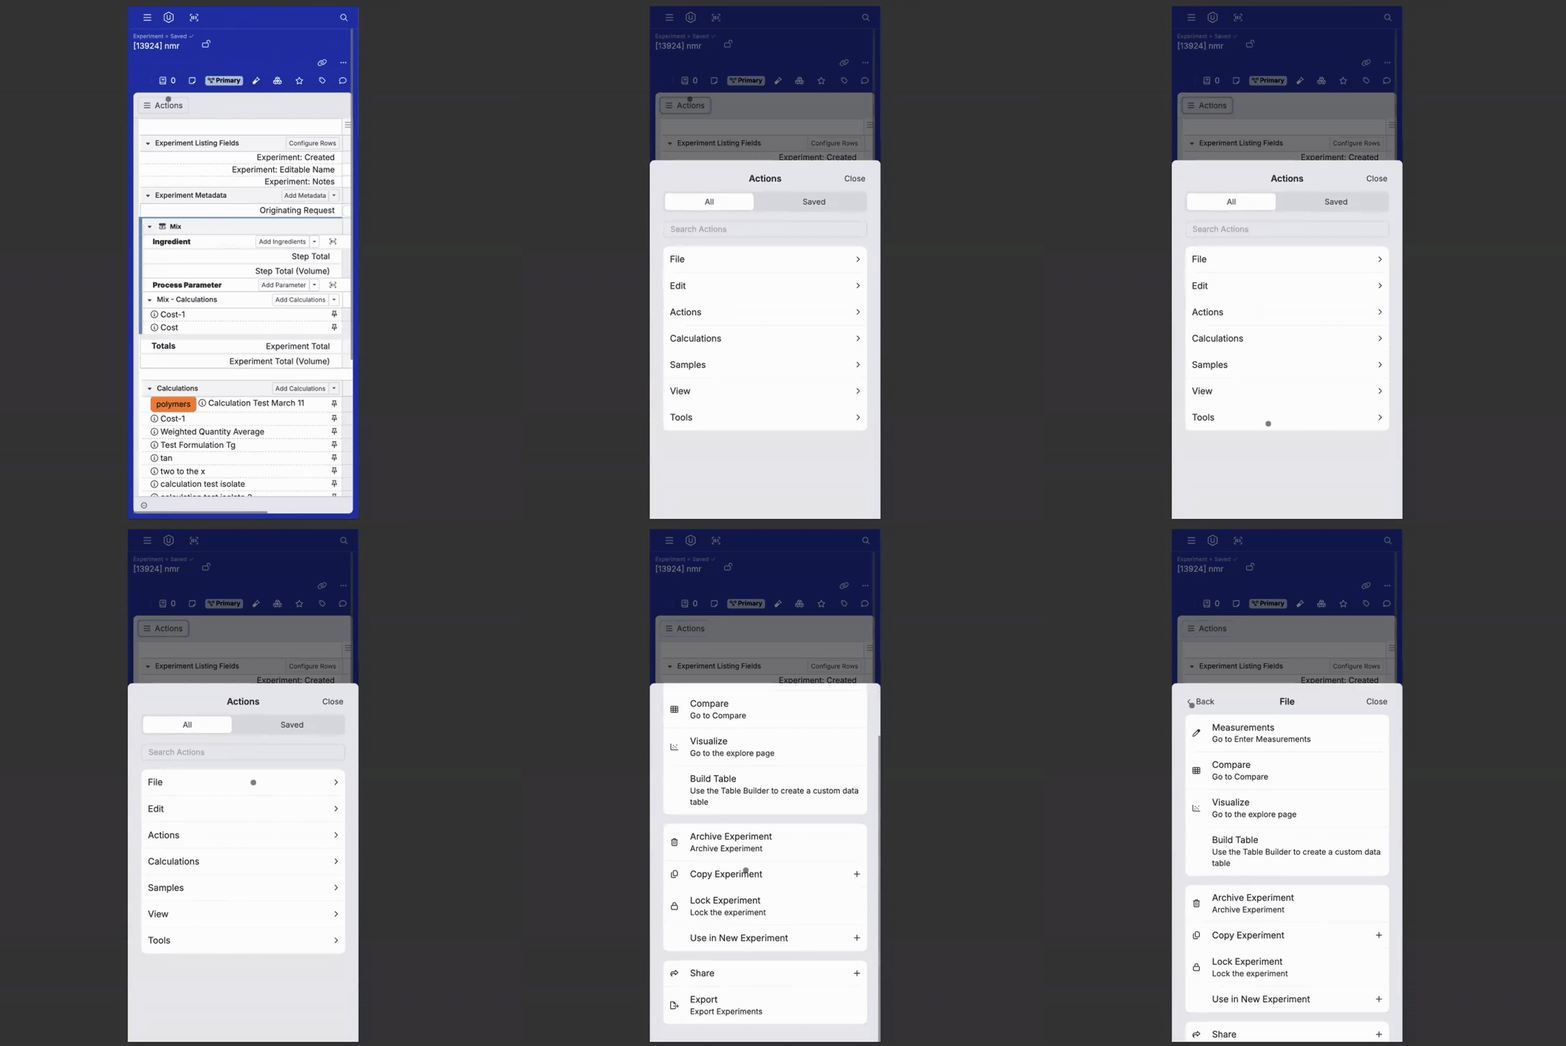
Uncountable’s mobile UI now features a new File menu interface which provides an easier user experience on mobile and smaller screens. The File menu is now displayed as an Action bar, offering the same set of options in a format that’s easier to access and interact with.
This change ensures that key file actions remain available and usable, even when working from a phone or tablet. No functionality has been removed—just repackaged for improved mobile usability.

Update to Embedded Entity Field Display in Notebooks
There has been a recent update which improves how Uncountable users display embedded entity fields on Notebooks. With this change, embedded entities can be displayed either in a top section or a collapsible Fields sidepanel.
To add fields on a Notebook, admin users can add them directly the Notebook definition on the Form Admin page. Once added, users can click the Fields button at the top of the Notebook page to view embedded entities.

Admin users can also control where these fields are displayed by configuring visibility constraints on the definition.
In the screenshot above, the “Description” field is shown at the top of the Notebook by default because it has a visibility constraint applied directly (A). In contrast, “Name”, “Experiments”, and “Assignee” appear only in the side panel because they belong to a field group with a “not visible” constraint (B).


To make these fields appear at the top of the Notebook, simply remove the “not visible”” constraint from the field group.

External API Update: More Control Over Mix Order Steps in Recipe Editing
We’ve expanded the functionality of the Edit Recipe Inputs API to support more precise updates when building or modifying recipes programmatically. This API is commonly used in integrations to construct recipes from scratch or sync them with external systems. Previously, when attempting to update an ingredient in a Mix Order step, the API would only target the first instance of that ingredient.
With this update, the API now supports targeting the last instance of an ingredient in a Mix Order step as well. This allows for more accurate updates—especially useful for scripts that dynamically build up complex recipes where the same ingredient may appear in multiple steps.
External API Update: Support for Date, Datetime, and Notes Fields
We’ve also updated the Set Entity Field Values endpoint to support additional field types. You can now set values for Date, Datetime, and Notes fields using the external API, bringing full coverage for all standard field types.
This means that all fields on an entity can now be updated using the API, making it easier to manage and automate data flows. Refer to our in-platform API documentation for the correct formatting when working with these field types.
Display Recipe Output Fields as Columns on the Enter Measurements Page
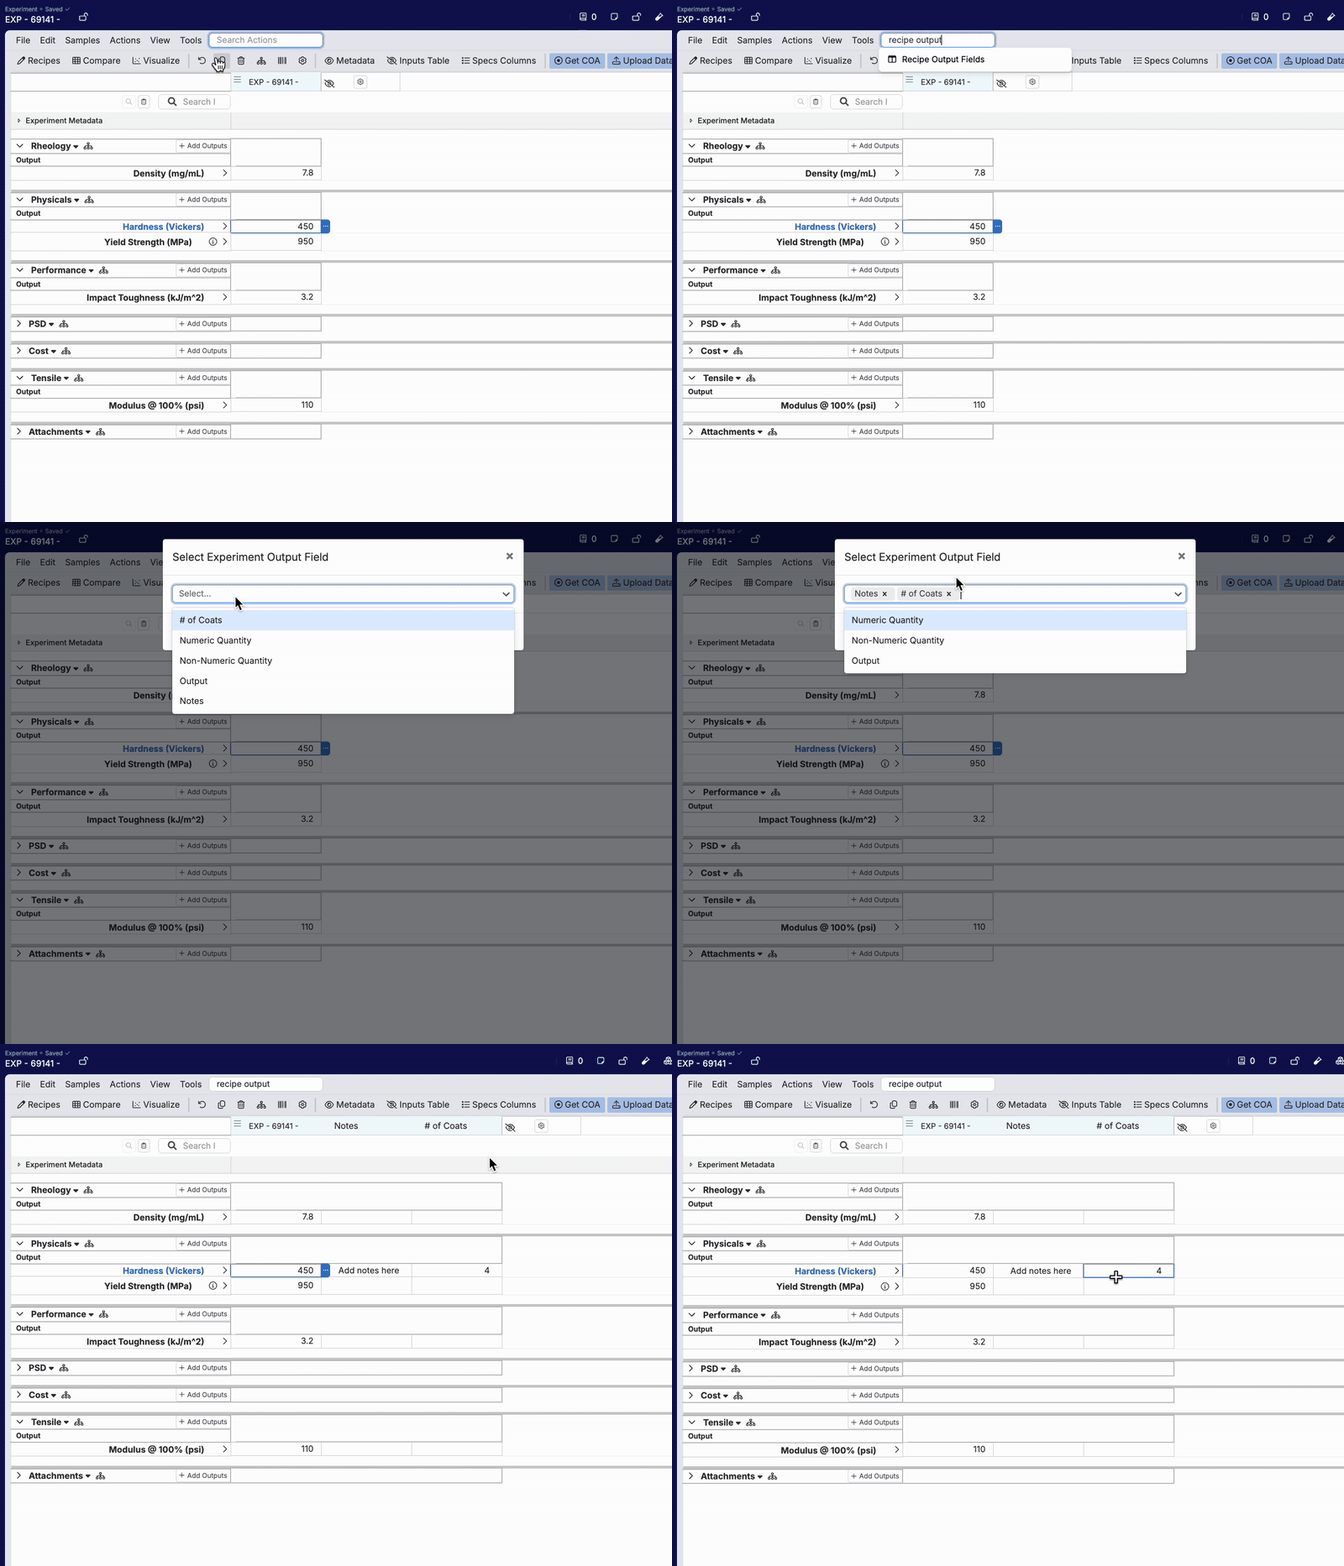
In a recent update, we have introduced the ability for Uncountable users to display recipe output fields as columns on the Enter Measurement page. This builds off recent improvements to how we handle output data, where recipe output fields have replaced the previous output metadata system. Learn more about this change.
With this change, users can now display recipe output fields as editable columns alongside measurement data—just like recipe input attributes, ingredient fields, and other metadata. This allows teams to record notes or context for individual output values directly within the measurement entry interface, without needing to navigate away from the main page.
Note that in cases where your recipe has recipes and you are using a single recipe + replicate column view, output fields are also shown per replicate.
How to Display Recipe Output Fields as Columns
- Access the Enter Measurements page for your recipe.
- Use the action search bar to search for “Recipe Output Fields”.
- Select the fields you want from the configuration modal.


Hide Legacy Notebook Navigation on Dashboard
As part of ongoing improvements to Project Dashboard customization, we’ve introduced a new Company-Wide Setting to control the visibility of the legacy “Notebooks” button in the Dashboard’s top navigation.
This setting, Show Legacy Notebook Navigation on Dashboard, is available under Customize Appearance tab of the in Company-Wide Settings page. For existing customers, this option will remain enabled to preserve the current experience. For new customers, it will be turned off by default.
When this setting is disabled, the “Notebooks” button will no longer appear in the dashboard sub-navigation, helping reduce visual clutter and align with our more modern navigation model.


Upcoming: Product, Spec, and Constraint Button Bar Updates
The Product, Spec, and Constraint quick action toolbar, previously visible only on the Project Details page, is being added to the Project Dashboard. This update is in an effort to unify the two pages to create a more consistent navigation across project views.
The new toolbar will appear in the same position as it does on the Details page and will include the same options, which provide quick access to relevant product, spec, and constraint information directly from the Dashboard.
As part of this update, the “Options” dropdown will be removed from both locations due to usability issues. We’re also introducing support for custom buttons in the action bar, allowing teams to tailor project pages to their needs.


