Experiment listing fields enable Uncountable users display key information about an experiment and its linked entities directly on the Enter Recipe and Enter Measurement pages. These fields allow you to display additional experiment context without needing to configure Experiment Metadata or build custom logic.
When configuring experiment listing fields on an Enter page, you can choose from the same options available when setting up Experiment Listing columns. Once selected, the fields appear as individual rows, helping users reference relevant information without navigating away from the data table.
Keep in mind that these fields have some limitations. For example, they cannot be pulled into runsheets like Experiment Metadata fields can.
Experiment Listing Field Examples
Display fields from the experiment itself or from any entities linked to that experiment. All fields selected will appear as rows in the Experiment Listing Fields section at the top of the Enter page, similar to how Experiment Metadata fields are displayed. Examples include:
Fields on the Experiment
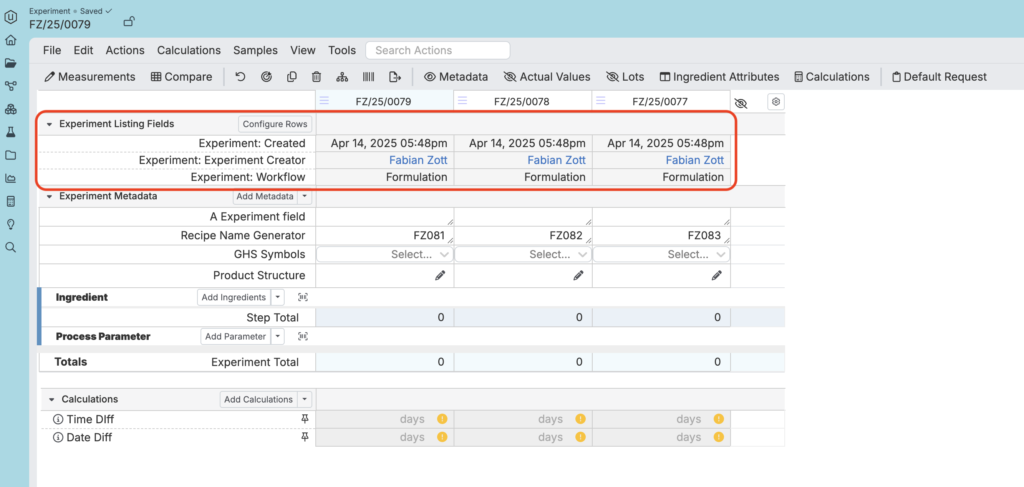
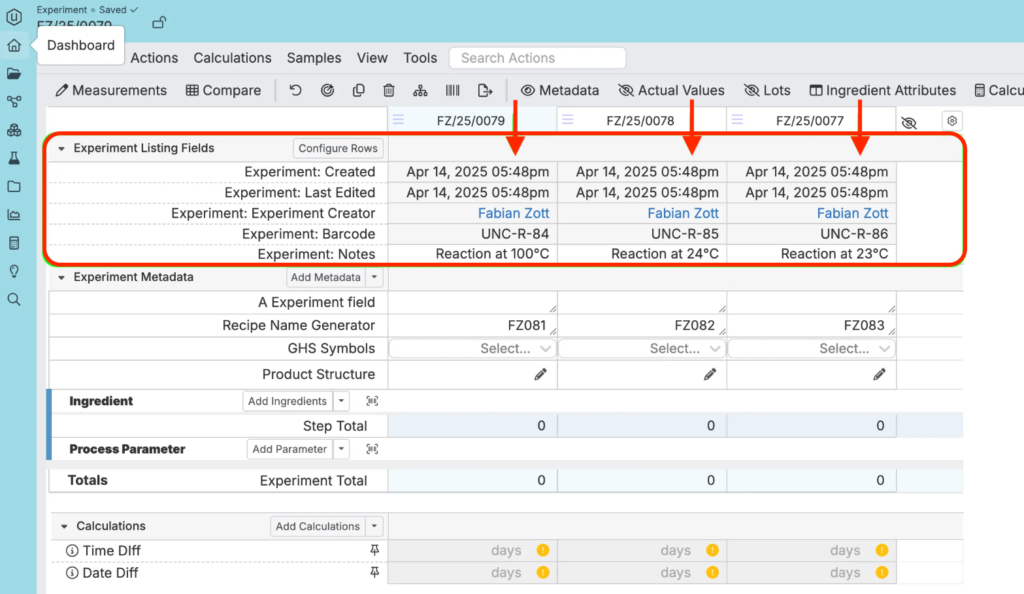
- “Created” date
- “Last Edited” time
- “Experiment Creator”
- “Barcode”
- “Notes

Fields on Linked Entities
- Lab Requests
- Lab Request → “Lab”
- Lab Request → “Lead”
- Lab Request → “Location”
- Test Samples
- Test Samples → “Creator”
- Test Samples → “Created Date”


Note that these are just a few possible examples. Field options include all those available when configuring columns in an experiment listing and can be configured to each team’s unique workflows or preferences.
How to Configure Experiment Listing Fields
- On an Enter page, use the search action bar to search for Experiment Listing Fields. Select the result to add the section to the top of your data table.
- Expand the section and click Configure Rows.
- In the configuration modal:
- Select any experiment fields or fields from linked entities that you want to display.
- Click Add & Save to add them to the section.


Once configured, the fields will appear as rows above the table. The values are updated per recipe and reflect the most relevant information tied to each experiment, lab request, or other entity.

Renaming Experiment Listing Fields
You can also rename experiment listing fields to create a more straight-forward, user-friendly display. To edit row names, take the following steps:
- Select “Configure Rows”. In the modal, access a row’s settings and select Edit Name.
- Input a new name and click Set.
- Repeat for all experiment listing field rows you want to modify. Then, click “Save”.


Once saved, the Experiment Listing Fields section will be updated to reflect all changes made.

Use Cases and Examples
Below are examples of how users could use experiment listing fields in Uncountable.
Example 1: Displaying Key Experiment Information
In some cases, it may be more convenient to display key experiment information as experiment listing fields rather than in the Experiment Metadata section— especially if that information is already included in the columns on the Experiments listing page.
Steps to Configure:
- Display the Experiment Listing Fields section on your Enter page.
- Click “Configure Rows” to add fields.
- Within the modal, add fields such as:
- Experiment → Created
- Experiment → Experiment Creator
- Experiment → Notes
- Save the listing fields.


Example 2: Displaying Lab Request Information
Display information on any lab requests associated with a recipe, such as Lab, Lead, or Workflow Phase, directly on your recipe or measurement page.
Steps to Configure:
- Display the Experiment Listing Fields section on your Enter page.
- Click “Configure Rows” to add fields.
- First, select Experiment → Lab Request, then Request → Lab/Lead/Location.
- Save the listing fields.


Example 3: Displaying GHS Symbols as Pictograms (Per Recipe)
Display relevant GHS symbols on a per-recipe basis alongside other experiment information. When displaying GHS symbols in this way, users can also choose to render them as GHS pictograms.
Steps to Configure:
- Display the Experiment Listing Fields section on your Enter page.
- Click “Configure Rows” to add fields.
- Add a Experiment Metadata → GHS Symbols as a row, then save.
- Within the Select Columns modal, access the Experiment Metadata: GHS Symbols row settings and select Edit Format Overrides.
- Configure the following Render override:
- Set the Render Type to Standard Multiple Entities
- Set the Style to GHS Pictograms
- Save the override, then save the listing field.


Setting Up User Group Defaults for Experiment Listing Fields
While individual users can configure their own experiment listing fields, there are cases where it’s helpful to create and share default listing fields. Uncountable supports this by allowing admins to create Listing Configs that pre-populate experiment listing fields for specific user groups.
To configure a default experiment listing field setup for a user group, take the following steps:
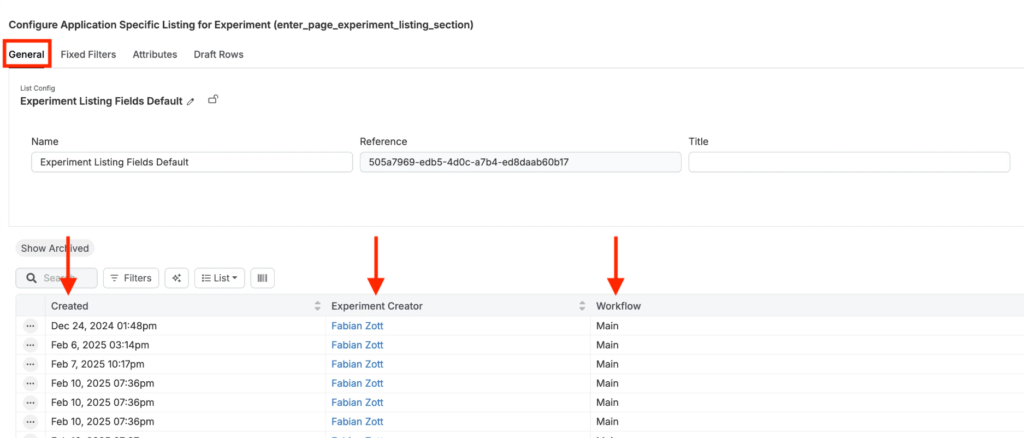
- Navigate to Form Admin, select Listing Configs, and click + Add Config.
- In the Create Config: Listing modal, add the following fields:
- Name: Add any name for the configuration.
- Base: Select “Experiment”.
- Type: Select “Default”.
- Scope: Select “listing/app”.
- Sub-Scope: Enter “enter_page_experiment_listing_section”.
- User Groups: Add user groups, if relevant.
- Add the specific columns that you want to have displayed in this listing config. In the example below, we added “Created”, “Experiment Creator” and the experiment “Workflow” as columns.
- To enforce these changes across users, we need to override their user-specific “Experiment Listings” fields. To do this, navigate back to the Listing Configs tab of the Form Admin page and select Configure Reset User Config.
- In the Reset User Configs modal, fill out the following:
- Base: Select “Experiment”.
- Scope: Select “listing/app”.
- Sub-Scope: Enter “enter_page_experiment_listing_section”.


This will reset the “Experiment Listing Fields” shown on the Enter Recipe page to match what is specified in the Listing Config from step two, as long as the user belongs to the “Admin” user group.