In Uncountable, constraints define limits on ingredient selection when generating formulations. They can be partial, allowing users to specify some ingredients while the Uncountable model fills in the rest based on past data, or full, requiring exact ingredient specifications for the generated formulation. This article outlines the process for setting up project constraints effectively.
Setting Up Project Constraints
To begin, select “Calculate” from the Uncountable navigation bar and on the Calculate and click “Set Constraints”.

Step 1: Ingredient Units
Different options to sum up the parts of the formulation are available:
- Percentage: Constraints are automatically summed up to 100%. The platform warns when the limits cannot be achieved with the current set of constraints.
- Parts: Constraints are not required to sum up to 100.

Selecting ingredient units
Step 2: Partial vs. Full Constraints
Users can choose between partial or full constraints when generating formulations:
- Partial Constraints: Use partial constraints when you want to specify some ingredients while allowing Uncountable’s model to fill in the rest based on past data. When suggesting experiments with partial constraints, new ingredients will be automatically added to the generated formulations.
- Full Constraints: Use full constraints when you want complete control over the ingredient selection. In this mode, only the specified ingredients will be included in the generated formulations. With full constraints, you can either perform a screening design to explore the input space or generate experiment suggestions based on past data and a specification to optimize.

Step 3: Adding Inputs
When a project is created, an empty set of constraints is automatically generated. The first time you access the constraints tab, no ingredients or process parameters will be present. To populate these inputs, several options are available:
Adding Inputs Manually
For greater control over the selection process, user can add ingredients and parameters individually by clicking “+ Add Ingredient” or “+ Add Parameter.” This opens a window displaying all available inputs, allowing you to select the necessary ones directly. If an ingredient does not exist, you can create it by clicking “Add New.” Once all desired inputs are selected, clicking “Add Inputs” will add them to the constraints page.

Loading Recipe as Base
Users can also initialize constraints by loading a past recipe as a base. This can be done by clicking the cogwheel and selecting “Load Recipe as Base”. The ingredient constraints will then be set to the exact amounts specified in the selected recipe.

Adding Common Inputs
Users also have the option to add common inputs by clicking the “+ Common Inputs” button. This will add frequently used ingredients and process parameters based on the formulations present within the project.

Adding Experiments as Intermediates
To add an experiment as an intermediate to a model constraint, you must first add the experiment as an ingredient and then configure its component experiment behavior.
- Add the experiment as an ingredient.
- Click the settings icon next to the constraint name at the top of the page.
- At the bottom of the settings menu, select one of the following Component Behavior options:
- Sample Mode: Treats component experiments as single ingredients, keeping their sub-ingredients hidden from the model. DOEs include the component experiments as ingredients. This is the recommended option when adding an experiment as an intermediate to a constraint set.
- Transparent Mode: Allows the model to learn from both the full formulation and the individual component ingredients, treating them as separate inputs.
Note: To use Explode Mode, all component experiments must be removed from the constraint set. Otherwise, select Sample Mode or Transparent Mode based on whether you want the model to see the sub-ingredients or treat the experiment as a single entity.


Step 4: Setting Constraints
After selecting inputs, constraints must be applied to numeric values. Note that text-based inputs cannot be constrained. For each numeric input, the following parameters can be configured:
Use
Determine how frequently an input should appear in generated formulations by selecting an option in the “Use?” column (A):
- Always Use: Ensures the input is included in every generated formulation.
- Never Use: Excludes the input from all formulations.
- Sometimes Use: Allows partial inclusion, setting a probability between 0 and 1. For example, if an input should appear 25% of the time, select “Sometimes Use” and set the minimum and maximum to 25%.
Minimum/ Maximum
Define upper and lower limits for numeric inputs within the Minimum and Maximum columns (B). By default, both values are set to the same number, but you can adjust them by clicking into the cell.
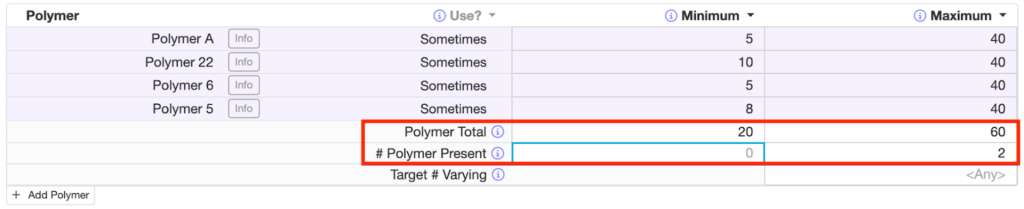
Category Constraints
Category-wide constraints can be set by clicking “+ Category Constraint” at the bottom of a category section (C). This allows you to:
- Limit the number of ingredients from a category.
- Define a total range for their combined amounts.
For example, if a formulation should include a maximum of 2 polymers with a total amount between 20 and 60, set “# Polymer Present” to maximum 2 and “Polymer Total” to 20-60. The system will then select appropriate polymers based on these constraints.

Saving and Locking Constraints
Once all constraints for the respective inputs are set, be sure to save them. Before saving, click the “Test Constraints” to ensure the set is complete and accurate. After testing, user can either overwrite the current set by clicking “Overwrite Constraints” or save it under a new name by selecting “Save As…” (A).
Users can also lock their constraint to prevent others from making changes. To do so, click the lock button next to the constraints name (B).

Advanced Options
Advanced options, accessible via the cogwheel in the top-right corner, allow for further customization of input selection for model training.

Predictor? Column
After enabling Advanced Options, a new “Predictor?” column appears on the constraints page. Here, users can manually designate inputs as predictors, non-predictors, or keep them on auto selection.
By default, inputs are automatically selected as predictors for training. However, manually enabling or disabling predictors can significantly impact the model’s performance. Adjust these settings carefully to optimize prediction accuracy, ensuring the predicted value is properly considered during training.

Varying? Column
Enabling Advanced Options also adds a “Varying?” column to the constraints page. This setting determines whether an input is treated as a variable during formulation generation.
Uncountable’s formulation generation process optimally fills the experimental space based on defined constraints while incorporating high-level constraints like sums, calculations, and predictive modeling. Due to the computational complexity, the procedure supports up to 40 Varying Inputs (ingredients and process parameters).
What Counts as a Varying Input?
- Inputs set to “Sometimes” sample contribute to the number of Varying Inputs.
- Inputs with a range of values (e.g., minimum = 0, maximum = 10) are considered Varying Inputs.
What Doesn’t Count as a Varying Input?
- Inputs set to “Never” sample (used only for training purposes).
- Fixed-value inputs where the minimum equals the maximum and are set to “Always” sample.
- Advanced constraints (category totals, sums, and calculated variables).

Advanced Constraints
When standard constraints are insufficient for defining the optimization problem, Advanced Constraints offer additional flexibility. These options, available at the bottom of the constraints page, allow for more complex relationships between inputs.
- Equation Constraints: Create temporary conditions that combine different ingredients to generate new metrics. These function similarly to Calculations but apply only within the constraints setup, helping limit ingredient usage based on factors not explicitly defined elsewhere.
- Generic Constraints: Combine multiple inputs or input categories using logical operators, ratios, or minimum/maximum values to define ingredient relationships more precisely.
- Sum Constraints: Ensure that the sum of selected ingredients stays within a specified range, whether based on total quantity or the number of ingredients present.
- Calculation Constraints: Use the results of previously defined Calculations as constraints, allowing for limits based on derived values rather than individual ingredient amounts.
- Ingredient Pair Constraints: Control whether two specific ingredients must always appear together or be mutually exclusive in a formulation.

Additional Predictors
In addition to inputs, it’s possible to add outputs, experiment metadata, and condition parameters as predictors within the model. This functionality can be accessed in the Additional Predictors section at the bottom of the page.
The most common use case involves condition parameters, such as test temperature or aging time. By adding these condition parameters as predictors, you can explore how they affect the outputs of the experiment. For example, if you want to analyze the influence of temperature and aging time on your results, adding these parameters as predictors removes the need to manually add conditions to the outputs on the project specification page.
Once the condition parameters are added as predictors and the model is trained (with the appropriate constraints, including the condition parameters), a message will appear, indicating the number of data points generated by splitting experiments based on different pairs of condition parameters. These additional predictors will then be displayed under the effect sizes section, alongside all other predictors in the model.
This feature provides more flexibility in refining models and helps better capture the effects of experimental conditions on outcomes.
