Input calculations are a powerful feature within Uncountable, giving you the ability to display derived values (ingredient ratios, formulation-level properties such as recipe cost or % solids, elapsed time, regulatory compliance, etc.) directly on the recipe view of experiments. This article will cover the types of input calculations available, how to configure them, and how to enable them within your experiments.
What are Input Calculations?
Input calculations are by definition tied only to the inputs of an experiment, meaning the ingredients and process parameters that are part of the recipe. Categories and attributes tied to these inputs can be factored into the equation and filtering of input calculations; however, outputs cannot be used. Visit the Outputs Calculations article for an overview of output calculations and their use within Uncountable.
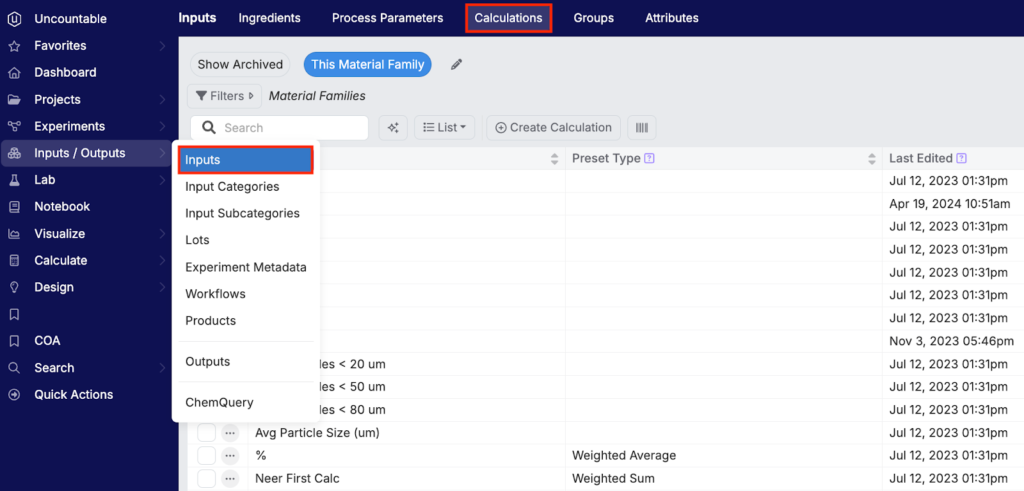
Input Calculations are accessed from Inputs / Outputs > Inputs > Calculations. You must have Write Inputs permissions within a material family in order to create new and make changes to existing Input Calculations.
Creating a New Input Calculation
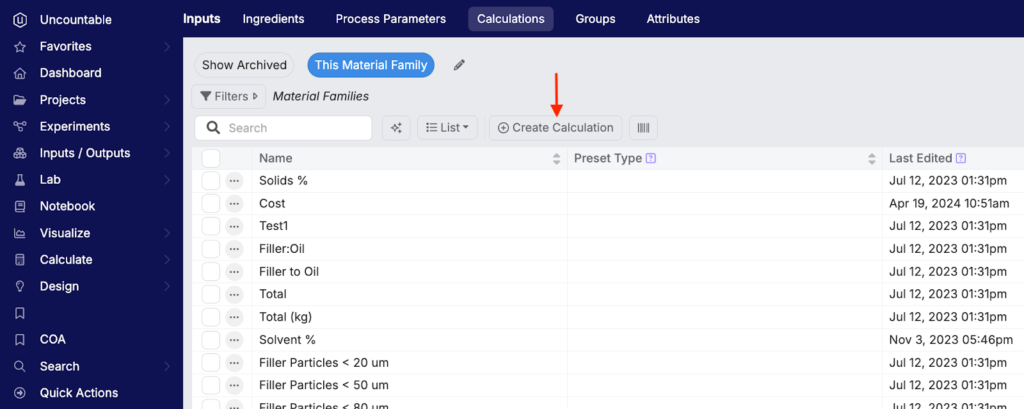
To edit an existing Input Calculation, select the name of the calculation in the list below. To create a new Input Calculation, select “+ Create Calculation”.
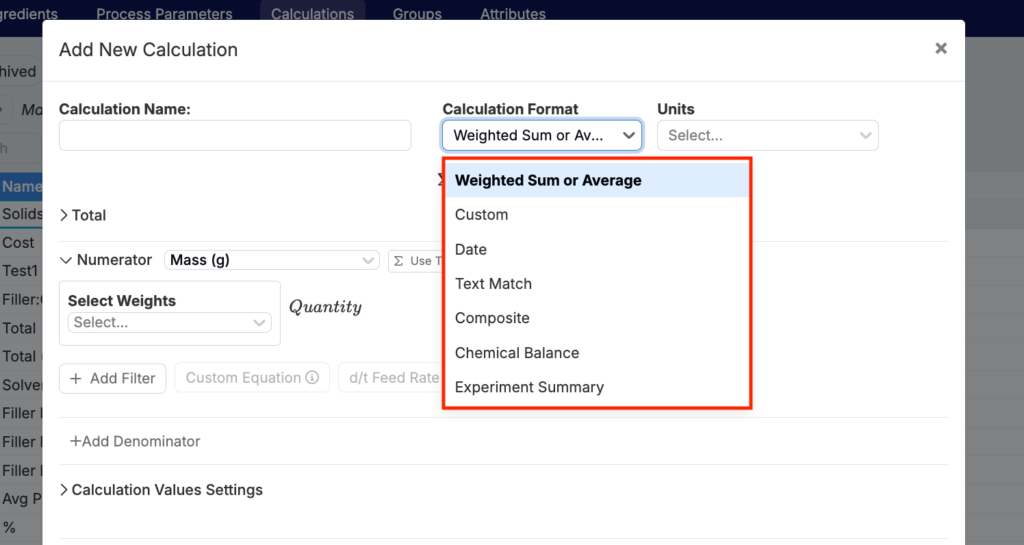
First, specify a name and units (recommended) for your calculation.
Next, define a calculation format. Format refers to the type of calculation being created. There are seven different calculation formats within the Uncountable platform: Weighted Sum or Average, Custom, Date, Text Match, Composite, Chemical Balance, and Experiment Summary.
Weighted Sum or Average Input Calculations
Weighted Sum or Average calculations are perhaps the most powerful and scalable types of input calculations, giving you the freedom to have both recipe-level and ingredient-level calculated values tied to the components of your recipes. Many of the types of calculations you may be used to working with as a formulator are in fact Weighted Sums or Averages, such as formulation cost, total % solids, or moles NCO. While the two aggregation behaviors serve different use cases, the configuration options available for both are largely the same.
- Weighted Sum – Sum of all the components in a recipe weighted by one or more attributes associated with each ingredient (cost, % solids, density, etc.).
- Weighted Average – Average of all the components in a recipe weighted by one or more attributes associated with each ingredient.
After selecting a Weighted Sum or Average format for your new input calculation, you will be prompted to define your calculation’s variable totals, numerator and denominator, and calculation, display, and availability settings.
Total
In this section, you will set variable totals that will be used to scale the overall calculation. The scaling factors or “multipliers” can be constants, ingredients, process parameters, ingredient calculations, or process calculations:
- Constant – Simple numeric values.
- Ingredient – Amount of an ingredient, which can be specific in multiple quantity basis units (arbitrary units, mass, volume or moles).
- Process Parameter – Value of a process parameter, either from the entire experiment, the same workflow step (as the defined calculation), or specific workflow steps (as defined in the subsequent dropdown menu). Note: When using specific workflow steps, the behavior can be set to sum or average in the case where multiple workflow steps are selected.
- Ingredient Calculation – An existing input calculation that has ingredients present as Entities.
- Process Calculation – An existing input calculation that has only process parameters present as entities (no ingredients).
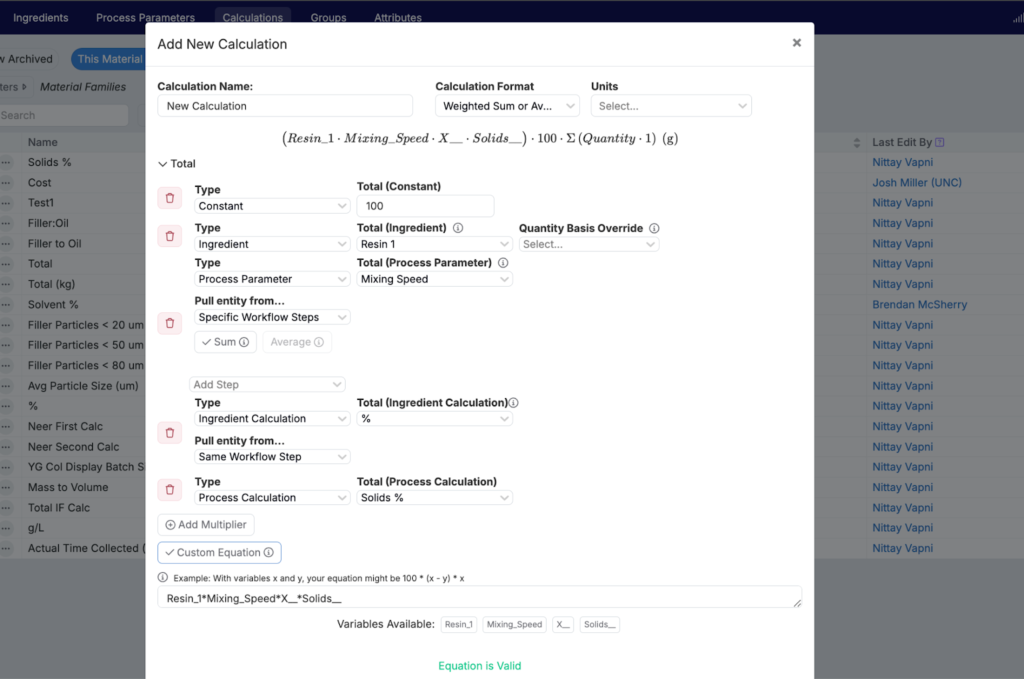
After specifying any number of multipliers in this section, you may choose to select the “Custom Equation” option, which allows you to define a basic arithmetic equation referencing these multipliers.
Numerator/Denominator
Here you will define the behavior for your weighted sum calculation (numerator only) or weighted average calculation (numerator and denominator).
Several options exist within the Numerator section:
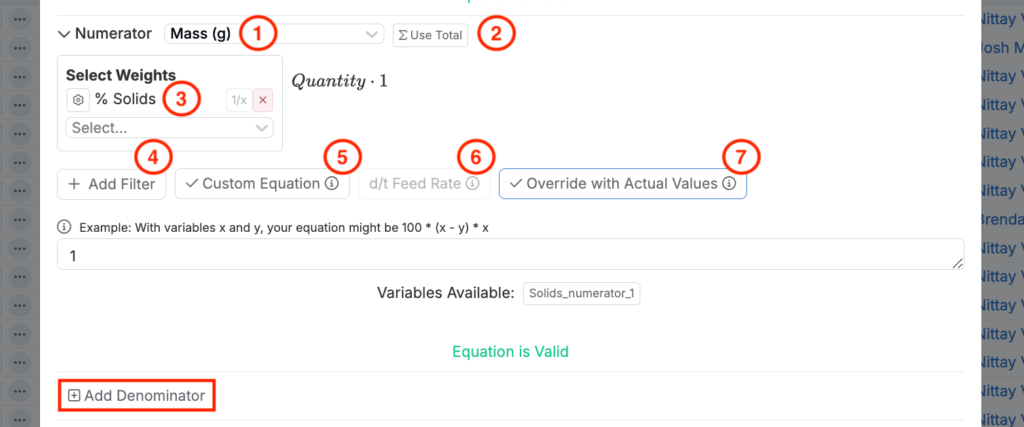
- Basis Units (1) – Used to define the associated basis for the numerator: mass, volume or moles. By default, the numerator will default to a mass basis. Note: Default basis units can be switched if you are utilizing the Basis Units feature in Uncountable and have specific default conversions across mass, volume and/or moles within your material family. For more details regarding Basis Units, reach out to your dedicated Account Manager.
- Use Total (2)- Allows you to use a manually specified experiment total rather than calculated totals from ingredients present in the recipe. If selecting this option, you can choose to use manually specified totals only or to fallback to the calculated totals (the default behavior for calculations). Note: Selecting this option removes the ability to specify additional weights in the numerator component of your calculation.
- Select Weights (3)- Allows you to select attributes that will be used in the numerator or denominator of your Weighted Sum or Average calculations. These must be numeric ingredient attributes and you may select fallbacks for each attribute included in the calculation. You may also select the “inverse attribute” option (1/x) to flip the attribute in the numerator of your calculation. Note: For more information on fallback attributes, see the Custom Input Calculation > Weighted Sum section of this article.
- Add Filter (4)- You may also apply filters to the numerator and denominator separately, thus restricting the scope of the calculation. Note: For more information on filters, see the Custom Input Calculation > Weighted Sum section of this article.
- Custom Equation (5)- Allows you to do basic arithmetic calculations on top of selected attributes. For example, if you wanted to use a Solids % attribute in a calculation to get you a Water % for each of your ingredients, you could apply a “100 – Solids %” subtraction to get to the Water %.
- d/t Feed Rate (6)- Relevant only when using a feed type relationship between steps in a multi-step recipe workflow, this setting allows you to divide out the feed time from the quantities specified in a recipe (thus giving you the feed amount).
- Override with Actual Values (7)- Allows you to override the ingredient amounts with actual values if they have been entered. This is primarily useful if you want an input calculation to be based on actual amounts entered once the sample tied to the defined recipe has been physically prepared in the lab.
Once you have configured the numerator and denominator of your Weighted Sum or Weighted Average input calculation by specifying the desired attributes, scaling constants or variables, and adding relevant filters, there are additional calculation, display, and availability settings available.
Calculation Settings
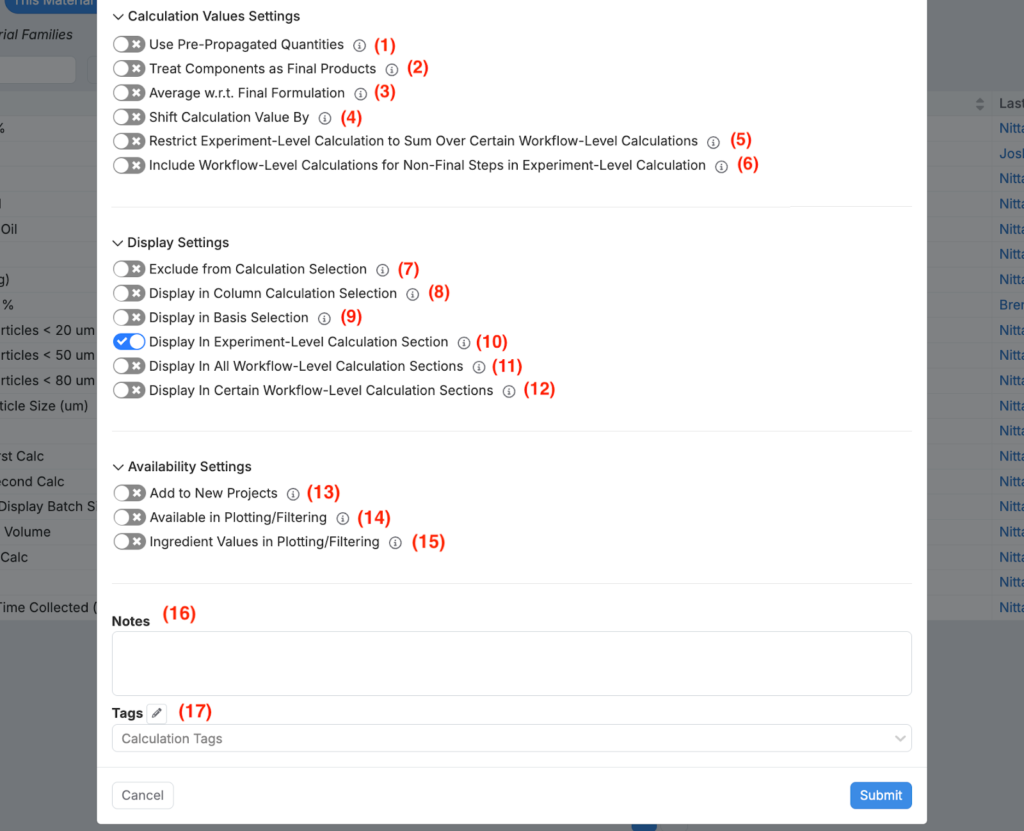
- Use Pre-Propagated Quantities (1) – When enabled, this calculation will use the original quantities of ingredients you entered instead of the adjusted propagated quantities. For example, if an ingredient has 10 parts and the propagated percentage is 50%, enabling this setting will use the full 10 parts in the calculation, while leaving it disabled will use the adjusted 5 parts (50%).
- Treat Components as Final Products (2)- This setting determines how component experiments are handled in calculations. By default, the ingredients of each component experiment are treated as separate terms in the calculation. If you enable this setting, the entire component experiment is treated as a single term, and the ingredients inside it are not considered individually.
- Average w.r.t. Final Formulation (3)- This option allows you to determine the way in which the calculation columns will be normalized, when using the Solver features available in the Recipe page.
- Per-step calculation columns will be normalized with respect to the ingredients in the current workflow step. For example, the volume % column will show the volume that each ingredient occupies in the current step. Note that per-step calculation columns are not supported in complex, branching workflows.
- Full formulation calculation columns will be normalized with respect to all the ingredients in the entire experiment. For instance, the volume % will reflect the volume that each ingredient occupies across all steps in the experiment. These calculation columns are supported in all types of workflows.
- Shift Calculation Value By (4)- Allows you to add or subtract a constant value from the final input calculation amount.
- Restrict Experiment-Level Calculation to Sum Over Certain Workflow-Level Calculations (5)- This setting limits the experiment-level calculation to only sum specific workflow-level calculations that you select. This allows you to focus the final calculation on particular workflow steps, rather than including all workflow-level calculations in the experiment-level total.
- Include Workflow-Level Calculations for Non-Final Steps in Experiment-Level Calculation (6)- When enabled, this setting ensures that workflow-level calculations from non-final steps are included in the experiment-level calculations. When disabled, these calculations from non-final steps are excluded from the final experiment-level calculation.
- Exclude from Calculation Selection (7)- This setting is commonly used for intermediate calculations and hides the calculation from view, preventing it from being selectable on the platform.
Display Settings
- Display in Column Calculation Selection (8)- This setting lets you show calculated values for each ingredient in an additional column on the Enter Recipe page. This display provides insights into how each ingredient contributes to Weighted Sum or Weighted Average calculations. These calculated values can also be directly adjusted and locked as part of solver workflows when designing experiments in Uncountable. For instance, this feature allows for displaying variations like Weight % or Solids % contributions within a formula.
- Display in Basis Selection (9)- This makes the calculation selectable as a basis for an ingredient.
- Display in Experiment-Level Calculation Section (10)- This establishes that the calculated values appear only in the overall summary of the experiment’s results.
- Display in All Workflow-Level Calculation Sections (11)- This establishes that the calculation results are shown in the calculation sections for each individual step of the experiment.
- Display in Certain Workflow-Level Calculation Sections (12)- This establishes that the calculated values are only shown in the calculation sections of specified workflow steps.
Availability Settings
- Add to New Projects (13)- When selected, the calculation will be automatically enabled in new projects created within the material family. Note: If selected, an additional option “Insert to Existing Projects” will appear allowing you to enable the input calculation in all existing projects as well.
- Available in Plotting/Filtering (14)- This setting makes calculation valuables plottable and filterable.
- Ingredient Values in Plotting/Filtering (15)- When selected, allows the calculated values to be selected as the reference values to use when either filtering by or plotting ingredients. In other words, rather than filtering/plotting based on the entered amount (i.e. grams), ingredients can instead be referenced according to the associated calculated value.
- Notes (16)- A basic text-only field used to provide additional context regarding the Input Calculation. Text entered here will be displayed on hover over the calculation on the Recipe page of your experiment.
- Tags (17)- Used to identify and group together calculations. Tags then allow you to toggle groups of calculations to be displayed or not.
Once you have properly configured the calculation, display, and availability settings, you can save your new Weighted Sum or Average input calculation by clicking “Submit”.
Custom Input Calculations
The second, and most straightforward, type of input calculation is a Custom input calculation. Custom input calculations are used to display a recipe-level calculation tied to an experiment, either based on ingredient amounts or process parameter setpoint values. A basic example would be a Feed Volume (mL) calculation that takes feed rate (mL/min) and feed time (min) process parameters as variables.
To create a Custom input calculation, select Custom and begin adding individual entities as variables in the calculation:
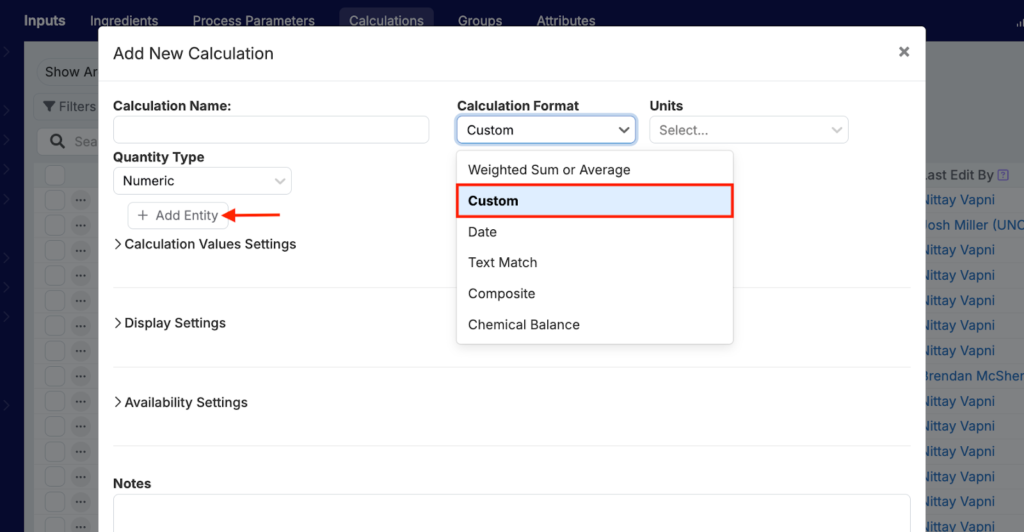
In a Custom calculation, entities may be one of six possible types:
- Input – Specific ingredient or process parameter that will be present within the experiment in which you would like the calculation to appear.
- Ingredient Attribute – An attribute of a specific ingredient (can also be a process parameter attribute, if applicable), which will be used as a factor of some sort in your calculation.
- Calculation – Another input calculation (must already be created).
- Weighted Sum – A weighted sum component that will itself be the sum of ingredients weighted by particular attribute(s).
- Step Quantity – The amount present within a recipe that is taken from a first, or parent, step into a second, or child, step. Step quantity entities are most commonly used to scale a calculation according to the actual amount of material taken from a preceding step.
- Metadata – A numeric, text, or categorical type metadata field present on an experiment.
Input
The first Custom calculation entity type is an Input entity. For Input entities, you must select the input (ingredient or process parameter):
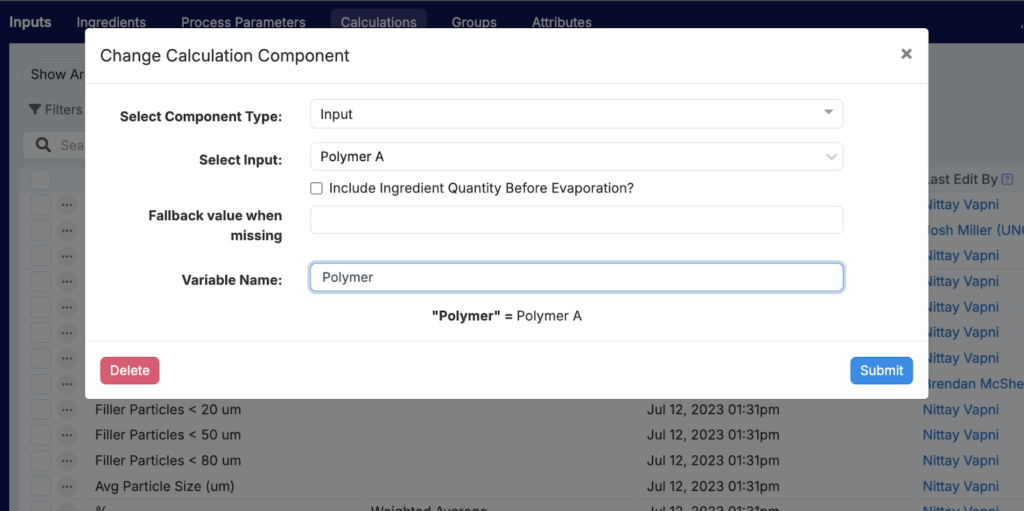
Once selected, you can specify if you would like to include ingredient quantity before evaporation, which means the amount taken will be the value entered initially by you and not the remaining amount after applying percent-based evaporation. Note: Ingredient evaporation is an advanced feature used to indicate that only a portion of the added ingredient is present in the final formulation. For more details, reach out to your dedicated Account Manager.
In addition, you can manually enter a “Fallback value when missing”, or a default input value for when the input is not present in the recipe. Note: If this field is not specified and the input is not present in the recipe, the calculation will be displayed as blank.
Like all entities added to a calculation, you may choose to modify the variable name. The variable name is the string you must use to refer to this entity in the equation editor for the calculation, so it’s best to use something that is user-friendly and logical. Note: The variable name cannot include any spaces or dashes, so use underscores or camelcase as needed (e.g., Variable_Name or variableName).
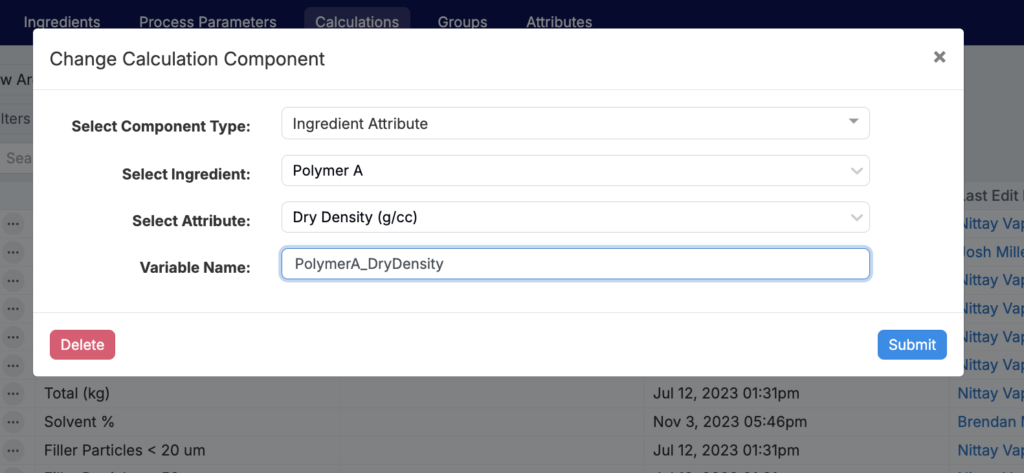
Ingredient Attribute
The second Custom calculation entity type is an Ingredient Attribute entity. For Ingredient Attribute entities, you must select the specific ingredient and associated attribute that you would like to reference. Note: While primarily intended to be used for ingredient attributes, you may also reference process parameter attributes.
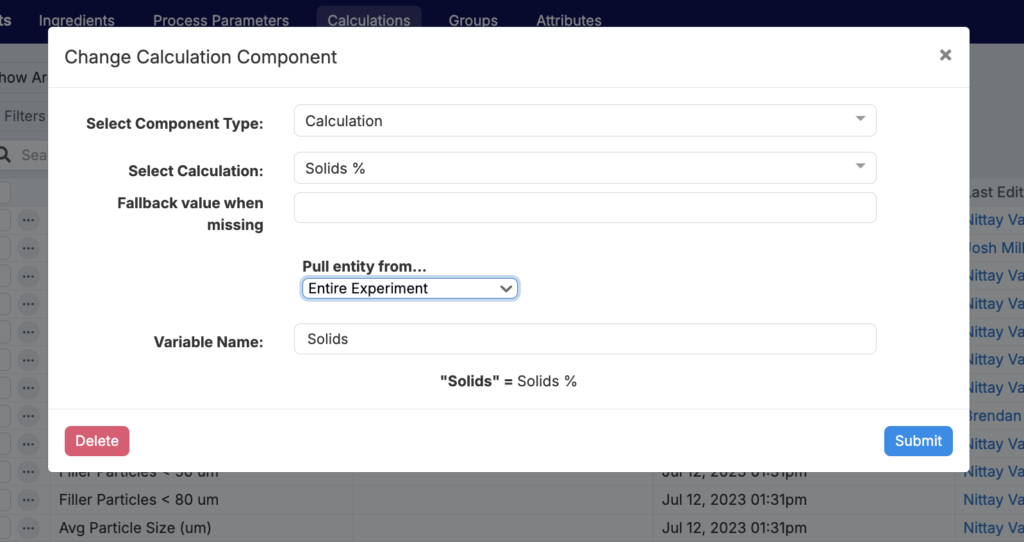
Calculation
The third type of Custom calculation entity is a Calculation entity. For Calculation entities, you simply need to select an existing input calculation that you wish to reference as part of the new one you are configuring. Note: You can only reference other input calculations, not output calculations.
Similar to inputs, you may manually enter a “Fallback value when missing”, meaning that the calculation value will be considered as the value entered if not already present in the recipe. Additionally, you can select to pull the entity from the entire experiment, the same workflow step, or defined specific workflow step.
Weighted Sum
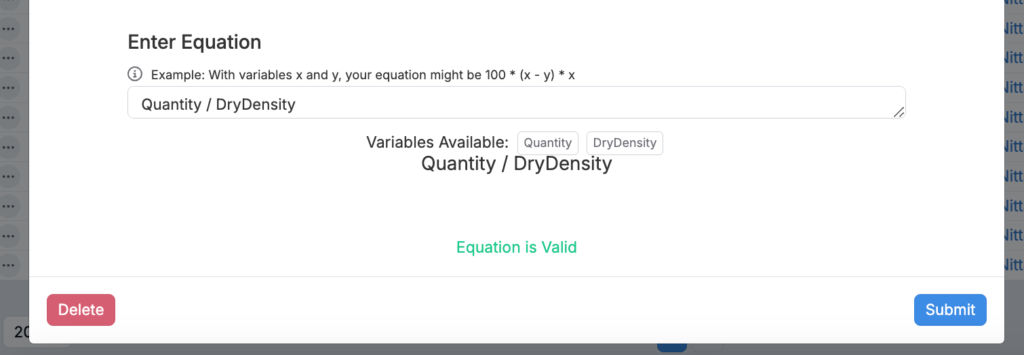
The fourth type of Custom calculation entity is a Weighted Sum entity. These entities are made of up sub-entities and filters and act as an embedded, or component, calculation within your larger input calculation. Note: The “Quantity” sub-entity is already preselected, since this type of entity is used to derive a weighted sum value of ingredients scaled by certain attributes.
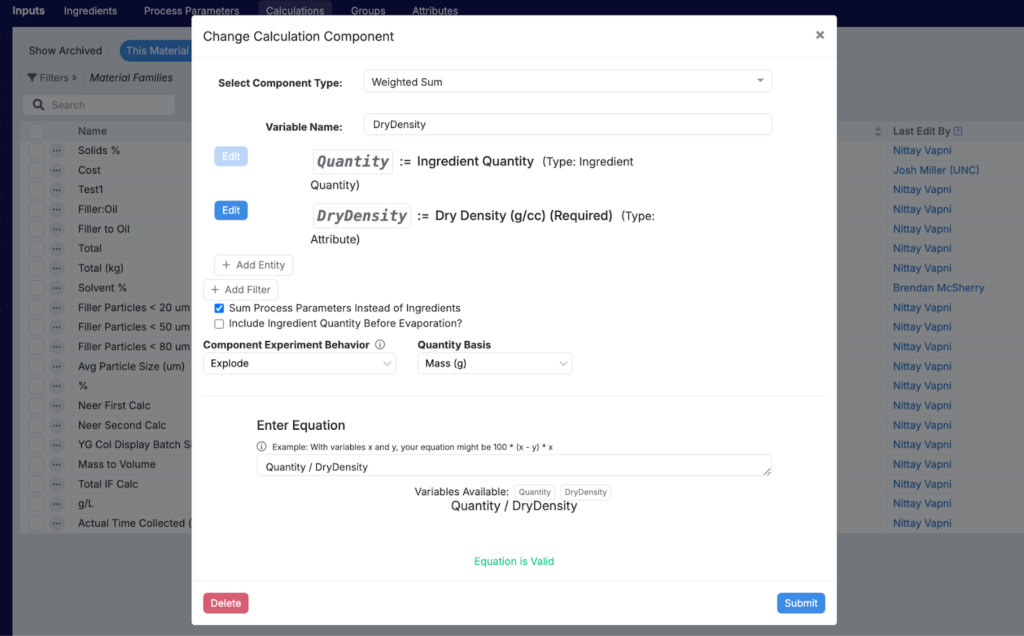
In addition to the default Quantity sub-entity, you can add additional entities for use in your Weighted Sum entity equation by clicking “+ Add Entity”. For example, selecting the dry density ingredient attribute as a second sub-entity would enable you to calculate a weighted sum representing the volume of your ingredients (mass/density=volume).
Fallback Attributes
When adding entities, you’ll notice several additional configuration options. Adding an optional “fallback attribute” allows you to determine the desired order in which attributes will be referenced. The most common use cases here are for the use of ingredient lots or intermediate (component) experiments.
Type of Attributes:
- Ingredient Attribute: A standard or theoretical value stored directly on an ingredient as an attribute.
- Lot Attribute: A measured value stored as an output on the lot of an ingredient.
- Process Parameter: A target value stored as a process parameter on the recipe of the same experiment.
- Intermediate Attribute: A measured value stored as an output on a component experiment (intermediate) present in the recipe.
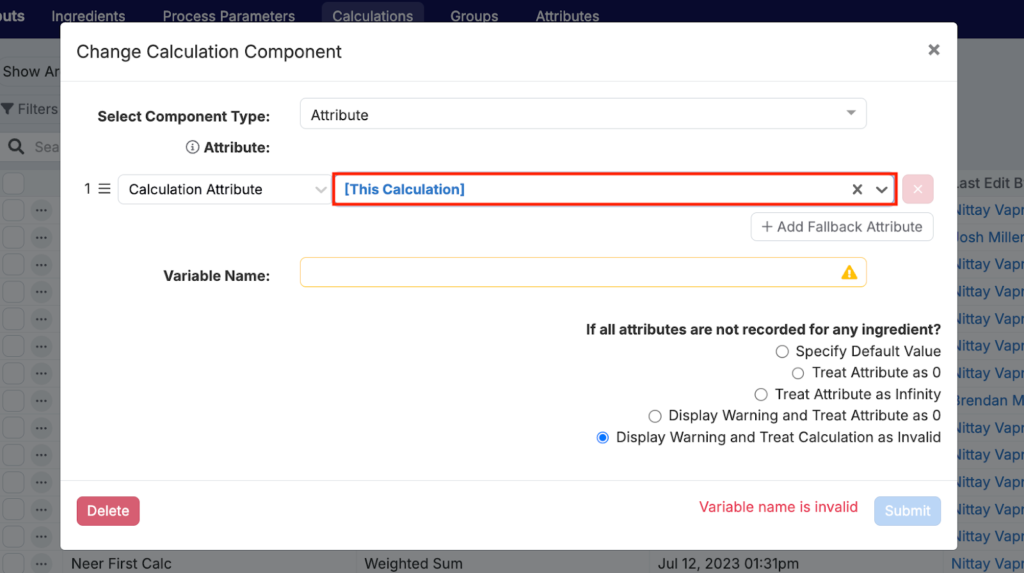
- Calculation Attribute: An input calculation present on a component experiment (intermediate) present in the recipe
- Input Annotation: A value stored as an annotation on an ingredient or process parameter in the recipe.
- Recipe Input Attribute: A value stored on a field associated with a recipe input, such as equipment. Note: Requires setting up fields in the Form Admin configuration page.
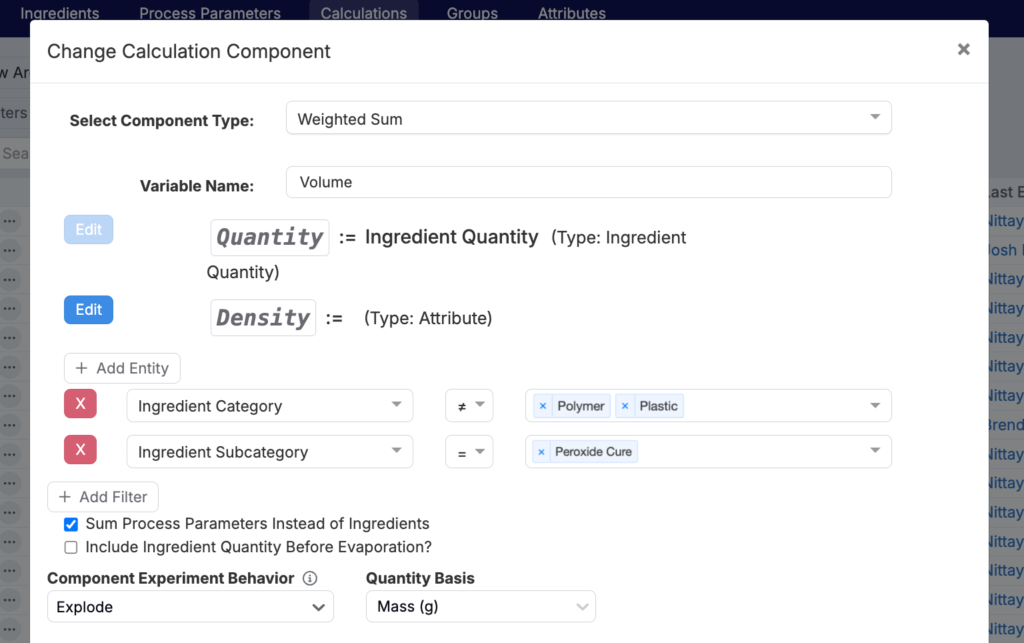
Let’s consider fallback attributes using the example of dry density. First, instruct the system to check for density as a measurement on an intermediate experiment (a recipe used as an ingredient). If this measurement is not available, you can then instruct the system to check for density as a property of an ingredient lot (from a supplier TDS or measured internally) by adding a fallback attribute. Finally, adding a second fallback attribute would check for dry density as an ingredient attribute if the first two attributes are not found. Such a configuration would look like the image below:
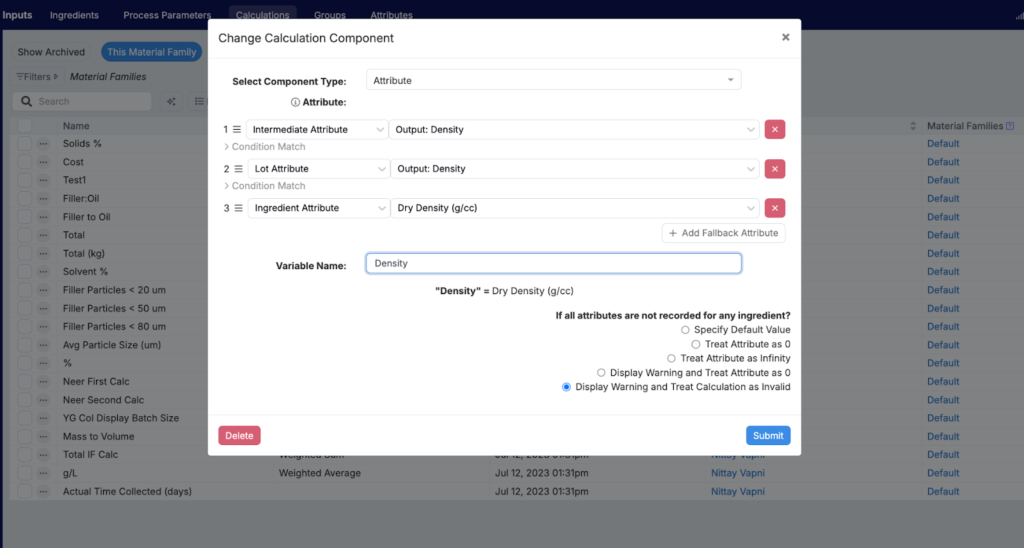
You’ll note that for the intermediate and lot attributes, you may expand the “Condition Match” section, which allows you to more specifically check for an attribute (or output, in this case) that is recorded with specific condition parameters, such as a supplier, method, aging condition, etc.
To reorder these attributes to determine the priority order in which they should be referenced, simply use the three horizontal lines to the left of each attribute.
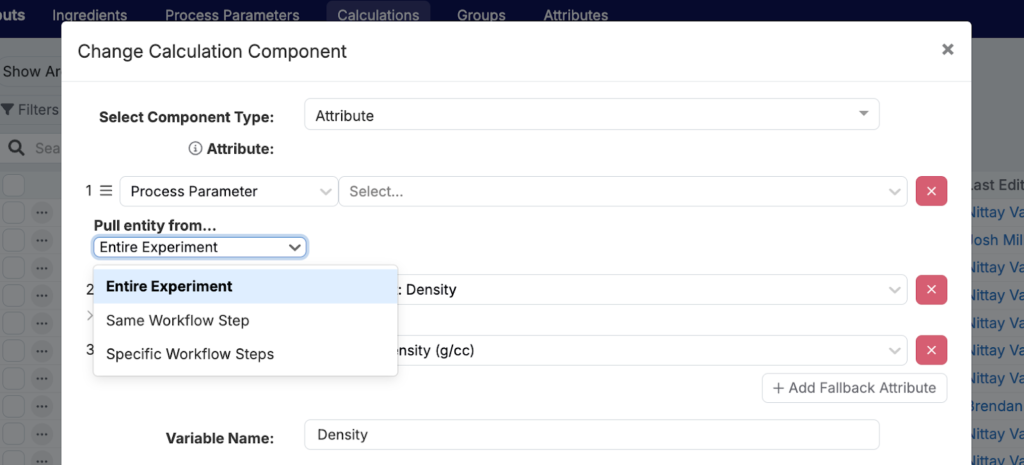
In addition to the three most common options listed above, process parameters can be defined as fallback attributes. When selecting a process parameter, you can also specify where the parameter should be referenced:
- Entire Experiment – The process parameter can be present anywhere within the recipe (default).
- Same Workflow Step The process parameter must be present within the same workflow step as the input calculation being configured. Note: This only applies if the input calculation itself is tied to a specific workflow step.
- Specific Workflow Steps – Allows you to specify individual workflow step(s) within which to check for the process parameter.
Furthermore, input calculations themselves can be defined as fallback attributes using the Calculation Attribute option. In this case, the input calculations must be present on intermediate (component) experiments present within the experiment, and the component experiment behavior for the overall calculation must be set to “Use as Single Term”.
After choosing an attribute for your Weighted Sum entity equation, there is an set of options to determine behavior “if all attributes are not recorded for any ingredient”:
- Specify Default Value – Allows you to manually enter a default value to use if an ingredient (or intermediate or lot) does not have an associated value.
- Treat Attribute as 0 (Default) – If the attribute is not present, it will be automatically treated as being equal to zero.
- Treat Attribute as Infinity – If the attribute is not present, it will be automatically treated as being equal to infinity. More commonly used if the attribute will be in the denominator of the equation for a Weighted Sum entity.
- Display Warning and Treat Attribute as 0 A warning will be displayed on the Recipe page, and the calculation will have a value of zero.
- Display Warning and Treat Calculation as Invalid – A warning will be displayed on the Recipe page, and the calculation will be displayed as invalid.
You may also choose to add filters, in order to restrict the Weighted Sum to only a subset of ingredients. You may apply these filters for ingredient categories, subcategories, individual ingredients, attributes, and/or quantities. Note: Separate filters are additive, meaning they are connected by an ‘AND’ condition, whereas options selected within a filter (if available) are connected by an ‘OR’ condition.
In the example below, the filters applied would result in the volume Weighted Sum entity being calculated only when the ingredient category is neither polymer or plastics, AND the ingredient subcategory is peroxide cure.
After adding the desired sub-entities and applying any appropriate filters, there are three remaining advanced options available to modify the behavior of your Weighted Sum entity:
- Sum Process Parameters Instead of Ingredients – By default (and nearly all cases), Weighted Sum entities are used to calculate a weighted sum of ingredients. However, by checking this option, process parameter values will be summed instead.
- Include Ingredient Quantity Before Evaporation? – When checked the calculation will utilize the ingredient amounts entered rather than those propagated to the final recipe (any amount assumed to be remaining after evaporation). Note: This only applies if you are using the advanced Ingredient Evaporation feature in your recipes.
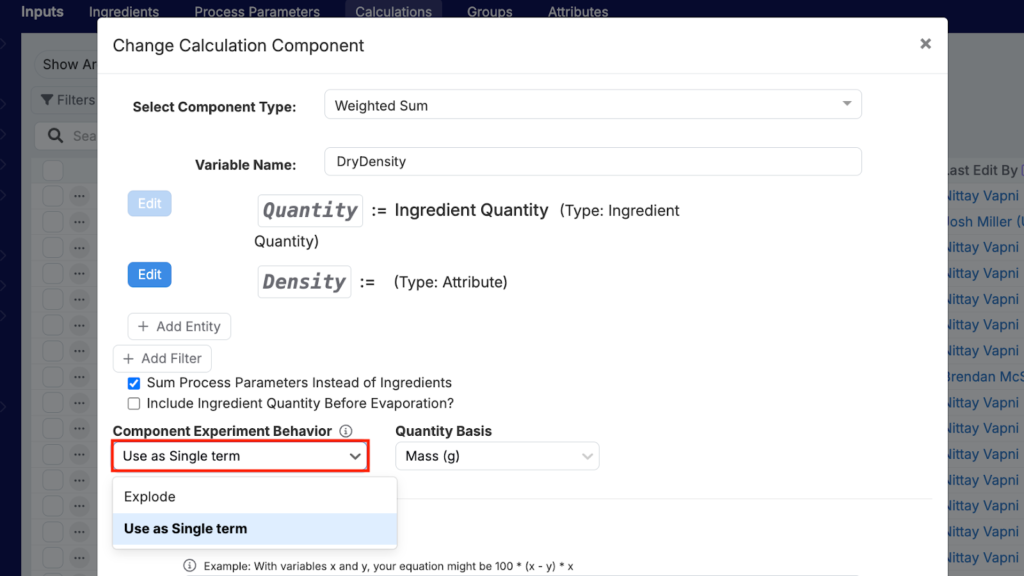
- Component Experiment Behavior – This option allows you to determine how to handle component (or intermediate) experiments. By default, Weighted Sum entities will use the “Explode” option, which will drill down into the individual ingredients present within component experiments and use associated attributes of those ingredients when computing the final Weighted Sum value. Alternatively, you may choose to “Use as Single Term”, in which case the intermediate experiment will instead be treated as one ingredient in the recipe. Note: If using this option, you want to make sure to select an intermediate attribute as a fallback when defining the entities of your Weighted Sum entity. As mentioned above, this option must also be selected when specifying a calculation attribute as a fallback attribute.
The final step of defining your Weighted Sum entity is to design the equation. Do this by manually typing in the variable names or using the pill buttons present below the equation editor. Use standard syntax for defining the basic arithmetic of your calculation and select “Submit” to save the changes.
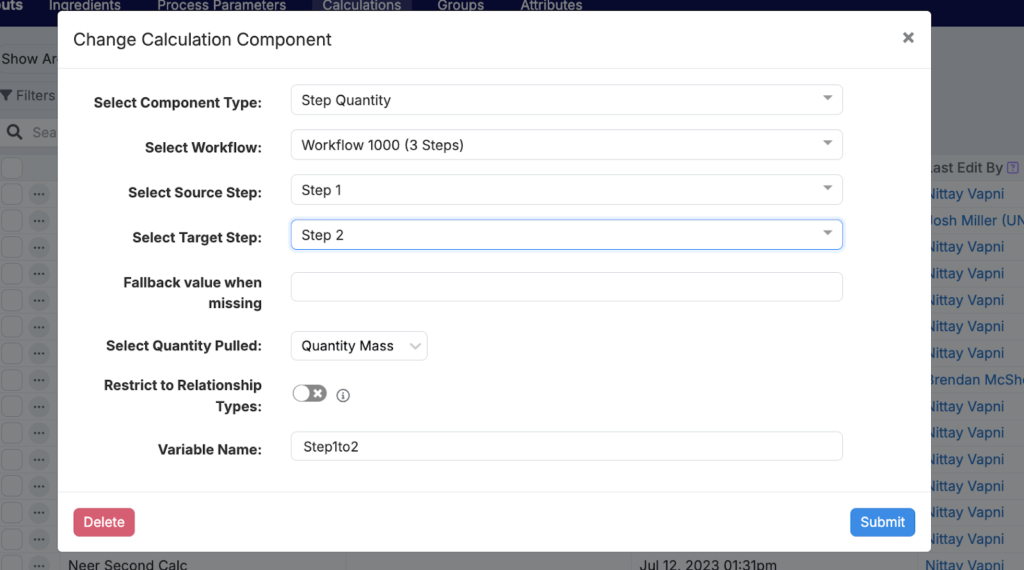
Step Quantity
The fifth type of Custom calculation entity is a Step Quantity entity. For the Step Quantity entity type, you must select a specific workflow, the source step, and target step. The step quantity entity will then allow you to use the actual amount of ingredients that were used from the source step in a subsequent target step.
In this modal, you can also select the quantity pulled, establish a fallback value, and restrict to relationship types. When restricting to a relationship type, users can select one or more relationships (autofill, feed, feed percentage, include all, include percentage, include quantity) and restrict the Step Quantity to only those specific types.
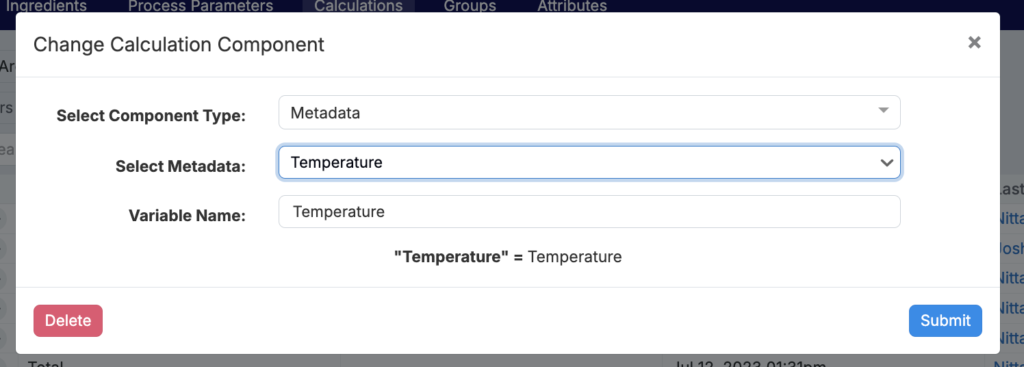
Metadata
The sixth and final type of Custom calculation entity is a metadata entity. The metadata entity type allows you to reference numeric, text or categorical metadata present on the experiment. Text or categorical metadata fields can be used only as part of conditional statements, such as if(condition,value_if_true,value_if_false).
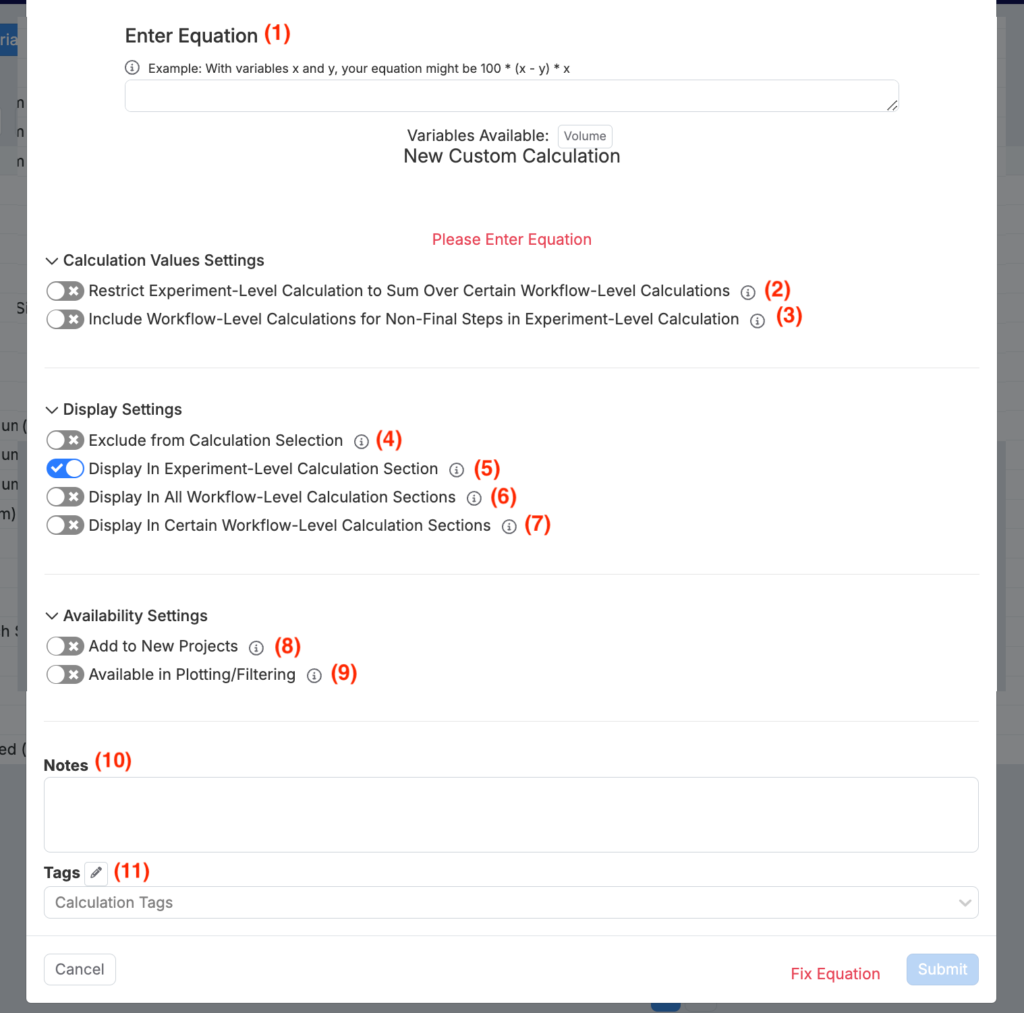
Once you’ve defined all the individual entities of your Custom Input calculation, there are several remaining options available to configure your overall calculation under Calculation Settings, Display, and Availability Settings:
- Enter Equation (1)- This field is where you will enter the actual equation for your Input Calculation, which can include basic arithmetic syntax (+, -, *, /, etc.) or advanced Excel-style functions, such as average(), log(), if(), etc.

Calculation Settings
- Restrict Experiment-Level Calculation to Sum Over Certain Workflow-Level Calculations (2)- This setting limits the experiment-level calculation to only sum specific workflow-level calculations that you select. This allows you to focus the final calculation on particular workflow steps, rather than including all workflow-level calculations in the experiment-level total.
- Include Workflow-Level Calculations for Non-Final Steps in Experiment-Level Calculation (3)- When enabled, this setting ensures that workflow-level calculations from non-final steps are included in the experiment-level calculations. When disabled, these calculations from non-final steps are excluded from the final experiment-level calculation.
Display Settings
- Exclude from Calculation Selection (4)- This setting hides the calculation from view and prevents it from being selectable on the platform.
- Display In Experiment-Level Calculation Section (5)- This establishes that the calculated values appear only in the overall summary of the experiment’s results.
- Display in All Workflow-Level Calculation Sections (6)- This establishes that the calculation results are shown in the calculation sections for each individual step of the experiment.
- Display In Certain Workflow-Level Calculation Sections (7)- This establishes that the calculated values appear only in the overall summary of the experiment’s results.
Availability Settings
- Add to New Projects (8)- When selected, the calculation will be automatically enabled in new projects created within the material family. Note: If selected, an additional option “Insert to Existing Projects” will appear allowing you to enable the input calculation in all existing projects as well.
- Available in Plotting/Filtering (9)– When selected, allows the calculated values to be selected as the reference values to use when either filtering by or plotting ingredients.
- Notes (10)- A basic text-only field used to provide additional context regarding the Input Calculation. Text entered here will be displayed on hover over the calculation on the Recipe page of your experiment.
- Tags (11)- Used to identify and group together calculations. Tags then allow you to toggle groups of calculations to be displayed or not.
Date Input Calculations
Date Input Calculations are used in a relatively narrow set of use cases, but allow you to easily calculate an elapsed time relevant to the overall processing steps of an experiment.
Date Input Calculations work with experiment metadata or process parameters of type “Date” or “Timestamp”, and they are used to perform a subtraction between these two Dates or Timestamps. These metadata or process parameter fields can be present either on the current experiment or on an intermediate (component) experiment. Additionally, it is also possible to reference the Current Date as a variable in these Date type calculations.
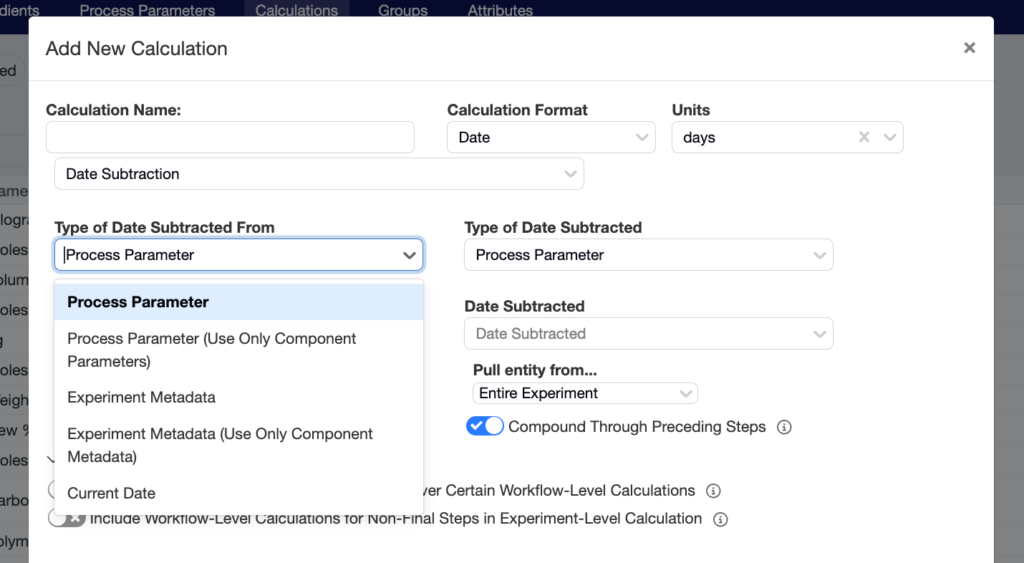
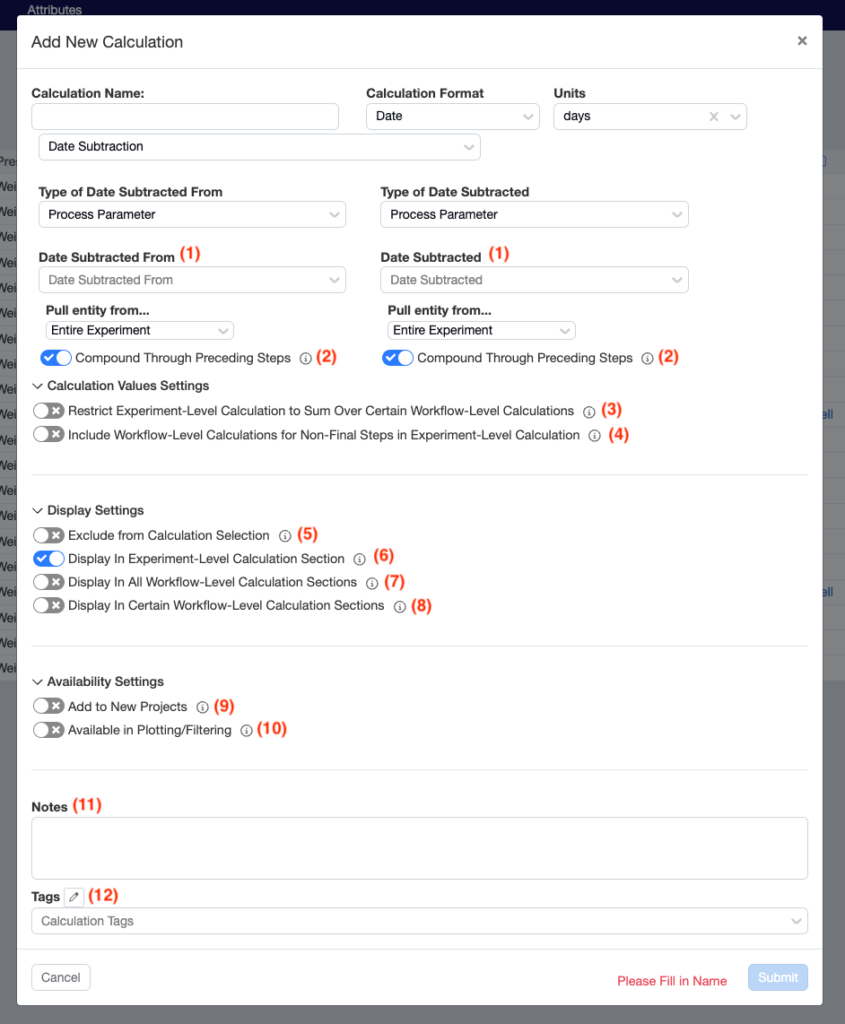
In the example below, and Sample Age is calculated by subtracting a “Sample Date” from an “Initial Test Date”, thus providing an elapsed “Sample Age”:
- Date Subtracted From and Date Subtracted (1)- Process Parameters or Experiment Metadata of either Date or Timestamp type from the current experiment or component experiments. The Date Subtracted From is typically the latest of the two dates, as it will be the “larger” of the two.
- Note 1: You may also choose Current Date in this menu if you want a dynamically updating calculation based on the current date when viewing an experiment.
- Note 2: When selecting process parameters, you may specify where to “Pull Entity from…”, similar to the Weighted Sum and Weighted Average calculation types.
- Compound Through Preceding Steps (2)- When toggled on, dates will compound through preceding steps. This setting is on by default.
Calculation Settings
- Restrict Experiment-Level Calculation to Sum Over Certain Workflow-Level Calculations (3)- This setting limits the experiment-level calculation to only sum specific workflow-level calculations that you select. This allows you to focus the final calculation on particular workflow steps, rather than including all workflow-level calculations in the experiment-level total.
- Include Workflow-Level Calculations for Non-Final Steps in Experiment-Level Calculation (4)- When enabled, this setting ensures that workflow-level calculations from non-final steps are included in the experiment-level calculations. When disabled, these calculations from non-final steps are excluded from the final experiment-level calculation.
Display Settings
- Exclude from Calculation Selection (5)- This setting hides the calculation from view and prevents it from being selectable on the platform.
- Display In Experiment-Level Calculation Section (6)- This establishes that the calculated values appear only in the overall summary of the experiment’s results.
- Display in All Workflow-Level Calculation Sections (7)- This establishes that the calculation results are shown in the calculation sections for each individual step of the experiment.
- Display In Certain Workflow-Level Calculation Sections (8)- This establishes that the calculated values appear only in the overall summary of the experiment’s results.
Availability Settings
- Add to New Projects (9)- When selected, the calculation will be automatically enabled in new projects created within the material family. Note: If selected, an additional option “Insert to Existing Projects” will appear allowing you to enable the input calculation in all existing projects as well.
- Available in Plotting/Filtering (10)- When selected, allows the calculated values to be selected as the reference values to use when either filtering by or plotting ingredients.
- Notes (11)- A basic text-only field used to provide additional context regarding the Input Calculation. Text entered here will be displayed on hover over the calculation on the Recipe page of your experiment.
- Tags (12)- Used to identify and group together calculations. Tags then allow you to toggle groups of calculations to be displayed or not.
Text Match Input Calculations
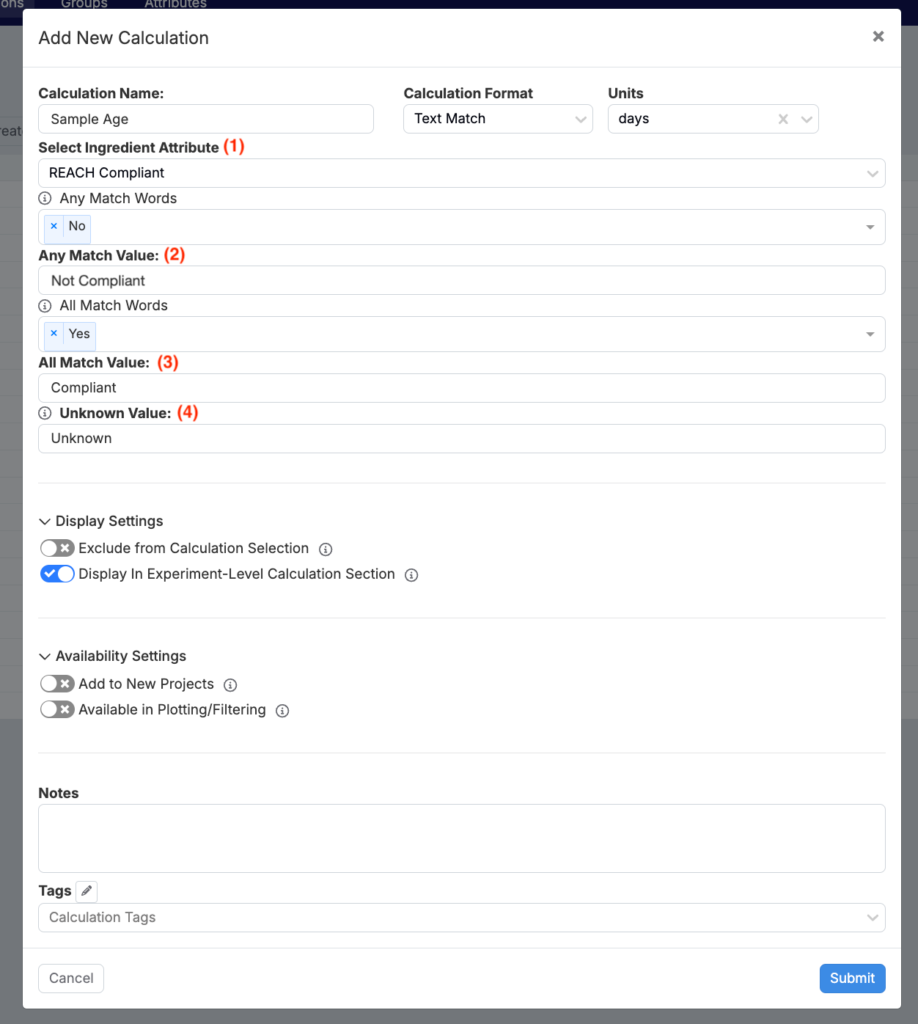
Text Match calculations allow you to display a conditional message on the Recipe page of your Experiments based entirely on matching logic associated with ingredient attributes. As an example, you may wish to know if an Experiment is REACH Compliant (EU regulation enacted), based on whether individual ingredients within the recipe are REACH Compliant. To do so you may utilize a Text Match Input Calculation:
- Select Ingredient Attribute (1)- The ingredient attribute (typically Text or Categorical) that will be matched against.
- Any Match Words (2)- If any of the words entered into this field are present for any ingredient in the experiment, the value for “Any Match” (in this case, “Not Compliant”) will be displayed.
- All Match Words (3)- If any of the words below are present for all ingredients in the experiment, the value for “All Match” (in this case, Compliant) will be displayed.
- Unknown Value (4)- If neither then “Any Match” or “All Match” criteria are met, the “Unknown Value” will be displayed.
The remaining options under Calculation Settings and Display Settings are the same as those described in the other calculation types included in this article.
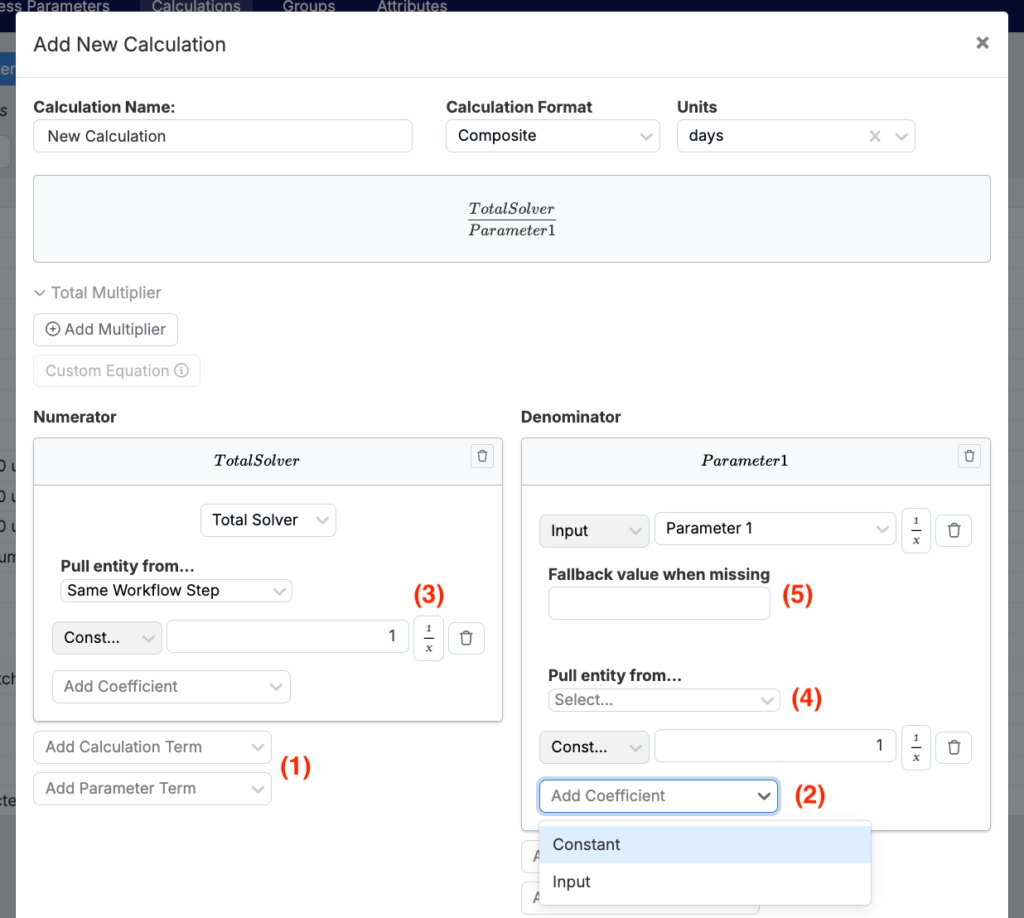
Composite Input Calculations
Composite calculations act as a hybrid of Custom and Weighted Sum/Average calculations, allowing you to combine multiple entities together into a single calculation with a numerator and/or denominator, each of which may contain multiple components that are summed or subtracted together. Entities may be included in either a numerator or denominator component of the overall calculation, and individual entities within the numerator and denominator can then be added together.
Terms within the numerator and denominator can either be other existing calculations or process parameters. With a Calculation Term, you may thus reference already existing Weighted Sum or Weighted Average calculations, which themselves will feed into the Composite calculation.
- Specify the type of term in the numerator or denominator– calculation or parameter (1)
- Add a constant coefficient or process parameter (input) coefficient (2)
- Similar to Weighted Sum or Average calculations, the terms can be inverted by selecting the “1/x” button next to each selected term in either the numerator or denominator (3)
- When selecting process parameters (either as the overall term) or as a coefficient for the term, you may also specify the experiment vs. workflow behavior by selecting the appropriate option under “Pull entity from…” (4)
- Define a fallback value when the parameter value is missing (5)
All other elements of the Composite Input Calculation type (Multiplier, Calculation Settings, Display Settings, Notes, Tags) are the same as standard Weighted Sum and Weighted Average calculations.
Chemical Balance Input Calculations
The Chemical Balance Input Calculation type is used primarily for synthesis applications, allowing users to perform a mass balance equation directly in Uncountable. To utilize this type of calculation, you must have a Chemical Structure type ingredient attribute defined and populated for your ingredients:

Once this ingredient attribute has been created, you may reference it in your Chemical Balance calculation by selecting from the “Chemical Structure Identifier” menu (1). You will then need to specify the Reactant (2) and Product (3) workflow step(s) for your calculation, which will be used to perform the mass balance calculation:

All other elements of the Chemical Balance Input Calculation type (Calculation Settings, Display Settings, Notes, Tags) are the same as the other input calculation types defined in this article.
Experiment Summary
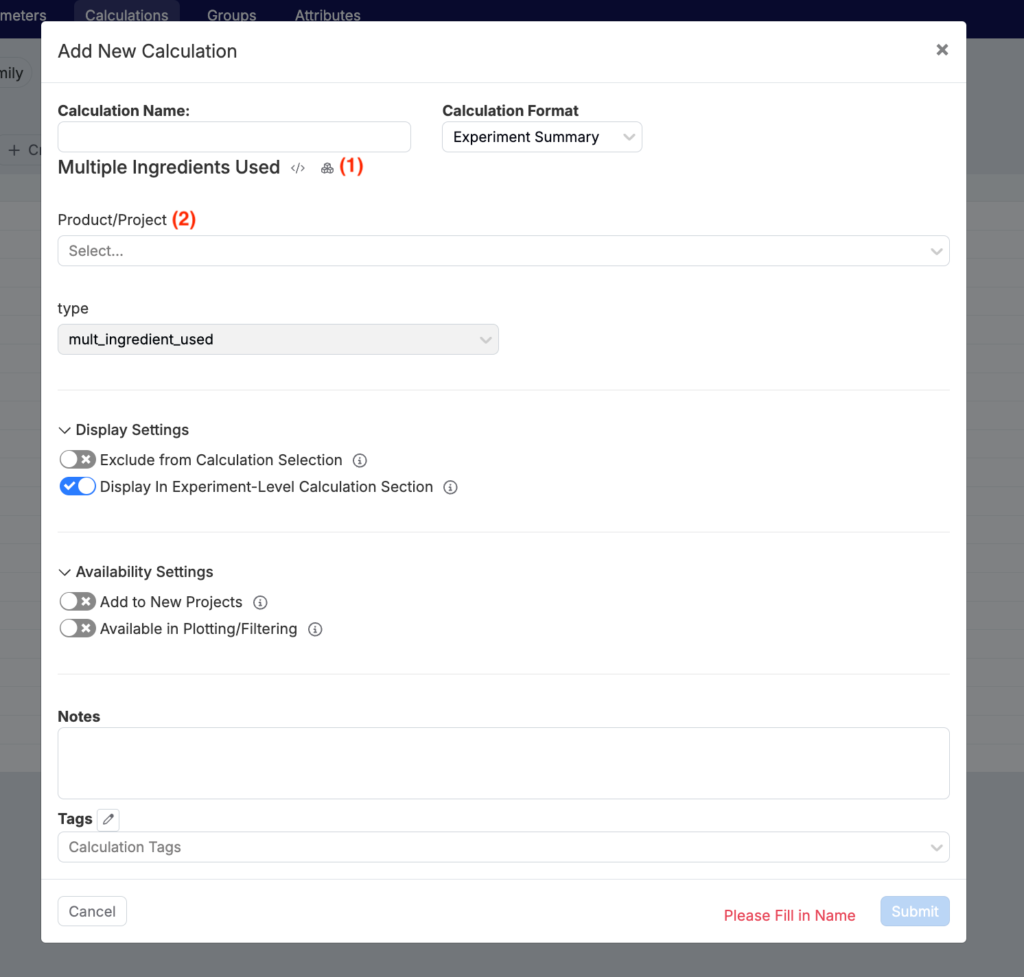
The Experiment Summary Input Calculation type was introduced to enhance the experiment list view for recipes involving intermediates, prioritizing the identification and usage type of the intermediate over its quantity.
Consider a multi-layer coating in which the user needs to identify which specific primer and topcoat were applied to a panel. With Experiment Summary calculations, users can easily view the type of recipe used in each experiment by displaying its name. These calculations can then be added to a listing for straightforward reference. In this input calculation type, each category or product will have only one designated calculation.
When setting up an Experiment Summary Input Calculation, start by naming the calculation based on the specific intermediate or recipe you want to highlight (e.g., Top Coat Used). You can toggle between “Single Ingredient Used” and “Multiple Ingredients Used” using the stacked boxes icon (1). This allows flexibility in scenarios involving multiple ingredients, such as identifying the solvent used in a mixture. Next, select the relevant product or project from the dropdown menu (2) that represents the type of intermediate being analyzed.
Editing Input Calculations
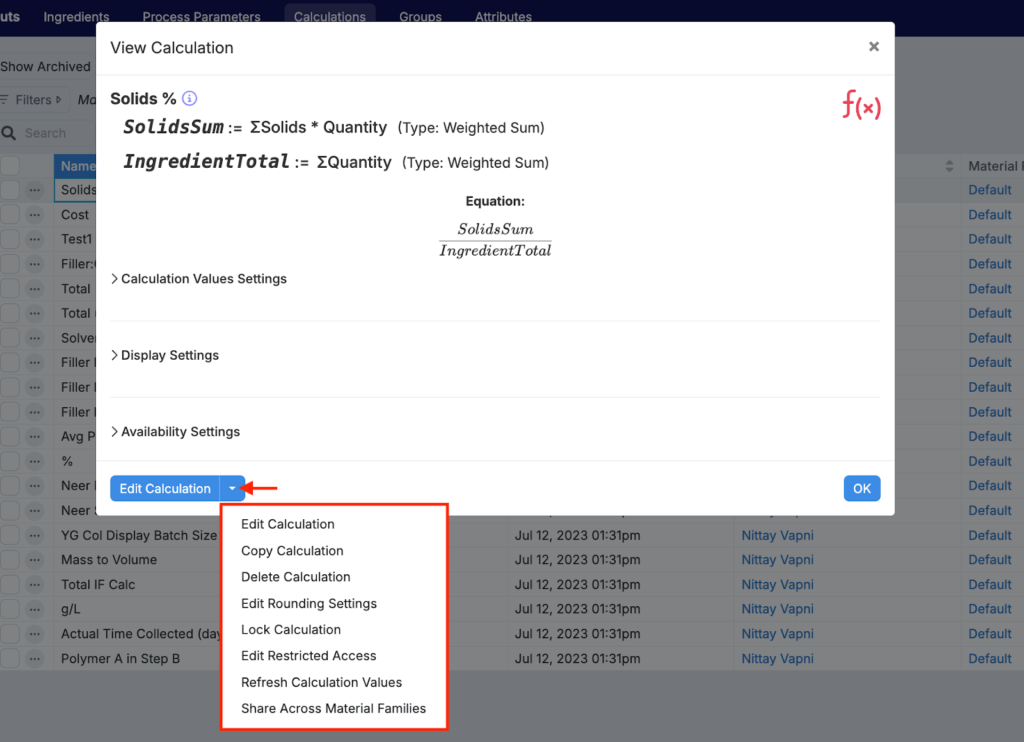
Once an input calculation has been created, it will appear in a listing on the Inputs > Calculation page. To edit the calculation, click the “…” associated and select “Edit Calculation”.
In this modal, you will see the calculation equation and its calculation, display, and availability setting toggles. To edit the calculation equation, units, or to add tags or notes, click the “Edit Calculation” button.
Clicking the arrow next to “Edit Calculation” expands a dropdown menu with additional calculation tools. In this menu, you can copy, delete, or lock the calculation. You can also edit rounding settings, edit restricted access, refresh calculation values, and share the calculation across material families.
- Edit Calculation: Opens the Edit Calculation modal.
- Copy Calculation: Copies the calculation into another target material family.
- Delete Calculation: Deletes the calculation.
- Edit Rounding Settings: Enables you to edit the number of significant figures displayed for calculated values.
- Lock Calculation: Prevents users from removing or editing the calculation on the Enter Recipe page.
- Edit Restricted Access: Allows you to restrict which users can see or edit the calculation.
- Refresh Calculation Values: Refreshes all values for the calculation across all projects.
- Share Across Material Families: Enables you to share the calculation with additional, selected material families.
Using Input Calculations
Input Calculations can be enabled at a Project-level, Workflow-level, or now the Experiment-level. Depending on the approach you have taken to structure and organize your experiments, either option may work best for you.
- Project-level: This allows for more of a “set it and forget it” method, in which the Input Calculation will be displayed for all experiments within a project and its subsequently created child projects.
- Workflow-level: This allows you to be more prescriptive in the way Input Calculations are displayed only for certain experiments, based on the workflow those experiments utilize.
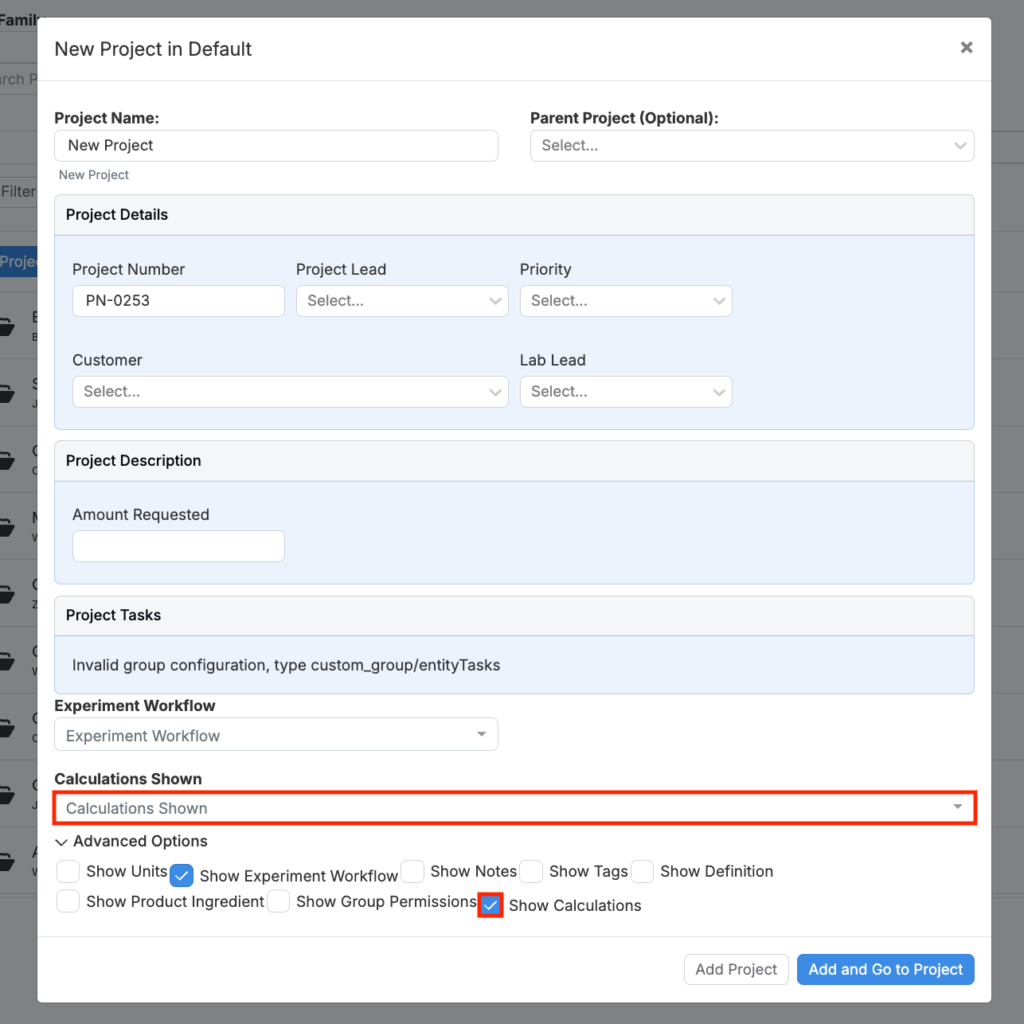
Project Level
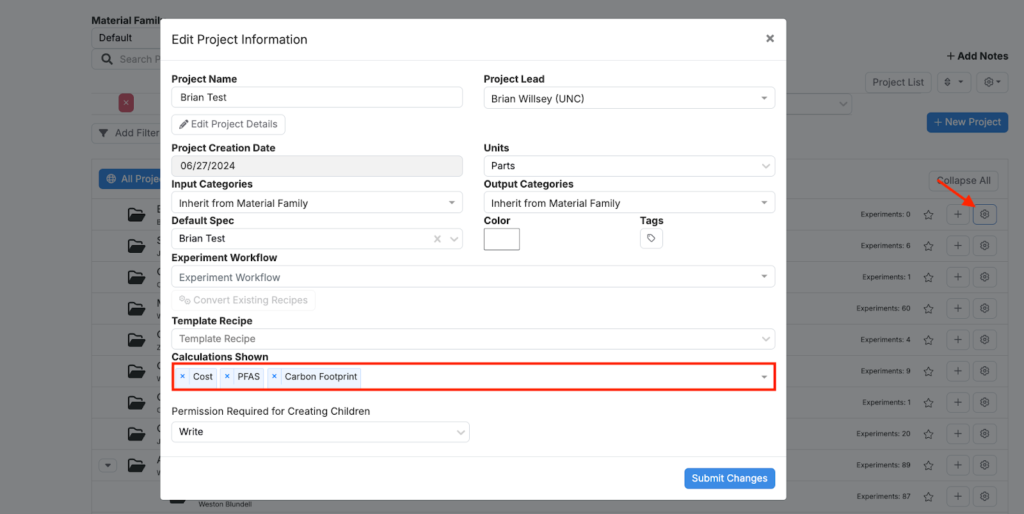
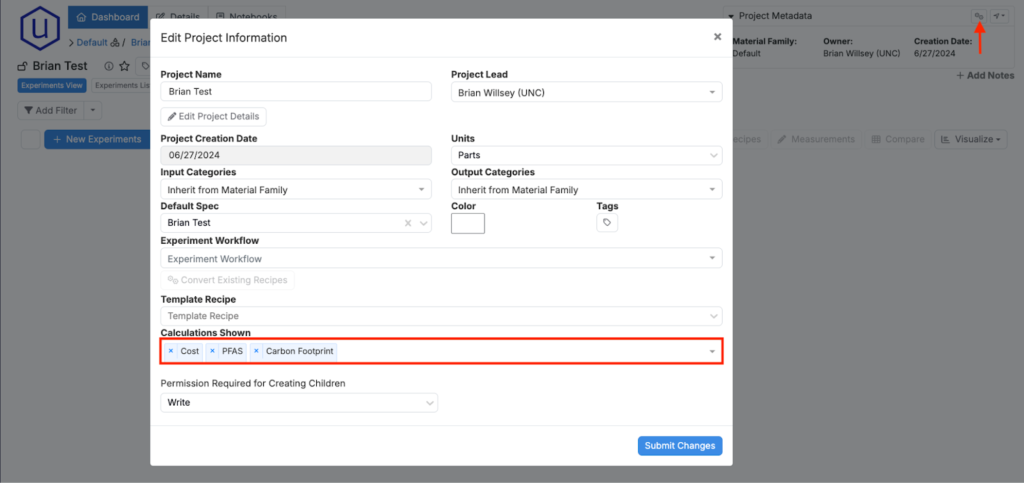
Input Calculations can be set at a project level when creating a new project by selecting existing ones from the “Calculations Shown” dropdown menu.
If you would like to enable additional calculations after creating a project, you can select the cogwheel icon next to the project name on the Select Project page, or the Project Configuration section on the dashboard of the current project (selectable via cogwheels icon):
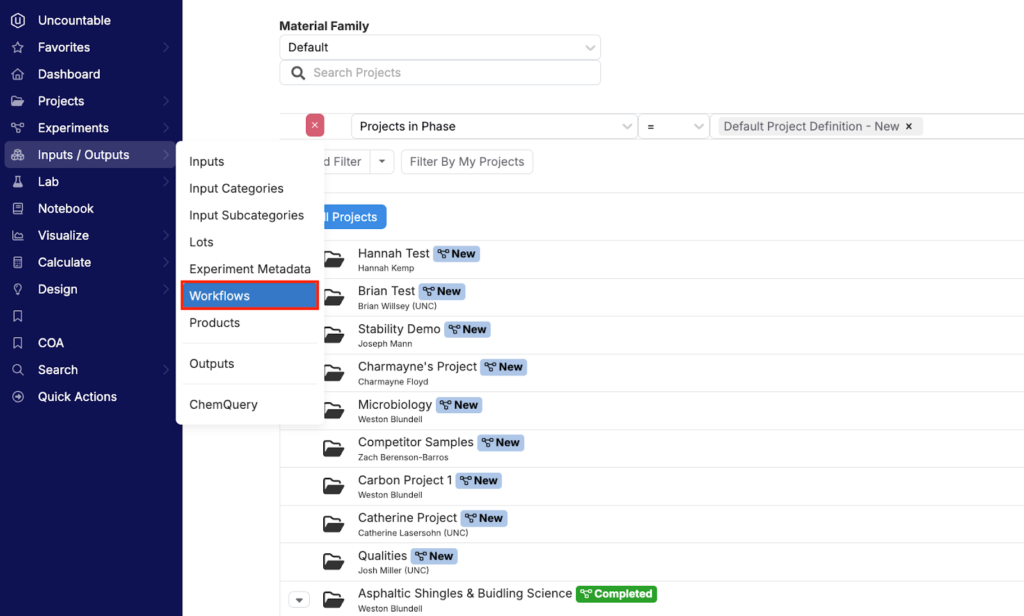
Workflow Level
For added flexibility and configurability, you may also choose to enable Input Calculations at a Workflow level. Note that calculations enabled at a Workflow level will be additive to those already enabled at a project level. In other words, calculations enabled within a Project will still appear, even if they are not explicitly enabled in a Workflow.
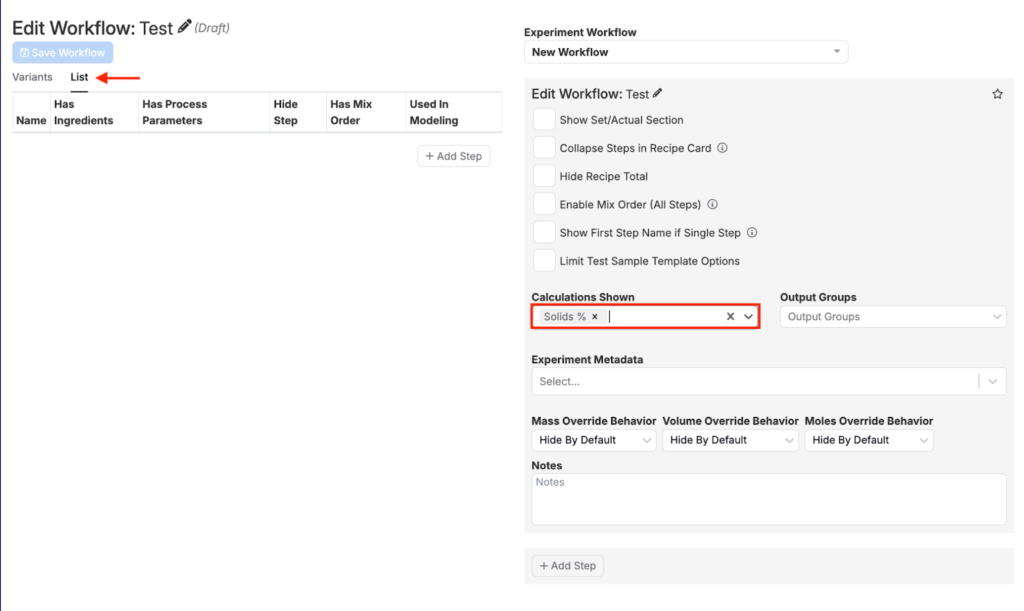
To enable Input Calculations at a Workflow level, navigate to Inputs / Outputs > Workflows from the Navigation Bar:
After selecting the desired Workflow, simply add existing Input Calculations in the “Calculations Shown” dropdown list available in the right-hand workflow settings.
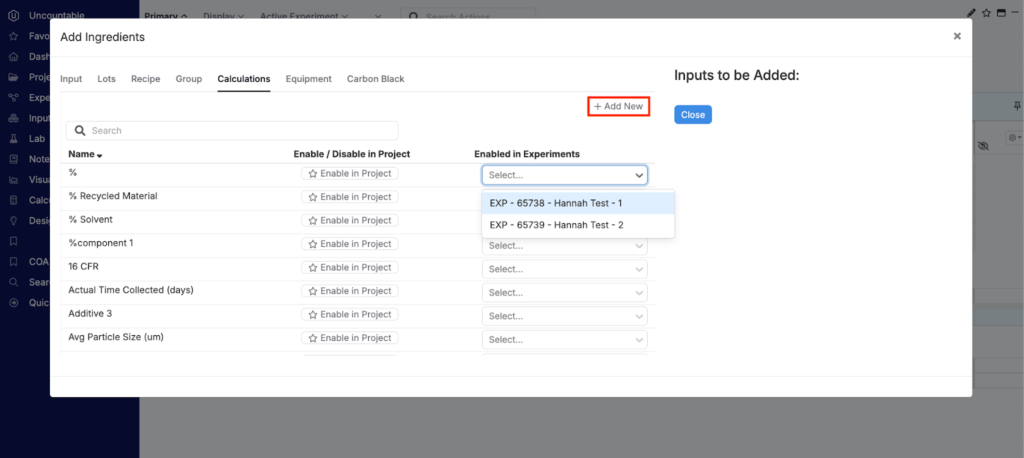
Experiment Level
When viewing the Recipe page of an experiment, you may also directly add Calculations on the page by selecting the “+ Add Calculations” button. As long as you are within a Project, and at least one calculation has already been enabled within that Project, this button will appear at the end of each Workflow Step and the bottom of the entire Recipe.
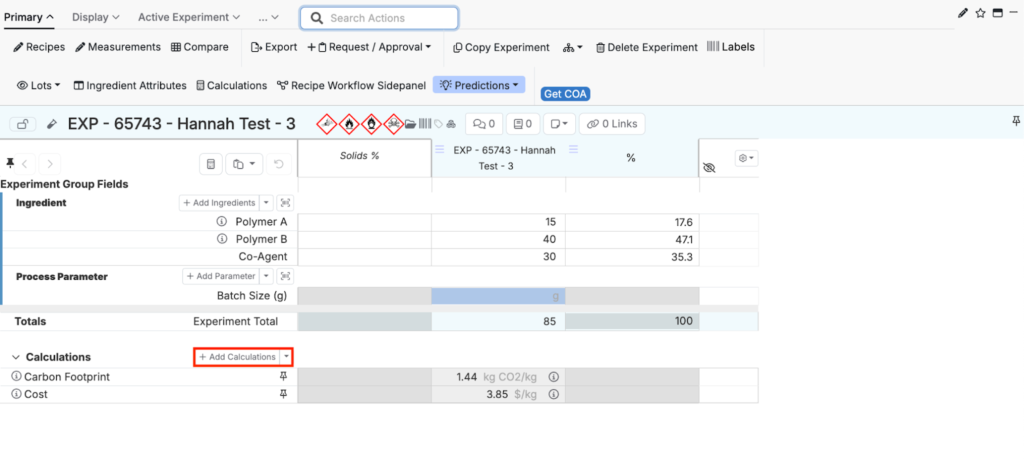
You can then enable existing calculations within the current Project or add a new calculation on-the-fly. You can also add calculations to individual experiments by selecting the experiment from the “Enabled in Experiments” dropdown menu. The main use case for enabling calculations on experiments is to associate them with an experiment published as a Variant of a Workflow. In this way, when creating new experiments from the particular Variant, those calculations will be automatically displayed. This is a useful approach to displaying calculations for only certain Variants of a Workflow.
Recipe Columns
For Weighted Sum or Weighted Average Input Calculations in which the “Display as a Column?” option has been checked (see details above), it is also possible to display these directly on the Recipe page of your Experiments.
Once on the Recipe page of an Experiment, select the Calculation button in the ribbon (a.k.a., toolbar) and click the desired calculation to show it. In the example, below, the Weight Percent calculation has been displayed, which is now visible in addition to the primary Recipe column where the ingredient amounts were entered in weight basis.
Note: The placement of the Calculations button in the ribbon may vary depending on customizations in place in your environment. You can always use the “Search Actions” field above to find the button if needed.
Calculation Sidepanel
Once enabled, Input Calculations will be displayed as additional rows on the Recipe view of your Experiments. If there is no specific workflow step associated with an Input Calculation, it will be displayed at the bottom of the recipe, otherwise it will be displayed at the end of its associated workflow step.
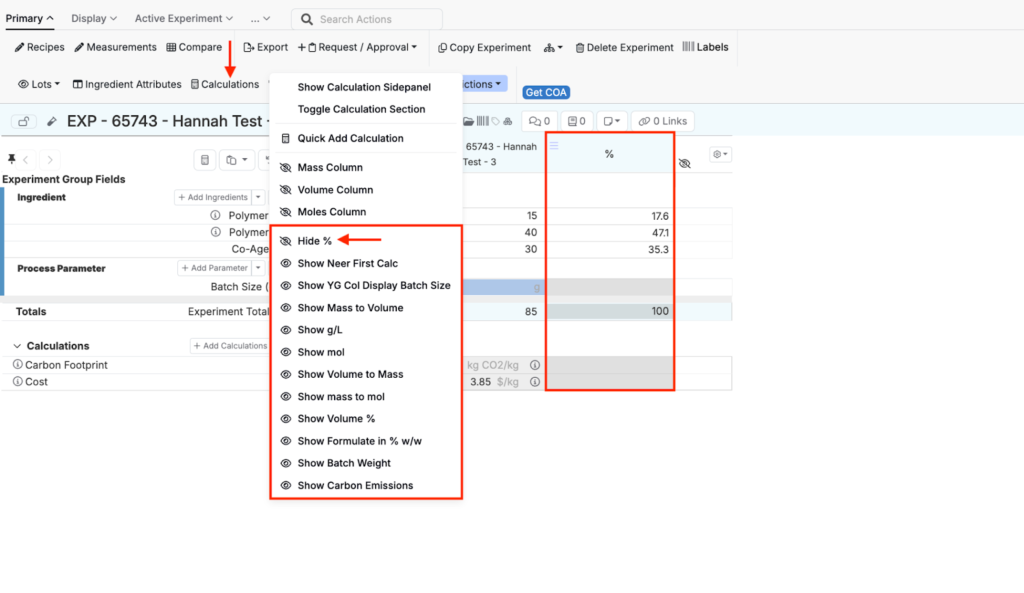
In addition to the default display of calculations as rows within the Recipe page, you may display the Calculation Sidepanel, which is also available from the Calculations button in the ribbon mentioned above. Once selected, a sidepanel will appear on the right side of the Recipe, listing all the calculations currently enabled either in the project or on the associated workflow.

By toggling the “Show individual calculation entity values” option on or off, you will also be able to see the details of each Entity contributing to the final calculated value. The Sidepanel view can also be particularly useful if you intend to use the Solver features available on the Recipe page to target specific calculated values, as part of your experiment design in Uncountable.
Quick Add Calculations
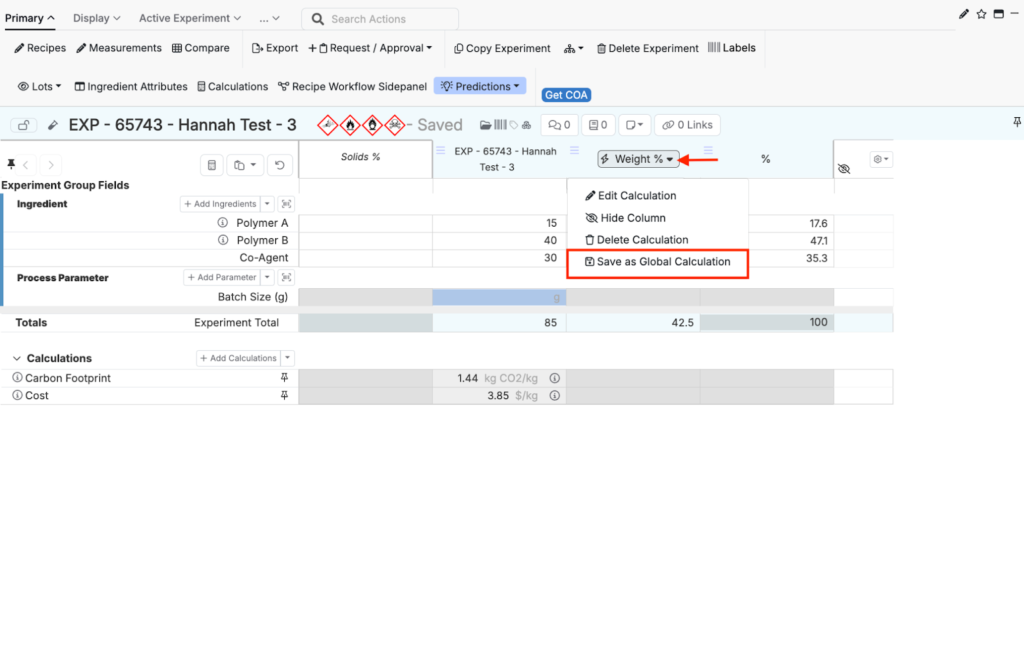
From the Calculations button available within the ribbon the Recipe view of your Experiments, you will also note the “Quick Add Calculations” button. This option allows you to add an on-the-fly Weighted Sum or Weighted Average calculation that will automatically be displayed as a column. Quick Add Calculations are detonated on the Recipe view of your Experiment by a small lightning bolt icon next to the calculation name in the column header.
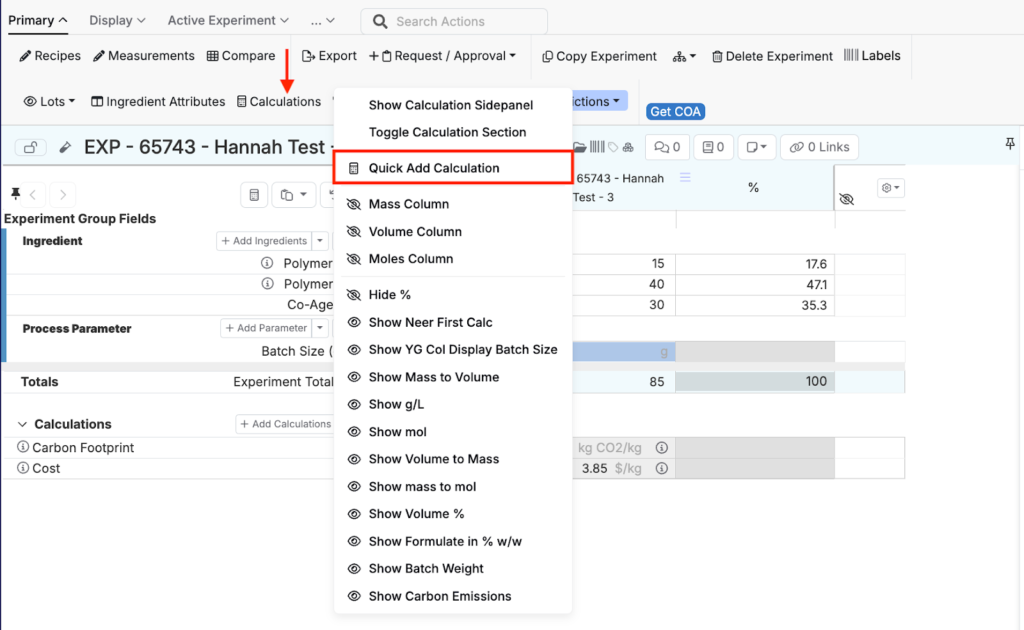
This Quick Add Calculation is available only to you, but once created you may select “Save as Global Calculation”, as long as you have permissions to add Input Calculations, to make it available to all users in your Uncountable material family.