Lab requests are an essential tool within the Uncountable platform, enabling efficient and comprehensive communication of recipe testing needs. Once a recipe (or multiple recipes) has been created, testing can be initiated by generating a lab request.
Lab Request Components
Lab requests are highly configurable to best suit the needs and workflows of different R&D teams, ensuring that each request is tailored to the unique requirements and processes of Uncountable platform users. Requests contain various fields with a phase workflow.
- Fields are data entry points to capture essential information about the lab request. Typical fields include run number, name, lab, lead, priority, desired start and end date, attachments, instructions, and experiments. Fields can also be made to have constraints (required, editable, hidden, etc).
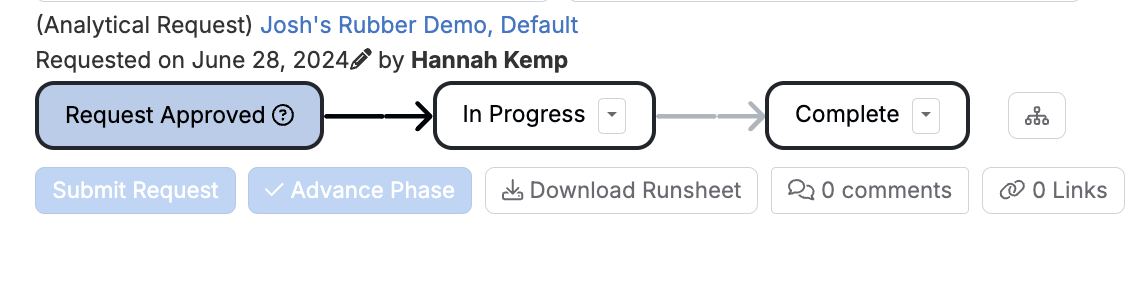
- Phase workflows are structured sequences of steps or stages that a lab request goes through from initiation to completion. Defining the stages each request must go through and the actions required at each phase ensures that all necessary procedures are followed. In the example below, the workflow contains three phases: approved, in progress, and complete.
Phase workflow can also be made to feature constraints or require reviews from assigned “reviewers” before progressing to the next phase. To add constraints or reviewers to a workflow, navigate to the Phase Workflow tab of the Form Admin or contact your Uncountable representative.
Numerous lab request templates exist within the platform. However, to configure a new request template with unique fields and workflow, contact your Uncountable representative.
Creating a New Lab Request
Lab requests can be generated directly from an Enter Measurements page or via the Lab Requests page.
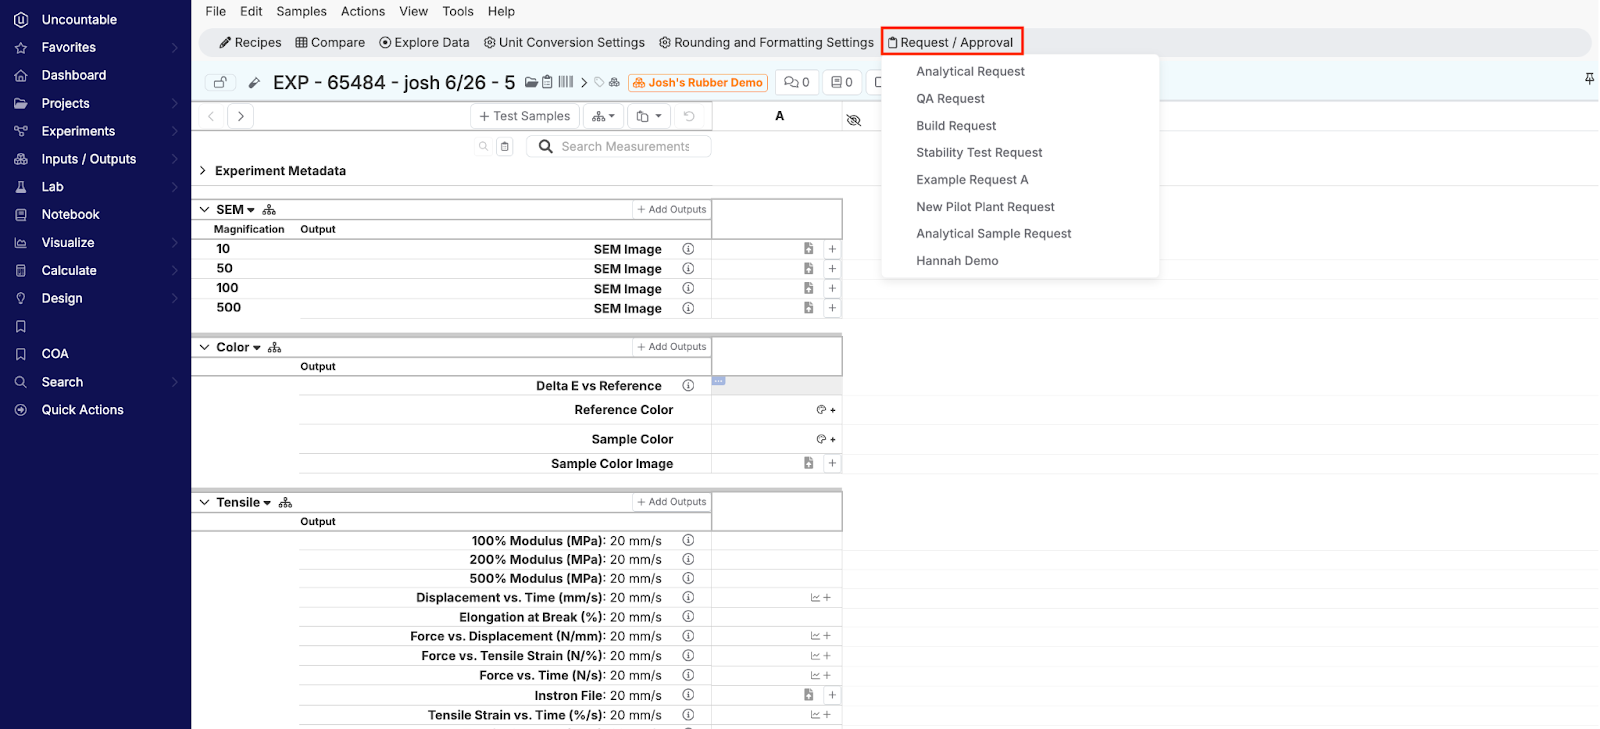
To create a lab request from the Enter Measurements page, click “Request/Approval” and select your request template from the list. This will create a ticket tied to the current recipe.
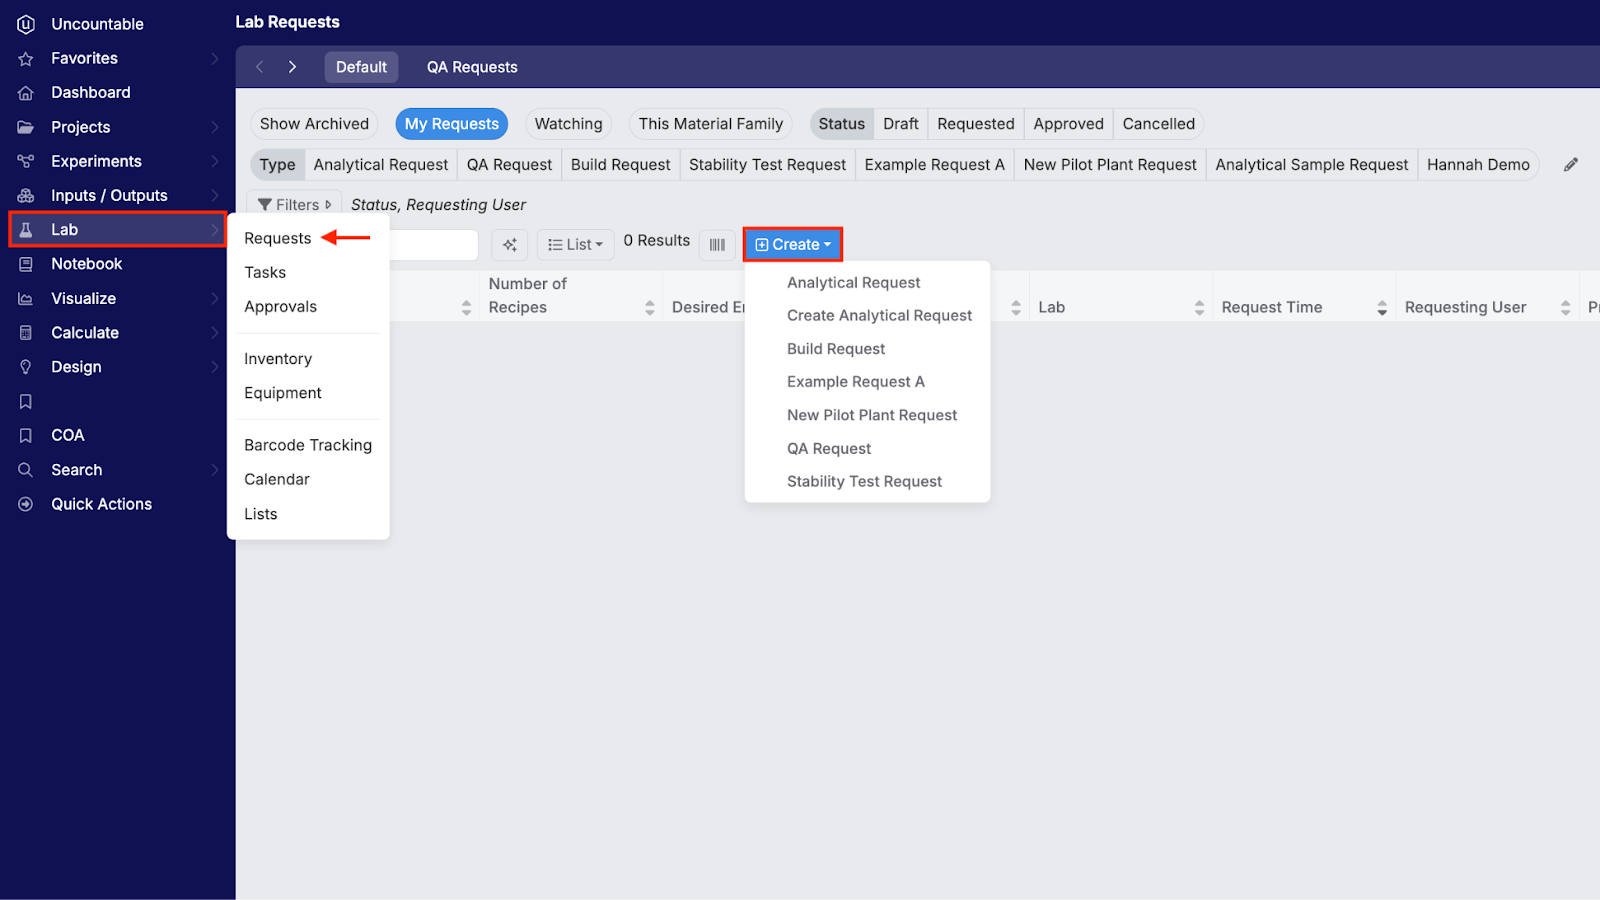
To generate a lab request from the Lab Requests page, select Lab > Requests from the Uncountable toolbar. From the Lab Requests page, click “Create” and select the desired request template. This method creates a blank ticket that will need to be manually assigned to a recipe or recipes.
Once you have generated a draft lab request, you will be prompted to configure it.
Lab Request Configuration
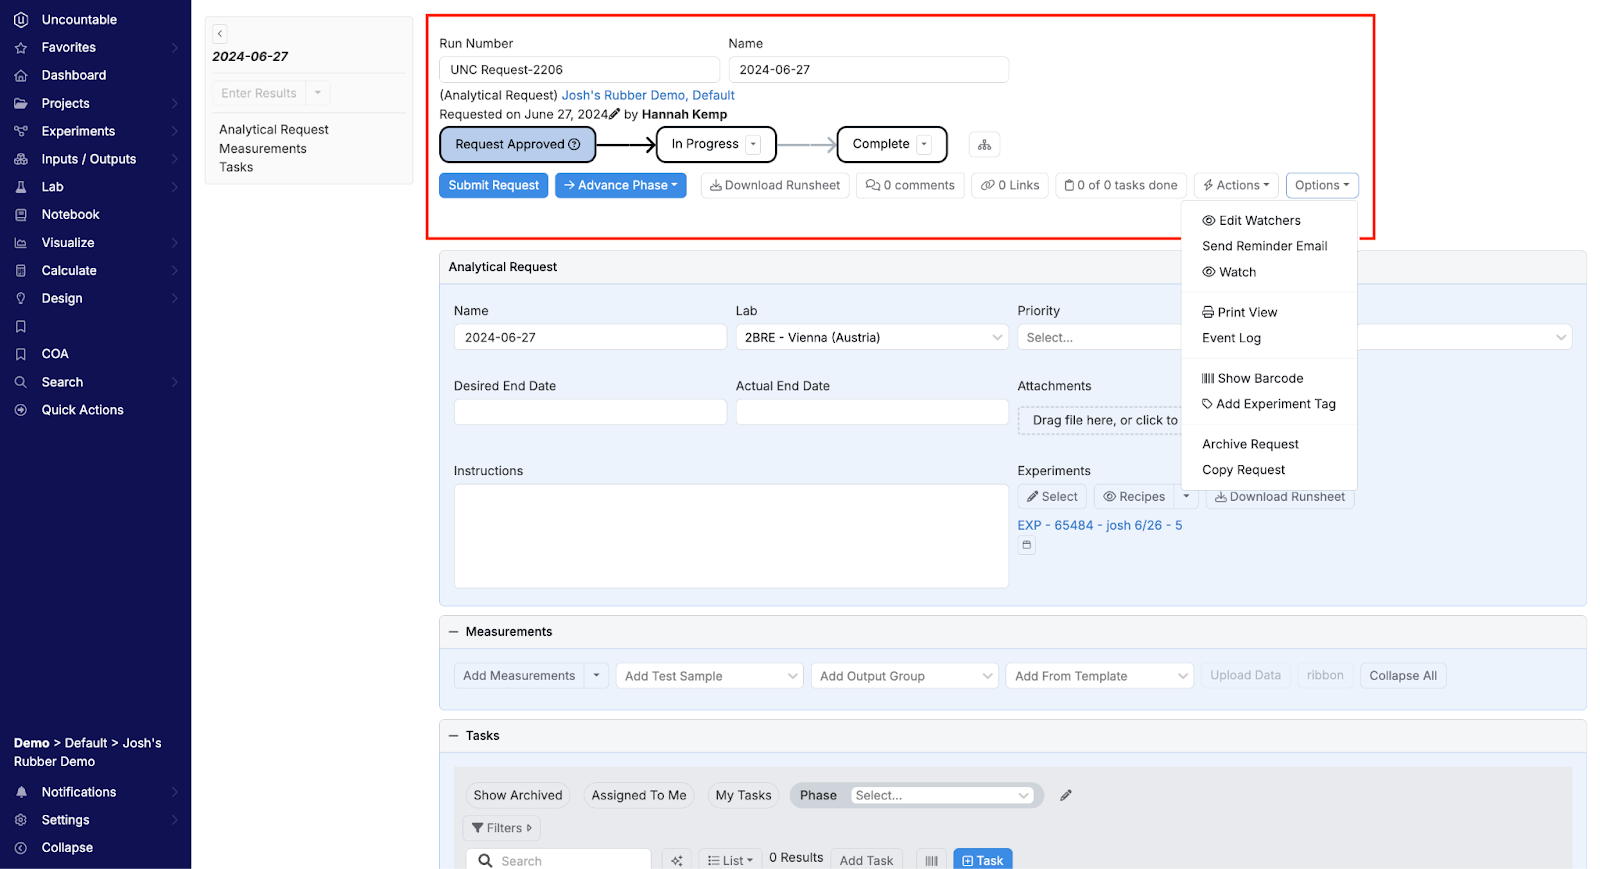
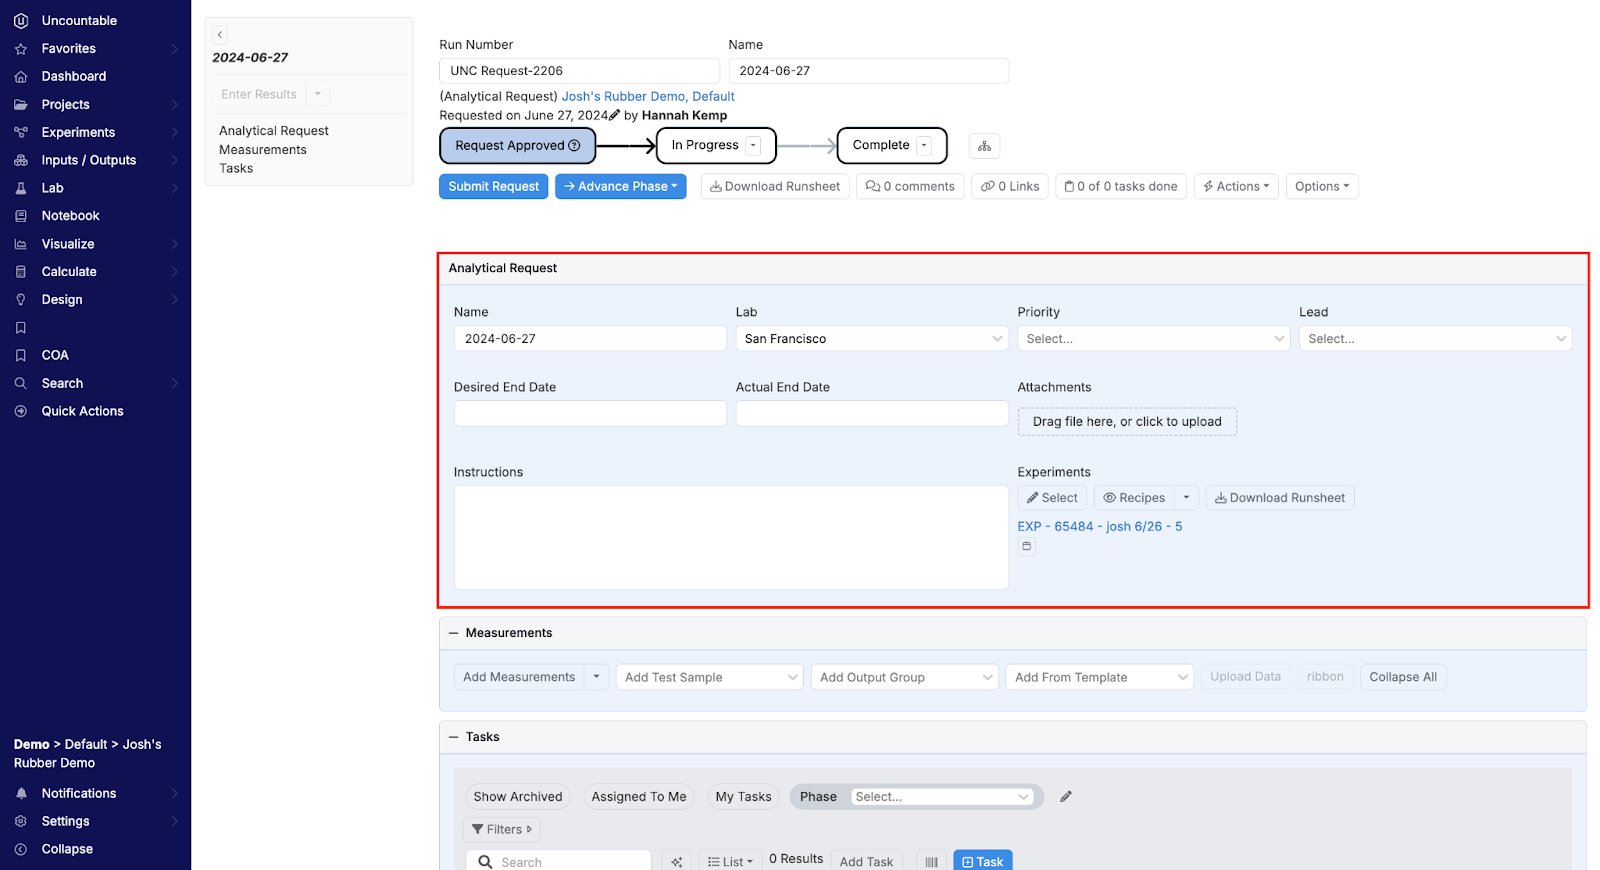
At the top of the lab request page page, you will find general information including the run number, the request name, date of request, and the name of the user who generated the request. Beneath that, the current lab request phase is highlighted in blue.
Additional buttons include options to submit the request, advance the phase, download the runsheet, and view comments, links, and completed tasks.
The “Options” dropdown menu offers additional helpful features, such as the ability to assign watchers (individuals directly alerted to updates to the request), send a reminder email, print the request, view the event log, add experiment tags, and archive or copy the lab request.
Form Section
The Form section of a lab request contains the defined fields. Here you can rename the lab request, define the lab responsible for testing, set the priority level (urgent, high, medium, or low), desired end date, and lead. The lead is the individual responsible for testing and will receive email notifications when the request is submitted and as it is updated.
In the example below, the request was generated directly from an Enter Measurements page. Therefore, the associated experiment is already linked. However, users have the ability to manually add experiments or samples to the request by clicking “Select”.
The Form section also features options to download recipe runsheets and to add additional instructions or attachments, such as documents or images, as additional context.
Measurements Section
In the Measurements section, the user generating the request can list the specific tests to run and data points to collect. Outputs and condition parameters can be added individually or by selecting groups from the test sample, output group, or template dropdown menus.
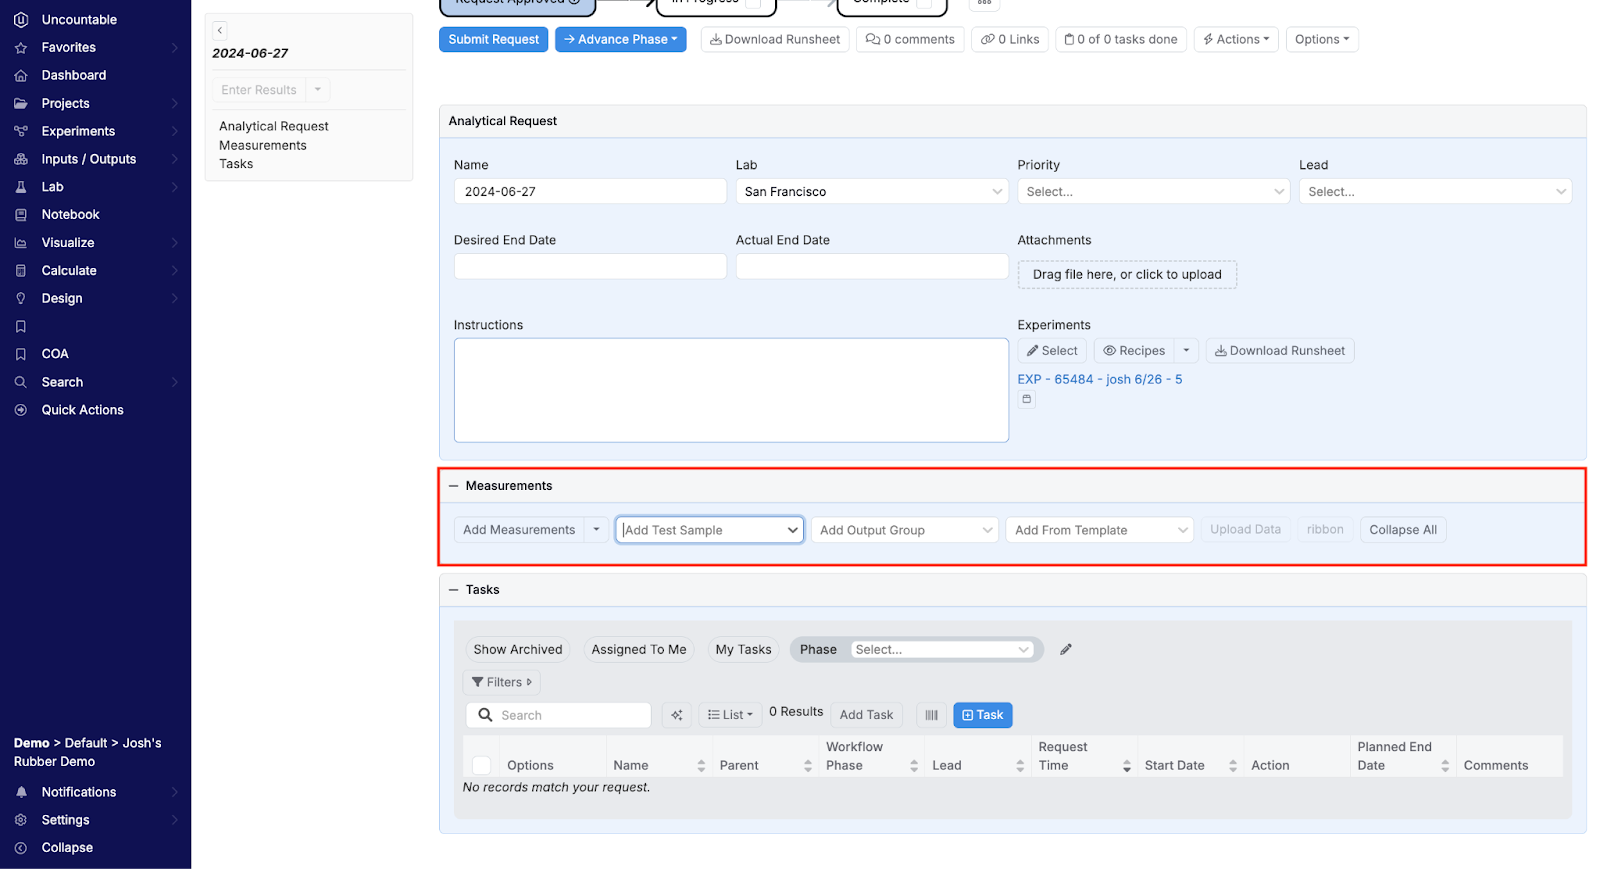
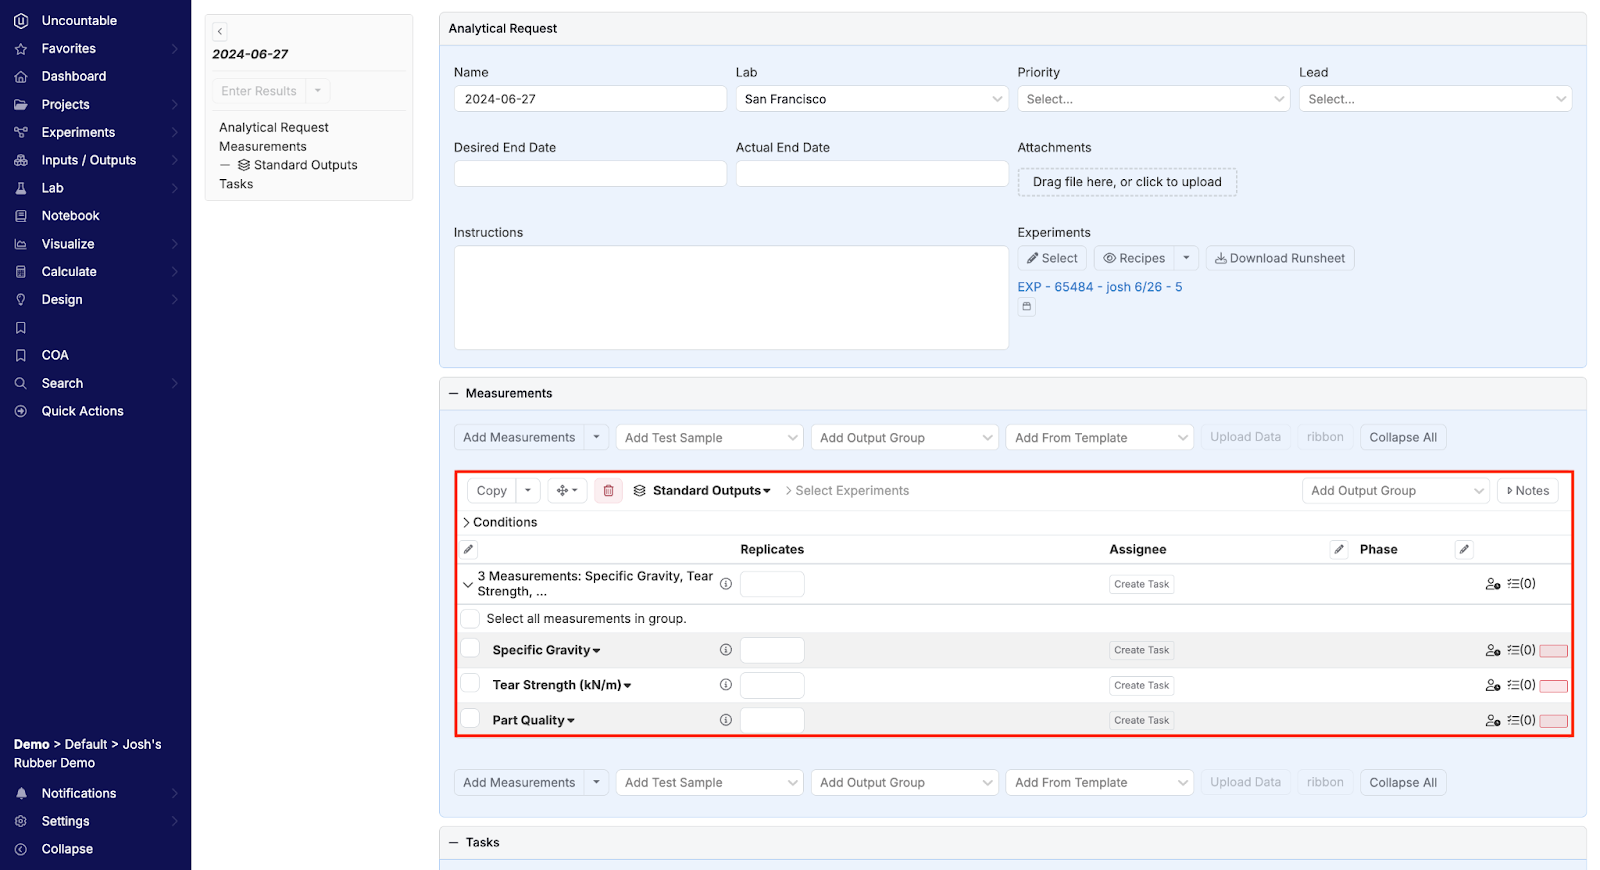
Users can select from test sample, output group, or template menus, which will load predefined conditions parameters, measurements, and inputs. (i.e. adding the “Standard Outputs” output group will automatically add specific gravity, tear strength, and part quality measurements).
After loading a test sample, output group, or template, the request can be further configured by defining condition parameters, number of replicates, and assigning individual measurements to specific laboratory personnel. If the request contains multiple experiments, output groups to specific ones by clicking “Select Experiments”.
Output groups can be copied, reordered, and removed by clicking the icons next to the group name.
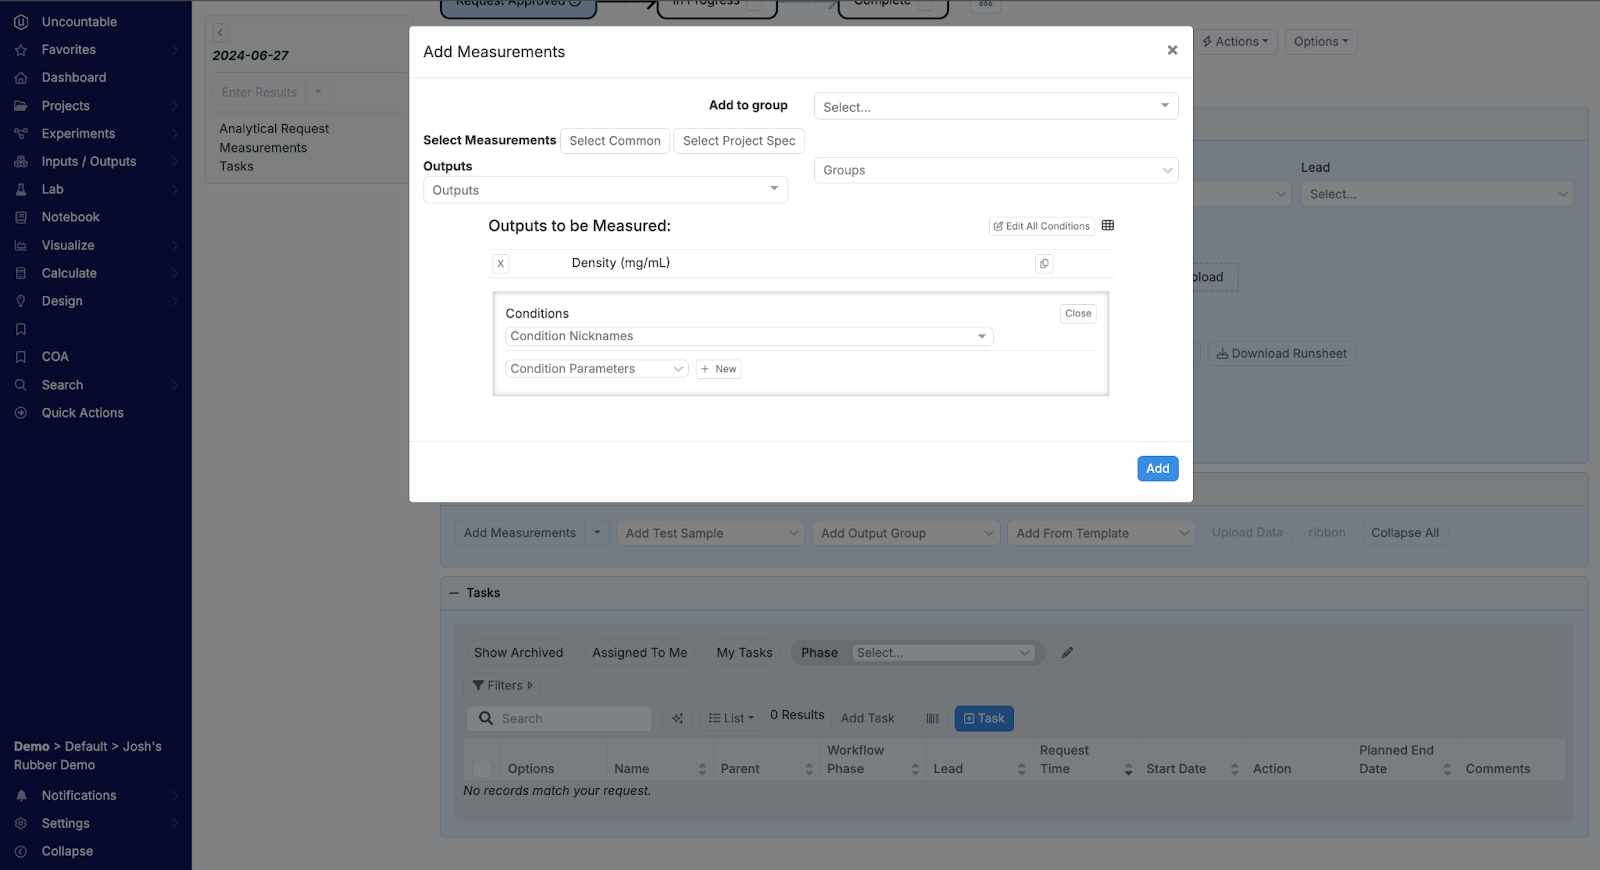
To add individual measurements click the “Add Measurements” button. From this modal, users can manually select outputs and define their condition parameters.
If an output group already exists within the request, these measurements can be added to that group by selecting it from the “Add to group” dropdown menu. Output groups can also be added in this modal by selecting them from the “Groups” menu.
Tasks Section
The Tasks section is a spot to include actionable items that need to be completed for the request. This information helps in tracking the progress of the request and ensuring that all procedures are followed.
Users can create tasks, assign them to specific team members, set deadlines, and track notifications and communications related to each. The Tasks section is particularly useful for maintaining organization and ensuring accountability within the testing process.
Filters at the top enable users to display archived tasks, filter by workflow phase, or filter by assignment. Additional filters are available by clicking on the “Filter” button.
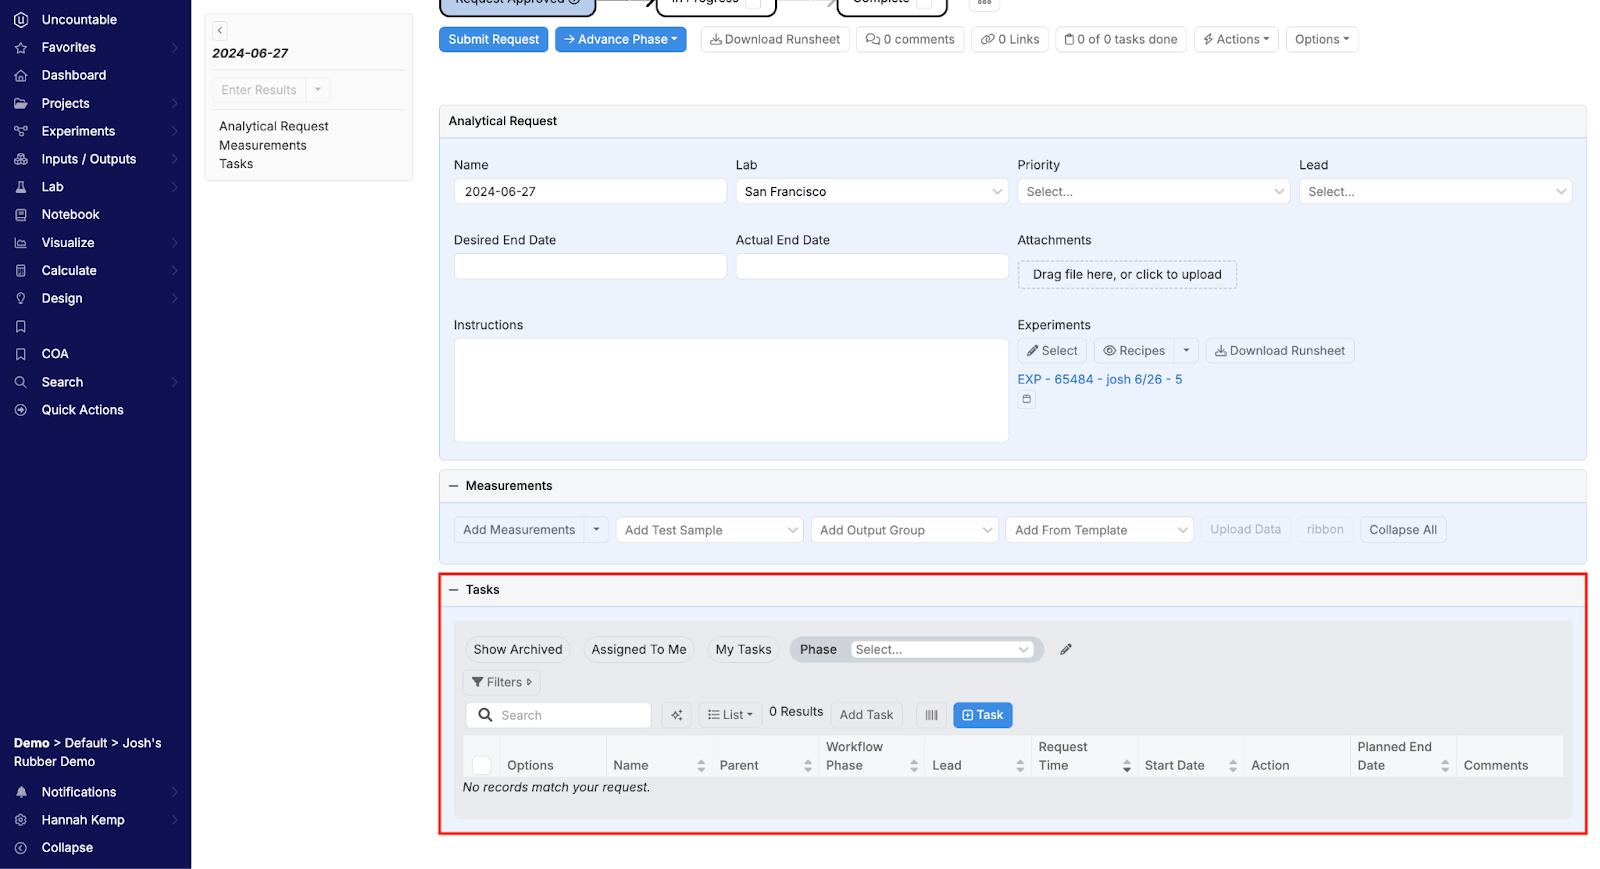
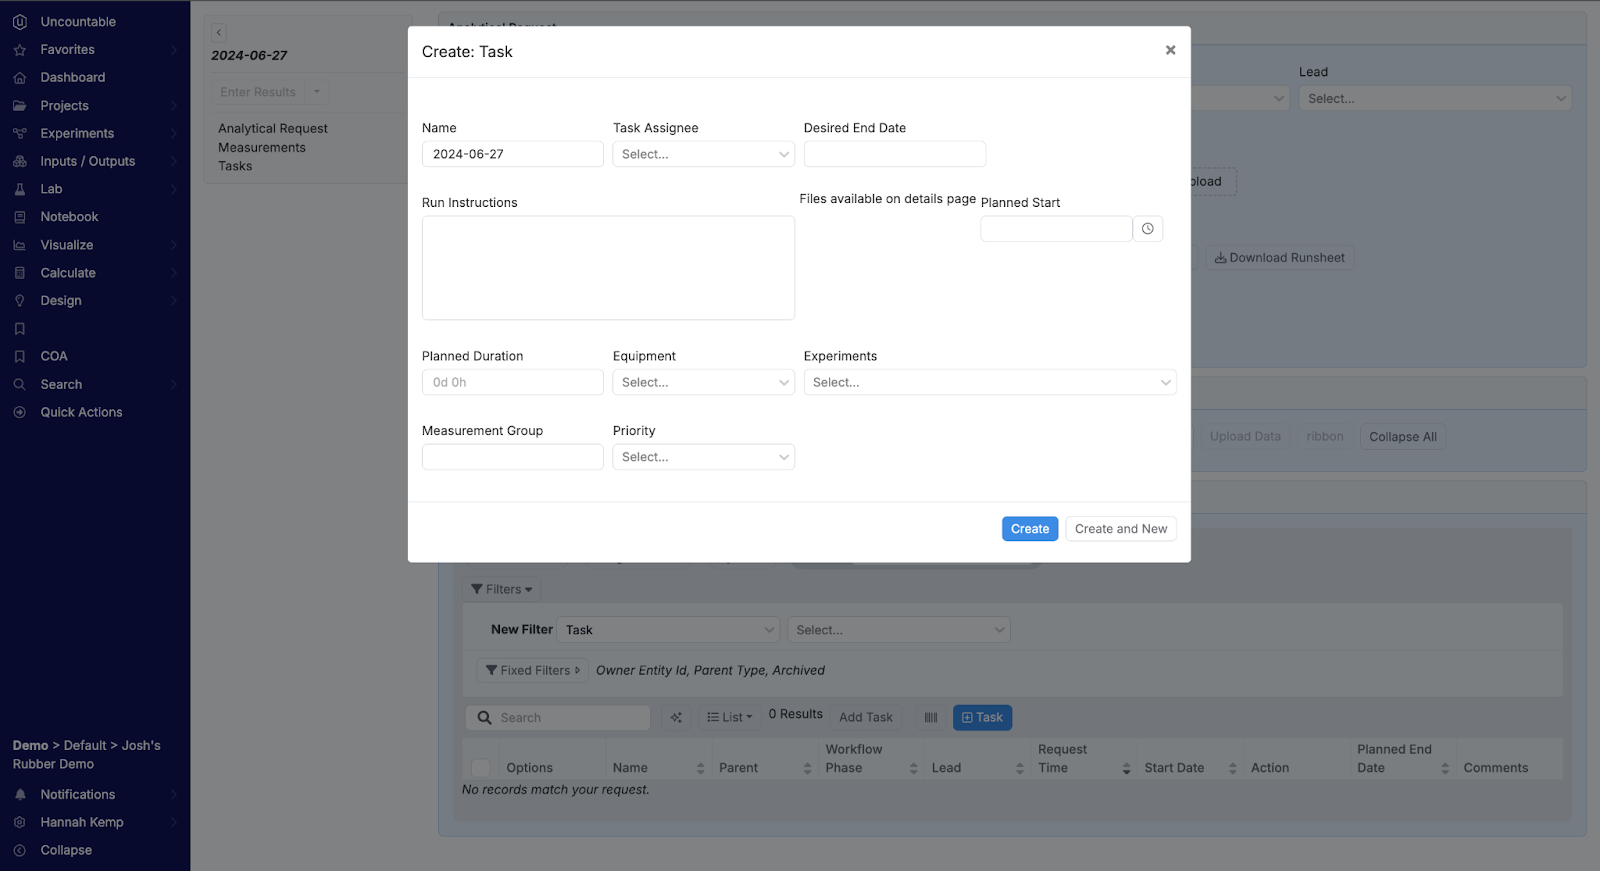
To create a new task, click the “+ Task” button. In this modal, the user can define all information essential for completing that actionable item. This includes the assignee, desired start and end date, run instructions, planned duration, equipment, experiments, and measurement group.
Once all necessary information for the Form, Measurements, and Tasks sections have been filled out, the user may submit the lab request by clicking the blue “Submit” button at the top of the Lab Request page.
Advanced Configuration Options
Lab request tickets include essential fields such as lab, priority, lead, timeline, instructions, and measurements. However, as with other aspects of the Uncountable platform, lab requests are easily customizable to best suit your needs.
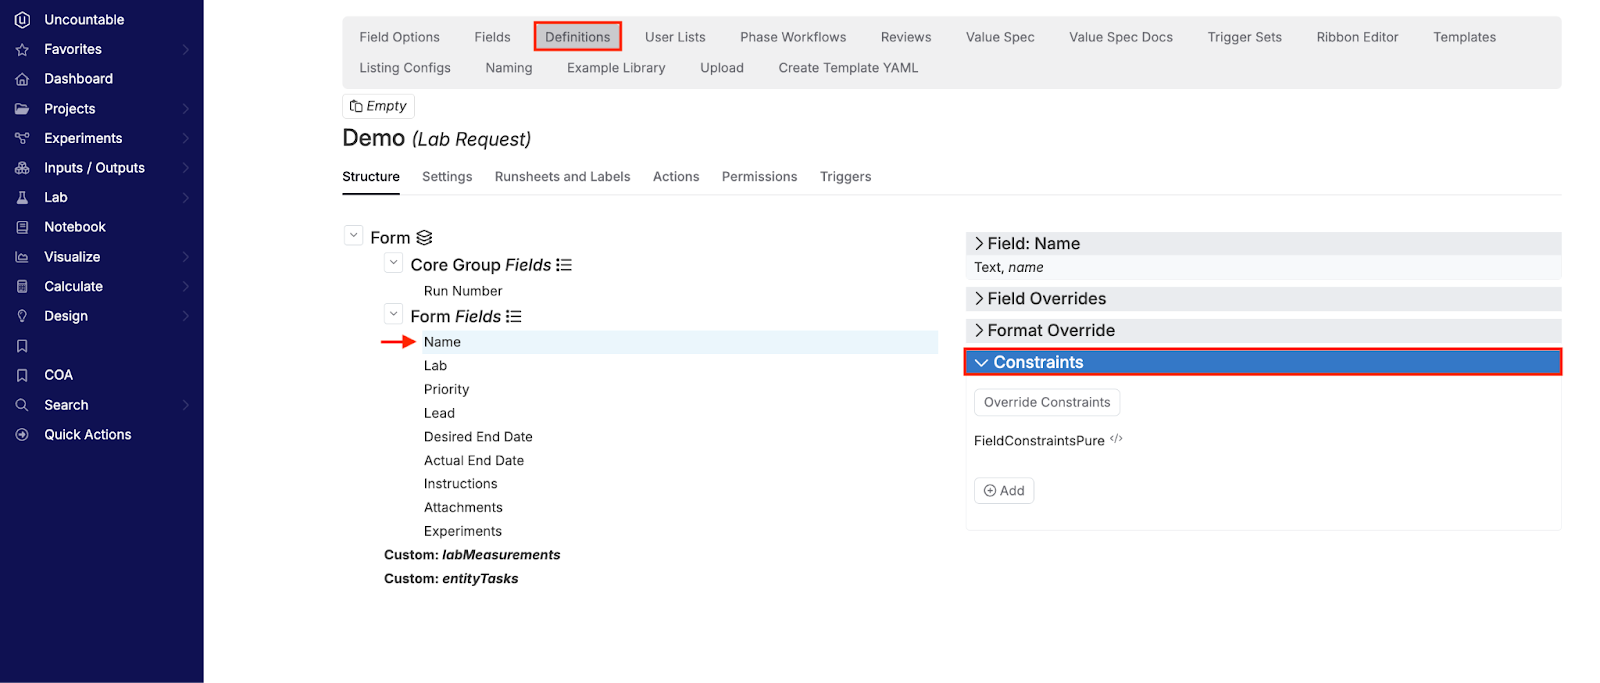
To further configure your lab request, access the Definitions tab on the Form Admin page and select your lab request from the list (i.e. “Demo”). From here, users have the ability to create and define new fields, set constraints to ensure data integrity (i.e. making a field required or limiting the input to certain values), and organize fields for easier navigation.
To create a new field, expand the “Fields” tab. From there, you can select an existing field or create a new field.
To add a constraint, select the field from the list and expand the “Constraints” tab. Here, you can choose to override or add new constraints to that specific field.
For additional advanced configuration options, such as adding new fields and definitions, contact your Uncountable representative.