Upcoming: User Administration Page Updates
To improve performance, we’re updating the tab order on the User Administration page. The User Listing tab will now appear first and serve as the default view, replacing the previous default, User Admin.
This change is the first step in a larger plan to phase out the User Admin tab entirely. While both tabs offer similar functionality, the User Listing tab is more performant and better suited for future improvements.
These updates are designed to improve load times and provide a more scalable experience for managing users on the platform.


Workflow Step Input Overrides
Uncountable users can now pre-filter the ingredients shown in the “Add Inputs” dropdown menu of a workflow step on the Enter Recipe page. When editing a workflow, use the new Input Select Overrides and Input Group Select Overrides to apply specific listing configurations—such as filters—to individual steps (or the entire workflow). This update streamlines ingredient selection, making it easier to add relevant ingredients to each recipe step.
How to Add Input Overrides to a Workflow Step
- Access the Workflow page by selecting Inputs/Outputs → Workflow from the navigation bar or using Command + K and searching for “Workflows”.
- Select the workflow to edit from the “Experiment Workflow” dropdown in the top right corner.
- Edit a workflow step by clicking the “…” associated and selecting “Edit Workflow Step”.
- Access Advanced Options in the Edit Workflow Step sidepanel.
- Edit the workflow and select a workflow step.
- Access Advanced Options in the workflow step settings.
- For Inputs Select Override and Input Group Select Override, select an existing listing configuration or create a new one.
- When creating a new listing config, you can add filters (such as category filters) to narrow down the ingredients for that workflow step.
Once configured, when adding ingredients to that workflow step in any experiment, the ingredient dropdown will respect the filters applied in the listing config.


Mobile Favorites Page Redesign for Improved Visual Consistency
The mobile Favorites page has been redesigned to bring it more in line with the visual style and consistency of the browser platform. The update includes the addition of the entity header, aligning the mobile version with the platform’s layout for a seamless user experience across devices.
With this update, any changes made to the color and icon associated with favorites on the “Edit Favorites” page will also automatically be reflected on the mobile page as well.

New Workflow Step Ordering Options
Uncountable users now have more control over workflow step order numbering. By default, steps are numbered within each workflow step. Now, you can change the numbering method to “Number Between Workflow Steps”, allowing step numbers to continue sequentially across multiple workflow steps.
How to Configure Workflow Step Order Numbering
- Edit the Workflow.
- Within the Edit Workflow sidepanel, locate the Workflow Step Numbering section.
- Select “Number Between Workflow Steps” from the dropdown menu.
Once applied, step numbers will continue sequentially across all steps in a workflow.


New Unit Format Option for Curve Output View
We’ve recently added the ability for users to change unit format for when visualizing curve data. This new functionality enhances the flexibility of curve output views, particularly when dealing with time-based data. To test out this new feature, take the following steps:
- Add a curve output to an experiment.
- Enter data into the curve table for the x and y-axises to generate the graph.
- Access the Visualize Curve Data page (Visualize → Visualize Curve Data) and select your curve.
- Access the Chart Settings (A) and click the pencil icon next to the “Custom X Unit Format” (B).
- Select the unit you want to display (i.e. minutes, hours, days, weeks, months, or years).
Once saved, the curve will update to reflect the change in units.
Whether you need to convert from minutes to hours or days to weeks, this new feature offers more flexibility when visualizing curve data.


Updates to Inventory History
We’ve made several updates to Inventory History which provide a more structured and transparent way to track inventory changes, ensuring better data organization and auditability. Key changes include:
- “Reason for Change” Field Constraints
- Admins can now apply constraints to the default “Reason for Change” field on the Inventory History definition. This allows you to make the field required when updating quantities on the Inventory listing page.

- Adding Other Custom Inventory History Fields
- Users can also add additional fields to the Inventory History definition to capture more information about changes in inventory.
- When updating inventory quantities on the Inventory listing page, these fields will appear in the “After Quantity” popover modal.

- Display of Inventory Changes
- Any information entered into the “Reason for Change” will be displayed in the Reason for Change column of an inventory’s history listing.
- Accessing an Inventory History entry navigates to an entity page showing all fields and information entered when updating the quantity.


Enhanced COA Customization
We’ve introduced new customization options which allow users to create and export Certificates of Analysis (COAs) in various formats. This update includes the ability to add custom tables to a COA and populate those tables from listing configurations and recipe outputs using new value spec commands and triggers. Key changes include:
- Adding Custom Tables: Add a Data Table or Information Table field to a COA custom entity definition.

- Populating Custom Tables: Use the “custom_table_from_structured_list” value spec command to pull data into a structured table format.


- Modifying Table Layouts: Utilize commands like “table_remove_rows_and_cols” to remove rows and columns, hide headers, or transpose tables as needed.

For more details on the new value spec commands, refer to our in-platform value spec documentation.
New Label Editor “Page Mode” for COAs
As a part of COA customization update, we have also introduced new features in the Uncountable Label Editor to help with COA creation and formatting. These updates include new Page and Page Template tabs with formatting controls and support for COA custom tables. Key changes include:
- Page Tab: Enable “Page Mode” to switch from a label card format to a COA layout. This tab also allows adjusting the COA’s page width and height.

- Page Template Tab: Add padding, headers, and footers to the COA for better structure and readability.

- Custom Tables: Insert custom tables in the Card tab using value spec or inline editing. For more details on COA custom tables, refer to the dedicated update.

Customizing the Navigation Bar
Users can now customize the appearance of the Uncountable navigation by hiding top-level navigation bar section. These changes will apply to all users within that schema.
To customize the navigation bar, access the Customize Appearance tab of the Company-Wide Settings page. In the “Top-Level Navbar Sections to Hide” menu, select pages to remove from the navigation bar. Once selected, upon refresh, these tabs will no longer appear in the bar on the left side of the screen.


Saving Actions to View Preferences
Uncountable users can now save “Active” actions to their View Preferences on both the Enter Recipe and Enter Measurement pages. With this update, sections in the Configure Actions sidepanel include:
- Admin: Admin-configured actions, which are visible for all users.
- User: User-configured actions, which are visible only to the individual user.
- Active (New): User-configured actions, which will be saved alongside column and naming configurations when saving a View Preferences.
Steps to Save Actions to a View Preference
- Access the View Preferences modal and select and load a preference.
- Open the Configure Actions sidepanel and add actions to the “Active” section.
- Return to the View Preferences modal and save the updated preference.
This update increases the functionality of View Preferences, helping users save time during experiment setup by automatically populating relevant actions when loading their workflow-specific preferences.


Default Test Methods at the Workflow Level
We’ve recently added the ability to assign default Test Methods at the workflow level, saving users time and ensuring consistency when creating test samples.
To assign a default method to a workflow, take the following steps:
- Select the workflow to edit.
- In the Edit Workflow sidepanel, use the “Default Test Method” window to search for and select a test method.
Once set, any new experiment created using that workflow will automatically populate the default test method when adding a test sample


Export Lot Metadata from the Enter Recipe Page
Lot metadata is now included when exporting from the Enter Recipe page. Previously, exported files left lot metadata columns empty. With this update, these columns will now populate correctly, ensuring all relevant data is captured in your exports.


Assigning Experiments to Products via the Experiment Listing Page
Uncountable users can now use the new “Recipe Products” column to assign products to experiments directly from the Experiments listing page. Adding a recipe to a product also links it to the project that product belongs to.
To enable this column, go to List → Set Columns, open the Select Columns modal, and add the Experiment Products column.

Once added, you can directly edit the product associations for each recipe from the listing.

For bulk updates, select multiple experiments in the listing, open the Selection Menu, and choose Toggle Bulk Editor to efficiently edit product associations across multiple recipes at once.
Clearer Archive Status for Entities
When archiving an entity on the Entity page, the platform will now display a prominent “Archived Page” banner instead of a small tag next to the name. This update makes it immediately clear that the entity is archived, reducing confusion and improving visibility.

New Features for Inventory Management
Uncountable now offers more flexibility when setting inventory quantities. When selecting “Set Inventory”, choose from two options in the Quantity to Set menu:
- Remaining Amount: Directly set the total quantity remaining in inventory.
- Amount to Remove: Specify the exact amount to deduct from inventory.
These options provide greater control over inventory adjustments, making it easier to track and manage stock levels accurately.
We’ve also introduced scale integration. Now, when setting or moving inventory, users can now connect directly to a scale by selecting “Scale” in either the “Amount to Remove” or “Remaining Amount” field.


Deep Copying Recipes with Intermediates
We’ve recently introduced support for “deep copying” recipes, allowing users to duplicate recipes along with their premixes or intermediates.
To copy a recipe, including all intermediates, begin by copying the recipe as normal. Within the Copy modal, toggle on the under “Copy Deep Recipes” setting under Advanced Options. This action will now copy not just that recipe but also any intermediate recipes that were used to create it.
In the example below, Toxicology Assay – 34 belongs to a recipe tree that includes five intermediate recipes, visible in the Related Recipes side panel. After deep copying the experiment, opening the Related Recipes panel for the copied Toxicology Assay – 34 shows that not only the top-level recipe was duplicated, but all five intermediate recipes were also copied and linked accordingly.

Update to “Advance Phase” Options
To free up vertical space, all Advance Phase buttons displayed beneath phase workflows are being removed. Instead, users will be able to advance phases via a new menu to the right of the workflow or by clicking directly on the phase to transition into it.
Note that these changes do not apply in cases where the Approve and Advance buttons are displayed above the phase workflow, such as on Lab Requests, Approvals, and Reviews.
This update is scheduled to go live on Monday, March 31.


New Spectroscopy Tools for Curve Analysis
Uncountable now offers spectroscopy tools for analyzing curve outputs on the Enter Measurements page.
Steps for Spectroscopy Analysis of Curves
- On the Enter Measurements page, select a curve output and click Go to Spectroscopy Analysis in the Measurement Details window.
- On the Spectroscopy Analysis page, select a spectroscopy type: NMR or LC-MS.
- Add peak labels by clicking and dragging on sections of the curve. Each label added appears in a table.
- In that table (A), associate molecules with peaks and assign reference numbers. Molecules associated and their spec data will appear in a secondary table beneath (B).

NMR: Adding Curve as a Recipe Output
For NMR analyses, there’s also an option to save results back to the original recipe by clicking Save to Recipe as Output button beneath the data table (C). This adds the curve as an output and displays labeled values directly on the Enter Recipe page as inputs.

To use these new features, enable Spectroscopy Analysis Tools on the Platform Config tab of the Company-Wide Settings page.

New Attribute Source Filters for Weighted Calculations
Uncountable now supports Attribute Source filters in Weighted Sum and Average input calculations, providing more control over when specific attribute sources apply to ingredients.
With this update, users can now filter attribute sources within calculation components. Click the cog icon associated with a component in the Select Weights section, then use the filter icon next to an ingredient attribute to apply an attribute source filter.
For example, in a Weighted Sum Calculation with a weight called “Active or Solids,” you might have two ingredient attribute sources: % Active and % Solids. By setting an attribute source filter to apply % Active only when the input category is Polymer, the calculation will automatically use % Active for polymers and % Solids for all other ingredients.
This enhancement makes weighted calculations more precise and adaptable, especially for complex formulations.


Improved Field Option Management
We’ve recently made improvements to how field options are managed within the platform, including new subset filtering options and drag and drop reordering.
When editing a field option with subsets, you can now select a subset from the dropdown menu and click Only Show Subset Field Options. This will display only field options within that subset, simplifying your view.

Additionally, all field options can now be reordered with a simple drag-and-drop, making organization more intuitive and efficient.
New Workflow Step Filters for Weighted Sum and Average Calculations
A new Workflow Step filter has been added to Weighted Sum and Average calculations, giving you more control over how values are pulled from different steps in your workflow.
To add a Workflow Step filter, create or edit a Weighted Sum or Average calculation. In the Edit Calculation modal, click Add Filter and select Workflow Step from the dropdown menu. This lets you limit calculations to values from specific workflow steps, refining your results.
Consider a simple example in which you are calculating the total mass of Filler in a multi-step workflow. By applying a filter to include only the “First (Main)” workflow step, the calculation will only pull filler amounts from that step. So, if the first step has 10 g of Filler and a second step adds another 5 g, the calculated total will correctly reflect only the 10 g from the first step.


Copy Values Across Rows for Recipe Step and Ingredient Fields
A new Copy Across Row feature has been added for Recipe Step and Recipe Ingredient fields, making it easy to apply a field value to all recipes in view.
For example, if you want to set the # of Coats recipe step field across multiple recipes, simply right-click the desired cell, select “Copy Across Row”, and the value will instantly populate across all recipes in view.
You can also use this feature to quickly clear values by selecting an empty cell and copying it across the row. This streamlines updating field values, saving time and ensuring consistency across recipes.

New Calculation Filter: Same Workflow Step
You can now limit calculations to only pull ingredients from the same workflow step, providing more control over multi-step recipes. Previously, calculations acting on specific ingredients would also include ingredients from preceding steps.
To apply this, edit the calculation and add the new Same Workflow Step filter. Ensure that the Display in All Workflow-Level Calculation Sections display setting is also enabled.

In the example below, the Part B workflow step includes a Part A 50% component, meaning 50% of the mass of Plastic 8 from Part A is factored into Part B’s calculations. This results in a total mass of 30 g — 10 g from Part A and 20 g from Part B.

Applying a Same Workflow Step filter to the calculation directs the platform to consider only the current workflow step, ignoring others. As a result, the total mass is 20 g, solely from Part B.

Changes to Categorical Output Configuration
Categorical outputs now support Fixed List (Single) and Fixed List (Multiple) types, introducing the ability to create multi-select output fields using an ID list. This update aligns categorical outputs with our entity and field systems, creating a more consistent, flexible, and integrated platform experience.
Steps to Configure a Categorical Output
- When creating a new categorical output, select either Fixed List (Single) or Fixed List (Multiple) as the Output Type.
- Beneath the output type, click the pencil icon and select an id source from the dropdown menu.
- Once the ID source is selected, define the field options associated with that ID source.


Once configured, add the output to a recipe on the Enter Measurements page as normal. Adding the output will add a selection menu to the output cell, allowing users to choose from the list of field options associated with the selected ID source. Selected field options will also be visible on the Compare page.


Recipe Data Sidepanel Progress Bars
The Recipe Data sidepanel now includes progress bars, providing a clear visual representation of your recipe formulation progress at different levels of granularity. The progress bars indicate the percentage of actual recipe values that have been inputted.
- Top Progress Bar: Displays the overall progress for all recipes in view, based on the number of cells that have assigned values.

- Recipe-Specific Progress Bar: Tracks the progress of the currently selected recipe, showing the percentage of filled cells for that recipe.
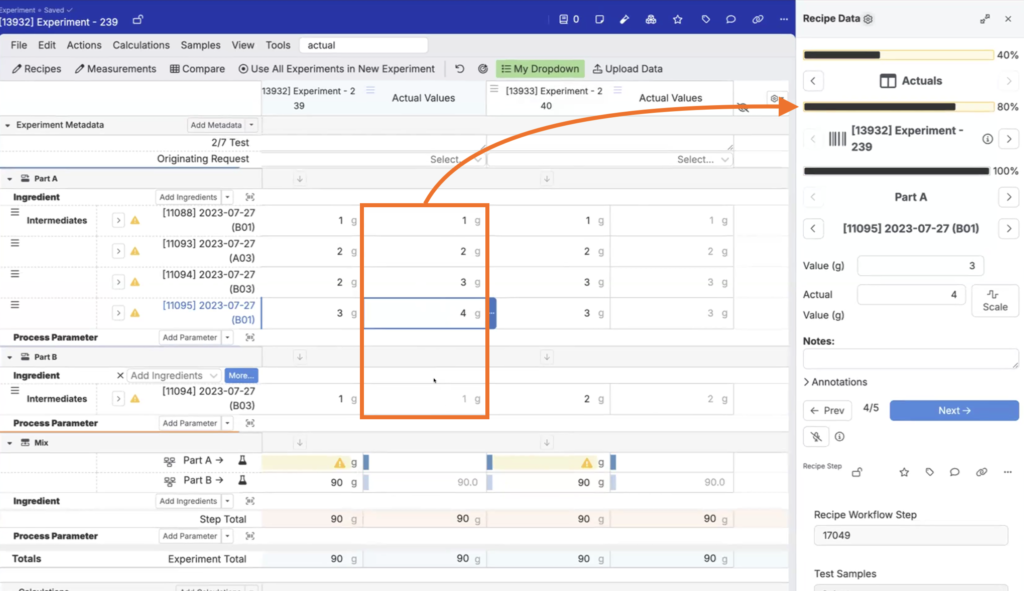
- Workflow Step Progress Bar: For multi-step workflows, this bar reflects the progress of the specific workflow step within the selected recipe.

As you interact with a recipe and select specific cells, the progress bars dynamically update to reflect the filled and unfilled cells for that particular recipe and workflow step. This visual feedback ensures you can easily track your recipe formulation progress at every level.
Export Labels via Trigger or Entity Action
Uncountable now supports exporting labels through both trigger actions and entity actions, providing more flexibility and automation in label generation.
By assigning a reference name to a label, users can configure a trigger to export specific labels automatically. Additional variables can also be set to control how and when the trigger executes.


Labels can also be exported via entity actions, allowing users to manually trigger an export from an entity or entity listing.

When the export is complete, users receive an in-platform notification and the exported label is added to the File Folders.

For a detailed guide on setting up label exports, refer to the dedicated article on this topic.
Configure Reset for User Configurations
A new Configure Reset User Configs modal on User Configs tab of the Form Admin gives admins more control when resetting user configurations. Within this modal, you can now filter which configurations to reset by Base, Scope, and Subscope.

Steps for Resetting User Configurations (Admin)
- Access the User Configs tab of the Form Admin page.
- Click the “Configure Reset User Configs” button.
- Within the modal, set the Base (required), Scope, and Subscope of configs you want reset.
- Select either:
- Reset to Admin Settings: Deletes personal configs for the scoped listing configurations, enforcing admin defaults.
- Import Admin Settings: Merges admin quick filters and tab order into existing personal configs, without removing the user’s columns or filters.

Previously, we could reset user configurations by base alone by selecting from the menu at the bottom of the page. While this option is still available, the new method gives admins more precise control over which configurations are reset and how the reset is applied.

New User-Controlled Reset Options
Platform users now also have more flexibility when resetting personal listing configurations. New options in the Select Columns modal let you choose exactly what to reset — columns, filters, sorts, quick filters, etc. — back to admin defaults. Resets can now apply across all tabs on a listing page, not just the current one.
Steps for Resetting User Configurations (User)
- Access the Select Columns modal of any listing page (List → Set Columns).
- Select the “Reset” button.
- Select from the following new options:
- Custom: Reset columns, filters, sort, and quick filters individually.
- Reset Tab to Default: Quickly reset everything in the current tab, equivalent to selecting all Custom options.
- Clear Tabs: Apply changes across all tabs at once, simplifying multi-tab management.
- Merge Defaults: Bring in admin defaults for tab order and quick filters across all tabs without touching personal columns or filters.
These new options make it easier to manage personal configurations and offer a faster, more flexible way to align with admin defaults across multiple tabs.


Rename Entity Column on Enter Pages
You can now rename entity field column names on Enter pages, giving you more control over how you view and organize your data. Editable columns include Attributes, Recipe Step Fields, Equipment Fields, and Ingredient Fields.
To rename a column, click on a its header, select Rename Column, enter your preferred name in the modal, and save.


This renaming is a personal override, meaning it won’t change the actual entity name — just your view for all recipes within a project. If you remove and re-add the column, it will reset to the original name. To keep your changes, save them as part of a View Preference. Learn more about View Preferences.

“Test Sample Templates” Terminology Change and Update
There have been a few recent updates to Test Sample Templates. Going forward, “Test Sample Templates” will now be referred to as “Test Methods”.

Additionally, users can now attach a Template Experiment to a Test Method. Any test samples created using that Test Method will automatically be a copy of the Template Experiment, streamlining setup and ensuring consistency across your tests.


New Feature: Reverse Relations
You now view linked entities in reverse, making it easy to find and display all connections from a given entity type. This feature is available on all single ID fields, providing greater flexibility when navigating entity relationships.
How to Add a Reverse Relation Column:
- Go to List → Set Columns.
- In the Add Columns tab, configure the following:
- Column Type: Select Reverse Relation to display linked entities in reverse.
- From Which Entity Type: Choose the entity type you want to display in the new column.
- From Which Column: Select the specific field in that entity type that creates the link.
Example: Reverse Relation in Inventory Listings
On the Inventory listing page, you can add a “Location” column to show where each inventory item is stored.

On the Inventory Locations listing page, users can now add a Reverse Relation column that pulls data from the “Inventory Item” entity via the “Location” field. This shows all items stored at each location, giving you a comprehensive view of inventory per site.

Once added, the new column displays all inventory at each location directly on the Inventory Locations listing page.

Update to Process Parameter Unit Display
To remove unnecessary clutter on the Enter pages, we’ve updated how process parameters are displayed. Previously, units were shown both in the process parameter ingredient headers and next to their values.

With this update, units are now only displayed next to the values, providing a cleaner and more consistent look. This change aligns with how ingredient amounts are displayed, simplifying the interface.

Upcoming: New Enter Page Header Cell Menus and Right-Click Functionality
To improve user experience, further updates are coming to the Enter pages. Key changes include removing hover behavior and introducing a consistent three-dot menu for header cells as well as enabling right-click functionality for header and body cell menus.
New Header Cell Menus
In February, we updated body cells in the Enter pages to feature a three-dot menu that allows users to access cell options. Learn more about this change. The upcoming update extends that functionality to Enter page header cells.
Header cells — like Ingredients, Step Total, and Calculations — will now feature a three-dot menu for quick access to cell actions, replacing the old hover behavior. This change makes navigation cleaner, especially on mobile and touchscreen devices.

Right-Click Actions
Previously, right-clicking on a header or body cell in the Enter page displays separate menu options (i.e. copying, locking, formatting). With this improvement, right-clicking any cell will function the same as selecting the three-dot menu for that cell.

For more information, refer to the dedicated update article on this topic.