Enhanced Constraint Management and Workflow Navigation
In order to make managing constraints more intuitive, there have been changes to the Set Constraints and Project Details pages.
On Set Constraints, workflows tied to constraint sets are now displayed beneath the “Set Constraints As …” button, addressing their previous lack of visibility. Additionally, the “Change Experiment Workflow” button, once hidden within the Settings dropdown menu, has been relocated to the main page for easier access.


On the Project Details page, new “Set Spec” and “Set Constraints” buttons have been added next to the “Add as Product” button. This replaces the need to navigate through the toolbar, simplifying navigation and enhancing usability.


Improved Mix Order Drag-and-Drop Functionality
Several recent updates have improved the drag-and-drop functionality for organizing mix order steps, making the process more intuitive and efficient. These changes include:
- Full Row Movement During Dragging: Previously, only the stacked lines icon moved during drag-and-drop, making it difficult to track which step you were adjusting. Now, the entire row moves with the cursor, providing clearer visual feedback and reducing errors when reordering steps.
- Dynamic Adjustment of Other Steps: Previously, workflow steps remained static while dragging, making it hard to visualize where the step would land. With this update, other workflow steps dynamically shift above or below the dragged step, creating a smoother and more predictable reordering experience.
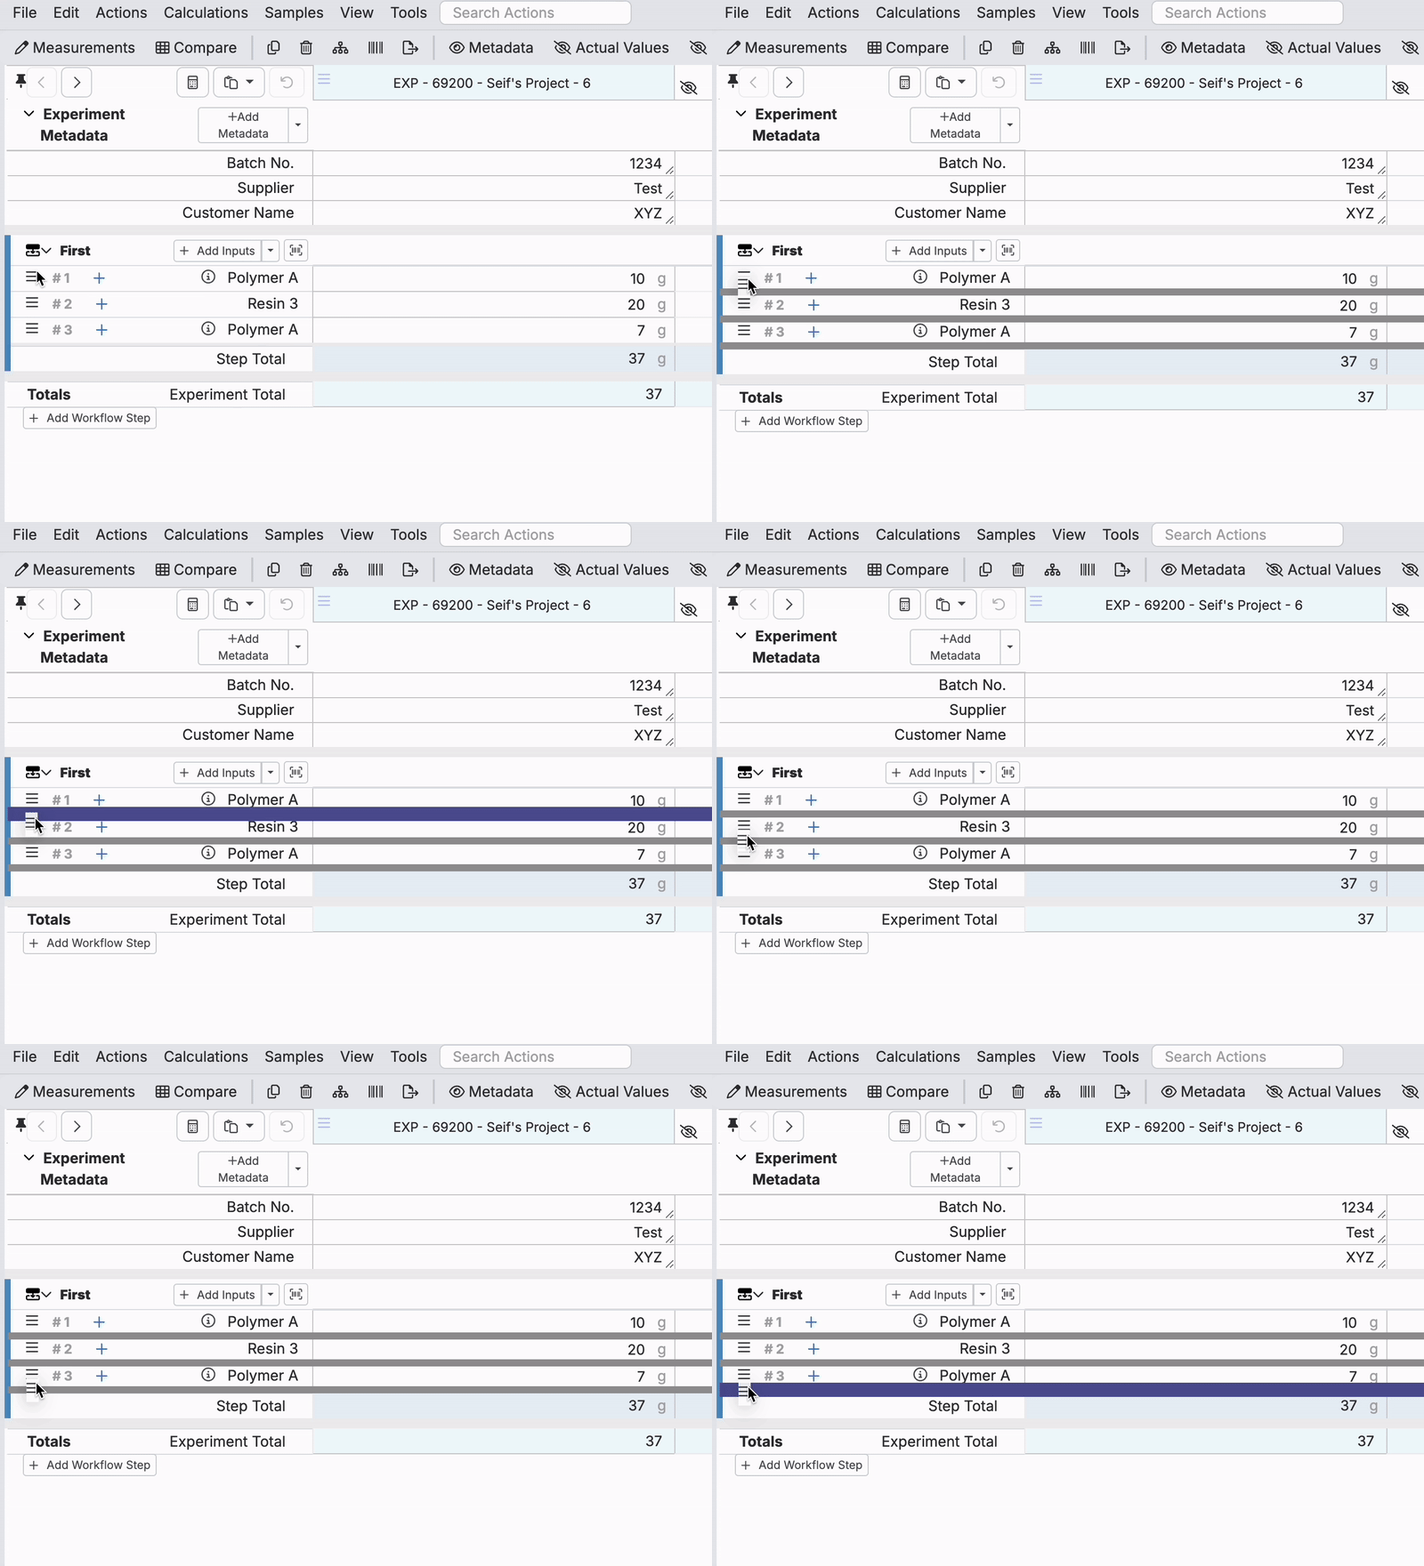
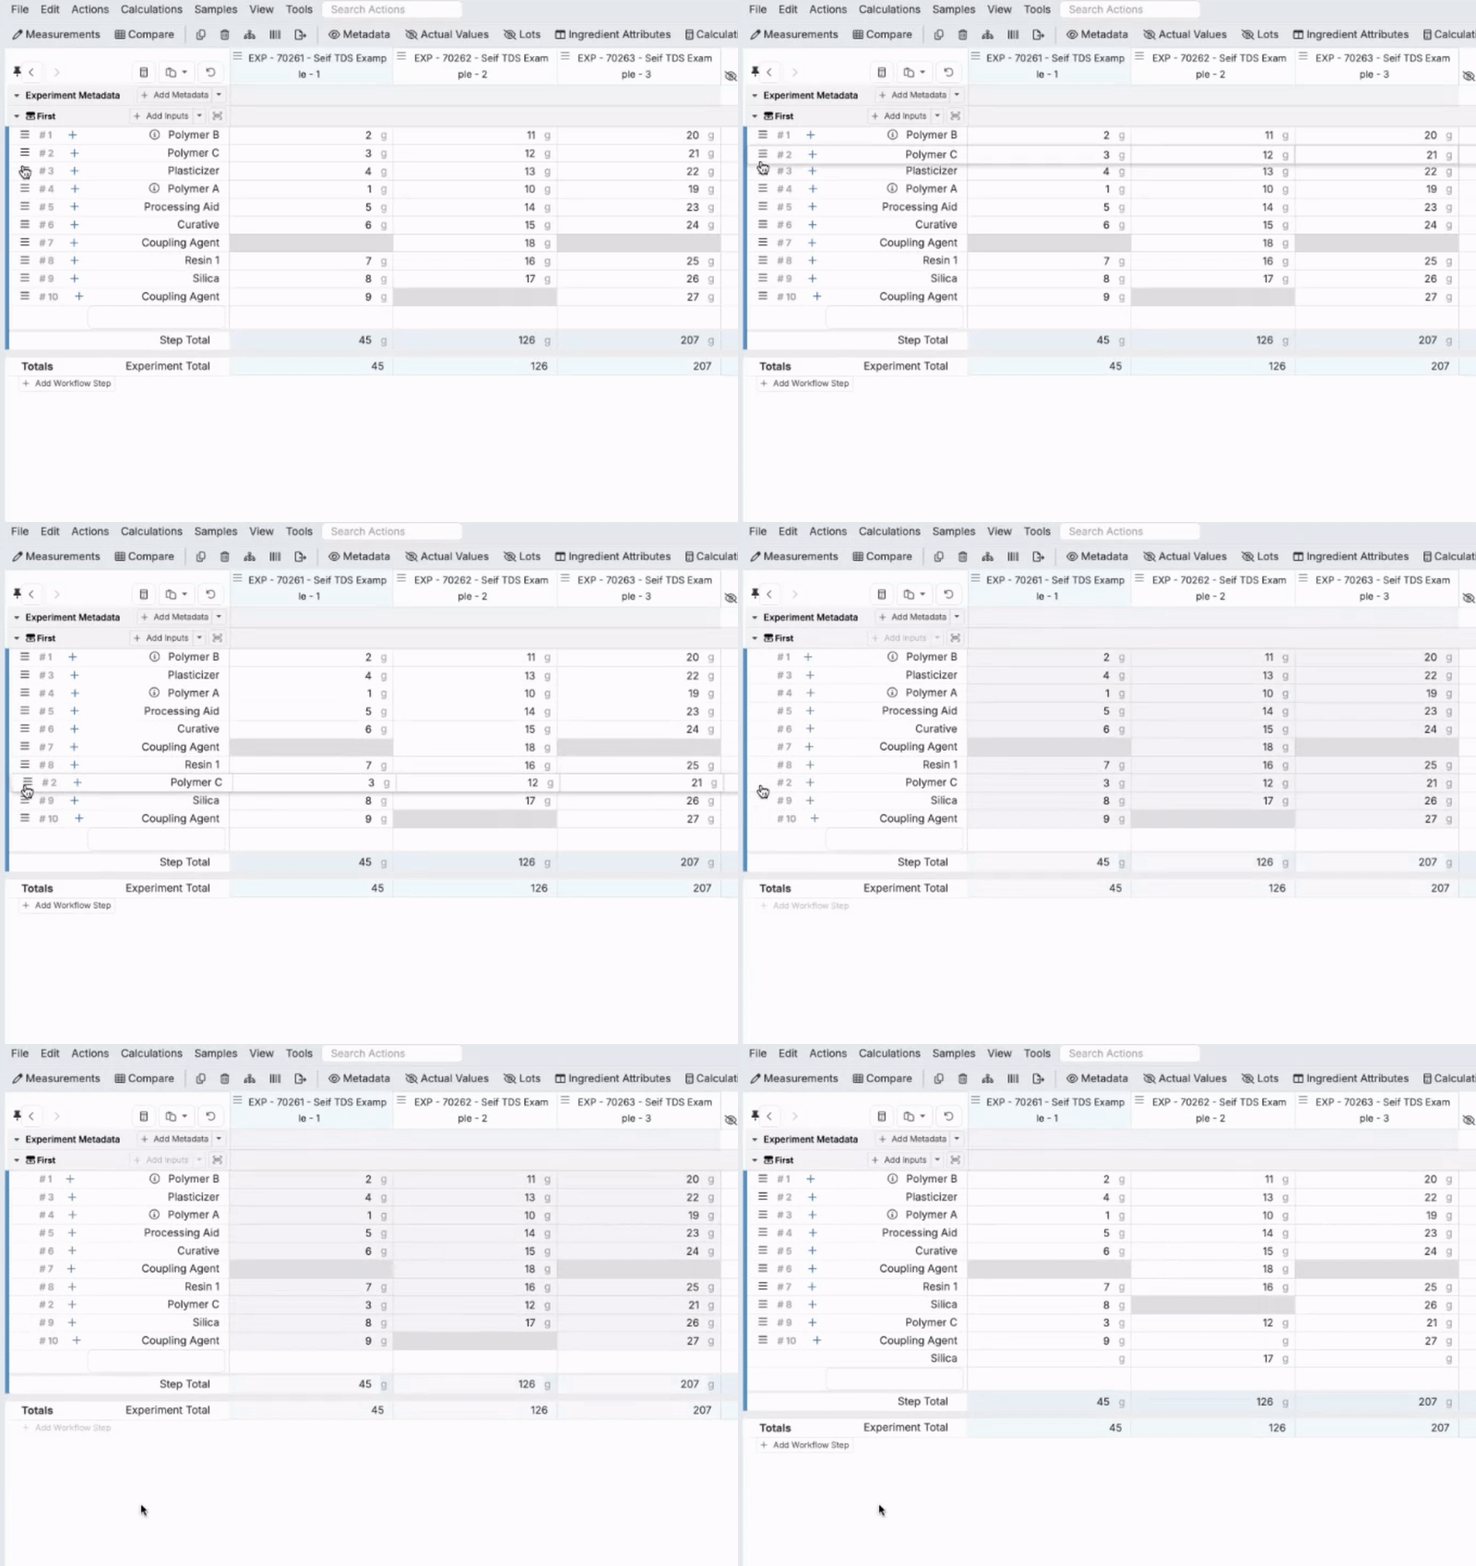
These updates address common challenges with mix order organization, helping users work more efficiently and with fewer errors.
Add Condition Parameters to a New Material Family
Uncountable users can now add condition parameters to a new material family directly from the Condition Parameters listing.
Previously, adding a condition parameter from another material family required selecting “New Parameter” from the listing and manually re-entering the same name and units.
Now, users can navigate to the Condition Parameters listing (”Inputs/Outputs” > “Outputs” > “Condition Parameters”) and select the “…” menu for the desired parameter. From the dropdown, click Edit Material Families to add or remove the parameter from material families.

New Case Format for Multi-Parameter in Advanced Screening Design
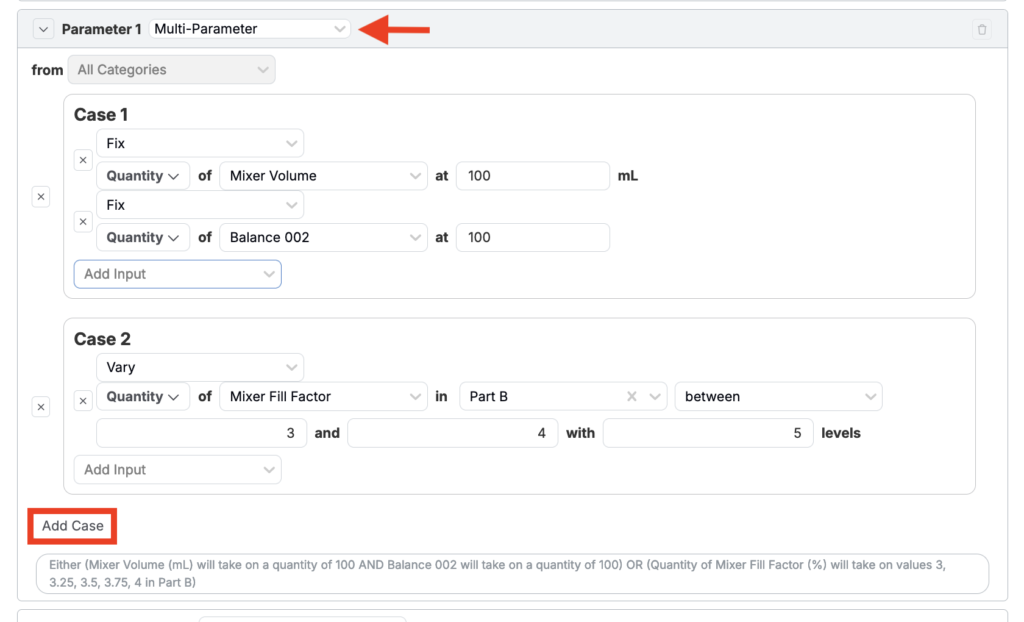
The Advanced Screening Design feature has been enhanced with the ability to specify subsets, or Cases, within the Multi-Parameter setup.
Previously, parameters could only be configured individually as “either X or Y.” With the new Case functionality, users can group multiple factors into specific scenarios, such as “X and Y in one case” or “Z in another.” This also preserves the ability to replicate the previous behavior by creating a separate case for each factor if desired.
Enhanced Customization for Test Samples in Lab Requests
We’re introducing a new feature that makes it easier to customize test sample structures directly within lab requests by modifying workflow steps.
To use this feature, start by creating a lab request as normal. After adding a test sample, click the new Add Step button beneath the workflow to include additional steps. In the example below, the workflow includes Part A, Part B, and Mix. By clicking “Add Step”, new steps (Part A, Part B, and another Part A) were added to the sequence.
After customizing the test sample workflow, click “Enter Sample Results”. On the Enter Recipe page, the additional steps will appear beneath the original workflow, along with any values assigned during the lab request process.
This update simplifies test sample customization and enables support for more complex workflows.


Expanded Notebook Filtering Options
We’ve expanded the filtering capabilities in Notebook to provide more flexibility and control. Previously, users could add Pill filters to quickly filter predefined sets of values. Now, support has also been added for Dropdown and Toggle filters.
To add a Dropdown or Toggle filter, insert a Control Filter cell into your Notebook. Click “Filters”, set the entity to filter with “includes”, and select the “+” icon to add an interactive filter. From the modal, choose the filter type:
- Dropdown: Select from a list of available entities.
- Toggle: Configure by selecting an entity. Once added, clicking the toggle filter will restrict the Notebook view to that one specific entity.


Recipe Workflow Step Alignment
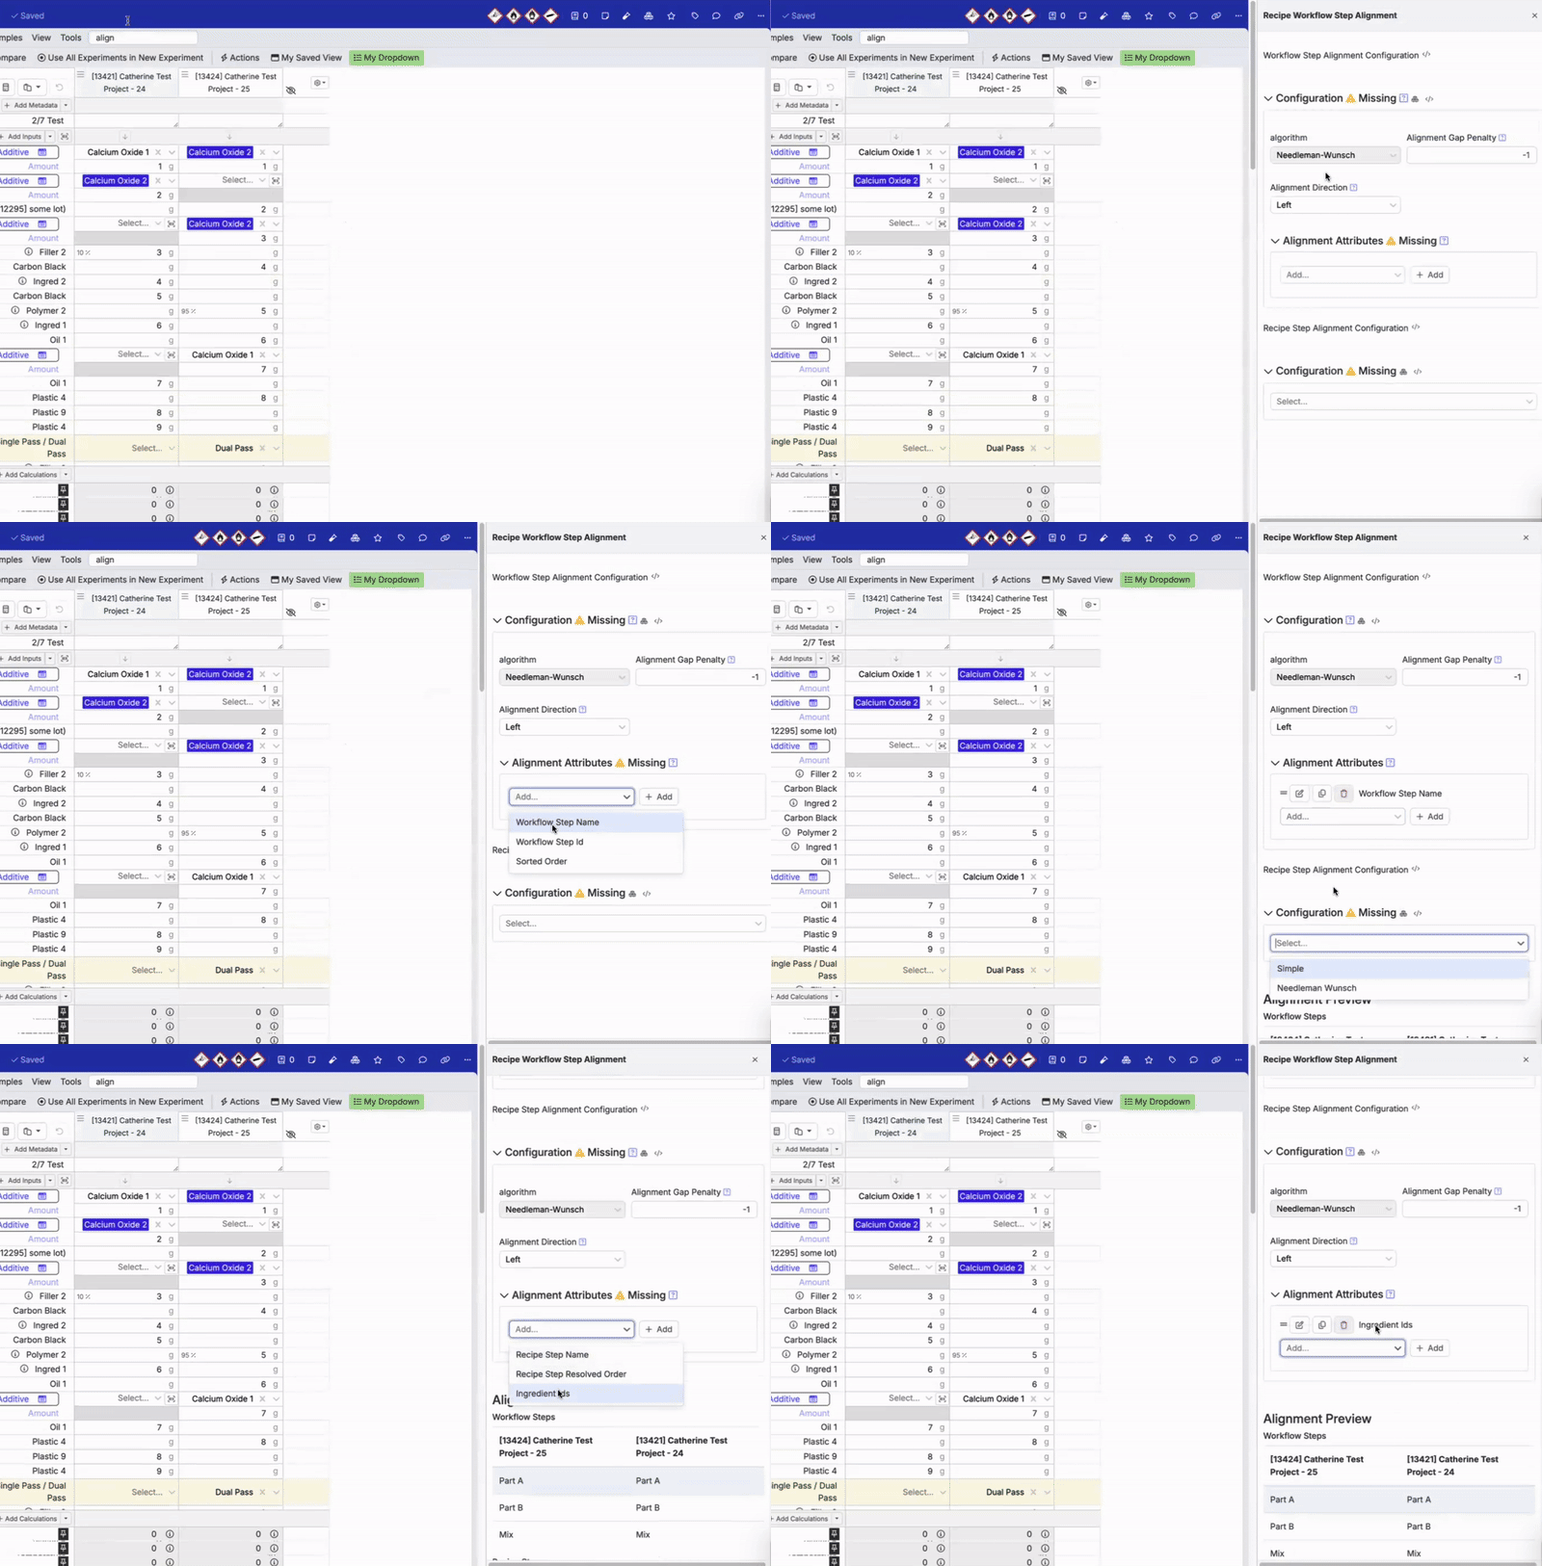
A new feature has been added to Uncountable to enhance clarity and usability when viewing recipes with similar workflow steps but slightly different mix orders. Previously, ingredients in different orders within workflow steps could cause misalignment, making recipes harder to interpret if they were made separately but then brought together to view.
The Recipe Workflow Step Alignment sidepanel addresses this issue by allowing users to configure alignment settings across recipes. Users can set alignment rules, specify attributes like Ingredient ID, and preview changes in real time before applying them. This feature adjusts the display for improved organization without altering the actual order of recipe steps.
This update, available for recipes with workflow step alignment enabled, reduces visual clutter and ensures a more consolidated and consistent recipe viewing experience.


Automatic Updates for PubChem Information
Uncountable now makes it even easier to maintain accurate ingredient data. Using an ingredient’s CAS number, users can access detailed PubChem information—such as GHS symbols, hazard classifications, and chemical properties—directly within the platform. This integration enhances compliance and provides a reliable reference for your workflows.
With our latest improvement, PubChem information will now refresh automatically every three months. This eliminates the need for manual updates, ensuring your data stays current while saving time and reducing the risk of outdated information affecting critical decisions.

Flexible Quantity Basis for Subtotals
Users now have greater flexibility in managing subtotals within workflow steps. If a workflow step involves a Mix Order, add subtotal rows by clicking on “Inputs” and selecting “Add Subtotal” from the dropdown menu. Previously, subtotals defaulted to the quantity basis of the workflow step.
With this update, users can now customize the subtotal’s quantity basis. By selecting the Subtotal row and accessing its dropdown menu, choose from Mass, Volume, or Moles. This enhancement simplifies calculations and provides better control over your recipe data.


New Setting for Recipe Output Details Display
Uncountable now includes a Company-Wide Setting that enhances how recipe output details are displayed, improving usability across devices.
In Company-Wide Settings > Customize Appearance, administrators can toggle “Display Recipe Output Details in Sidepanel” on or off. By default, this setting is disabled and clicking “…” in an Enter Measurement output cell opens the recipe output data in a popover. When enabled, recipe output data opens in a side panel.
This update is particularly beneficial for users on tablets or mobile devices, providing an optimized, user-friendly experience.


Configurable Parent Inclusion Behavior for Test Samples
The behavior of test sample templates has been improved, offering users more control over parent experiment inclusion. Previously, when a test sample was added to an experiment, the parent experiment would automatically be added as an intermediate in the test sample. This behavior is now configurable.
Templates now include a Parent Inclusion Behavior option, which can be set to:
- Add as Intermediate: By default, the parent experiment is included as an intermediate (previous behavior).
- None: The parent experiment is not included in the test sample (new behavior).

In the example below, the “Includes Parent” test sample template (A) has “Adds as Intermediate” parent inclusion behavior. Therefore, when adding that test sample and navigating to its inputs, the parent will be included as an intermediate (A).


The “Excludes Parent” test sample template (B) has “None” parent inclusion behavior. When a new test sample is added, the parent will not be included on the inputs page.


File Uploads in Create Modals
Platform users can now upload files directly within the “Create” entity modal, enabling them to attach and manage files or images. Once uploaded, these files will appear in the “Screenshots” column on the entity listing for easy access.
In the example below, files are uploaded into the “Create: Support Ticket” modal. However, this option is available for all entities that have a File and Create field on their definition.


User Profile Locations Added as Entities
User profile locations are now integrated directly into the entity view. This change reflects our move towards the entity system and unlocks the ability to leverage entity field functionality for user profile locations (i.e. querying using Value Spec).
To view your user profile location, select your name from the navigation bar and click “View Profile”.

Expanded “Intermediate” Dropdown Options
Recipe as Ingredients (aka Intermediates) functionality has been updated. Now, when creating an inventory amount for a recipe as ingredient, both recipes and individual ingredients will appear in the Intermediates dropdown on the Enter Recipe page. Previously, only recipes were displayed.
In the example below, inventory is created for a recipe in two ways: one as a recipe, and one as an ingredient. On the Enter Recipe page, clicking on the Intermediate dropdown allows you to select either option.


Enhanced User Stats with User Analytics Events
User stats have been moved to a new entity type called User Analytics Events, allowing for better utilization of user data. This change also supports our overall transition towards the entity system. With User Analytics Events, you can analyze user data by day, track the types of statistics being collected, and see the number of events. This new system also allows you to filter data and modify the listing to focus on specific users or metrics.
User statistics can now be viewed directly in Notebooks through listings and visualizations.


To add a User Analytics Event listing:
- Navigate to your Notebook.
- Add a new “Structured List” entity.
- Select “User Analytics Event” for the Listing Entity and add cell.
- Set listing columns by clicking List → Set Columns.

To add a User Analytics Event chart:
- Navigate to your Notebook.
- Add a new “Chart” entity.
- Click “Edit Chart Configuration” and select “User Analytics Event” as the entity type.
- Set listing columns by clicking List → Set Columns.
- Configure chart settings by selecting set columns as the X axis, Y axis, line, and chart grouping.

While the user stat page remains the same, tracking occurs in two places for now. Over time, the older system will be deprecated in favor of the new entity-based structure.
Fix for Input Pin Behavior on Enter Measurements Page
Previously, input pins on the Enter Measurements page would not properly “pin” as expected. This issue has now been resolved, and input pins will function properly, allowing them to stay pinned as intended. This fix ensures a smoother user experience and improves the reliability of input pinning within the platform.
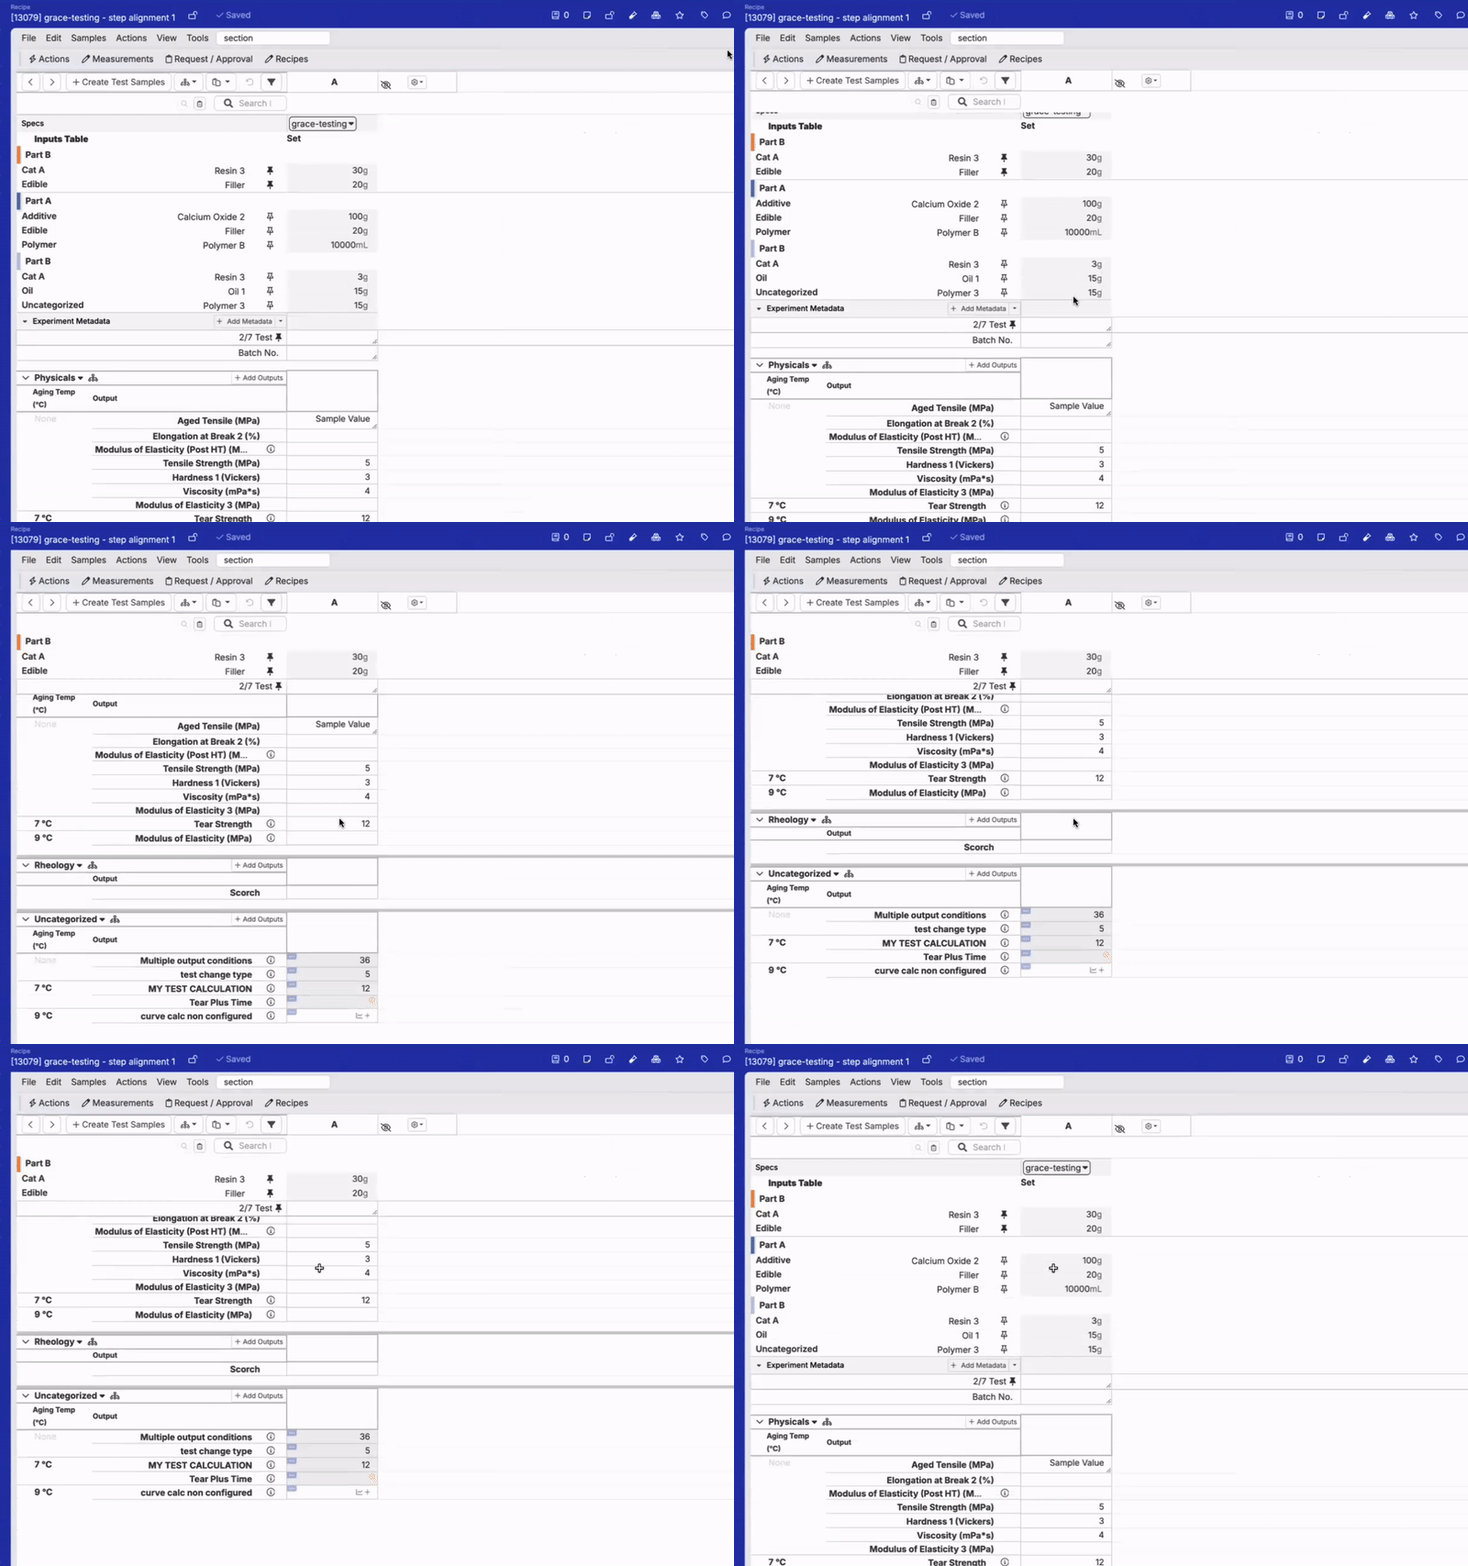
Reordering Inputs Table and Experiment Metadata
Users can now manually reorder the Inputs Table and Experiment Metadata sections on the Enter Measurements page.
Within the Sections sidepanel, simply click and drag the stacked lines icon next to a section to reorder them as needed. This enhancement allows users to better organize their data on the Enter Measurements page.
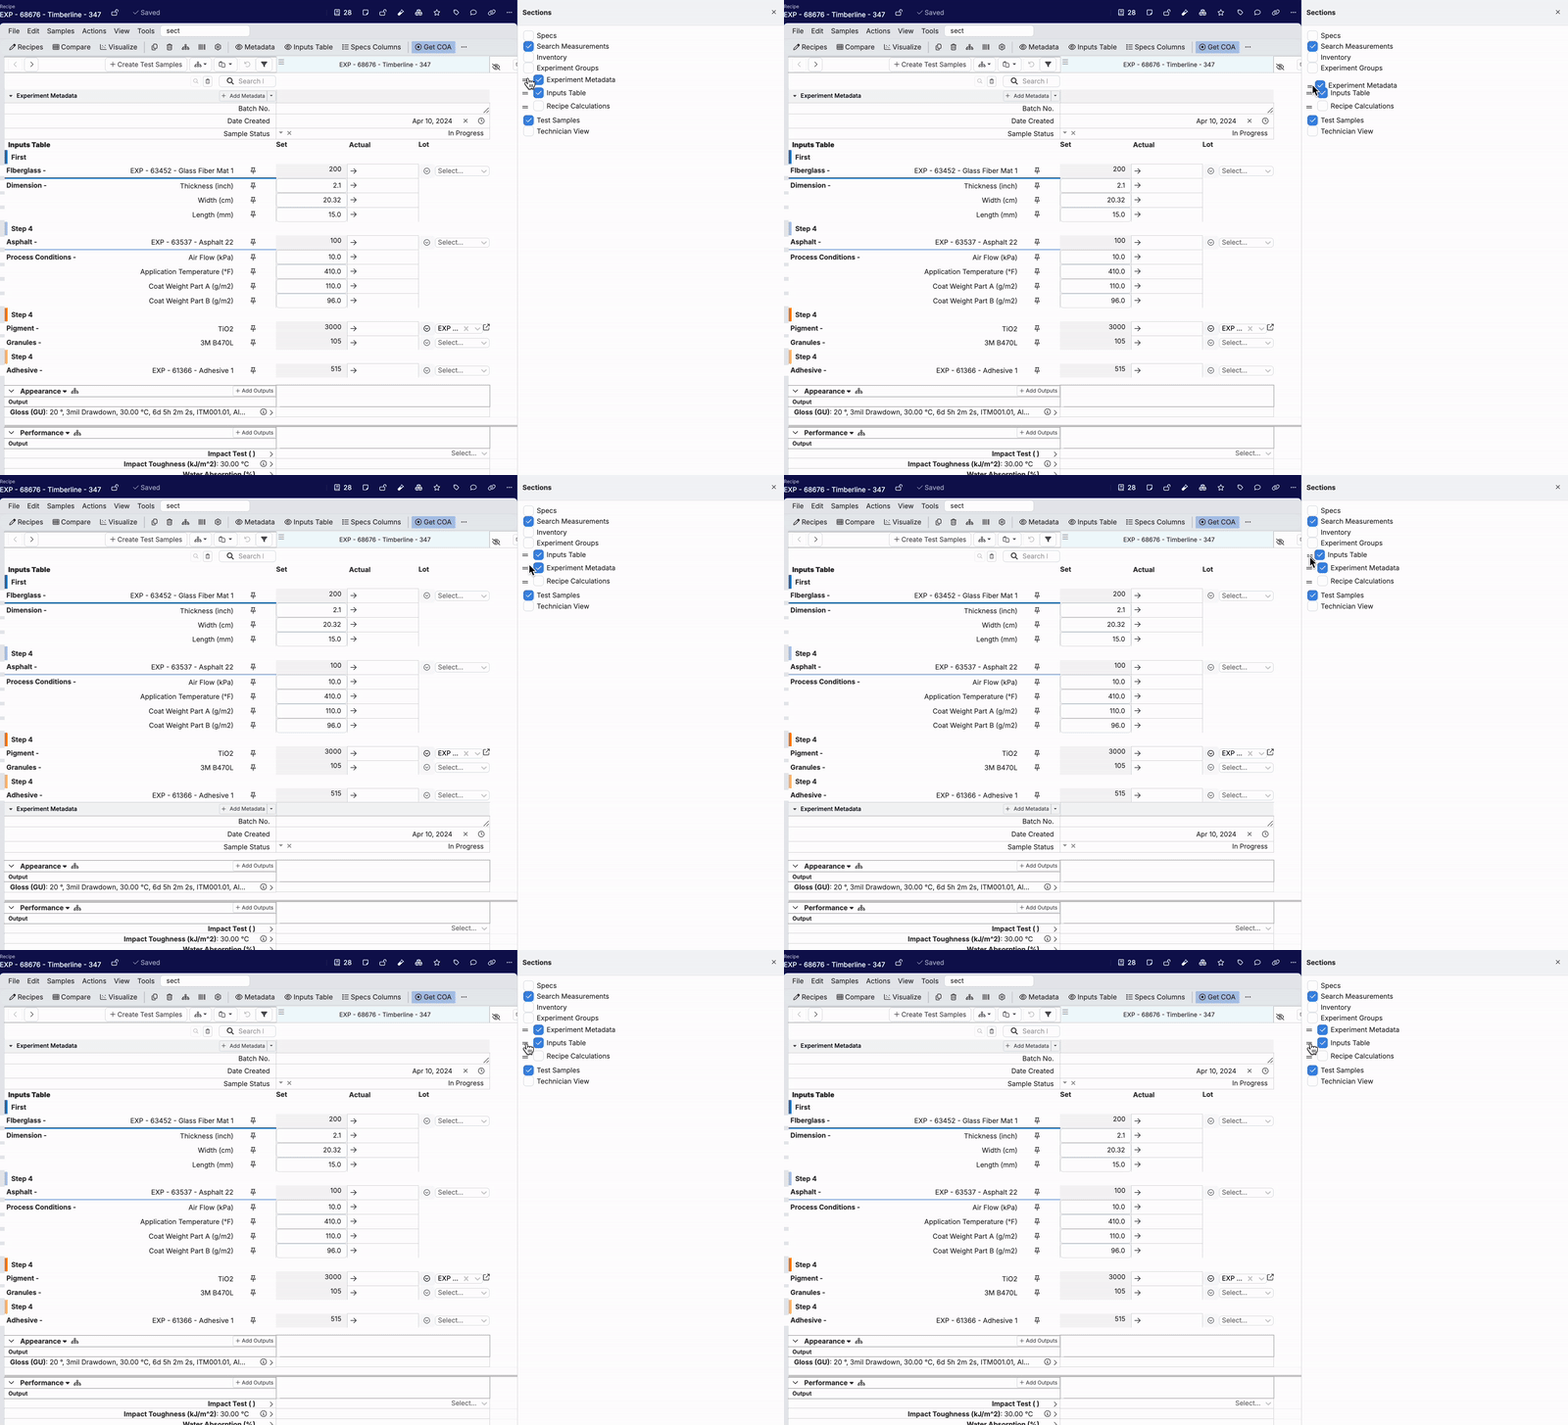
Query Points for Calculations with Curve Entities
We’ve enhanced calculations involving curve entities by introducing the ability to use other entities as query points. This provides great control when setting up dynamic calculations.
To configure this, start by adding entities and a curve to your calculation. Click “Edit” for the curve and select an entity from the Query dropdown menu.
For example, if you have a “Modulus of Elasticity” and a “Curve” output added to a recipe, you can create a calculation using these entities. When editing the Curve component of the calculation, set the Modulus of Elasticity as the query point. On the Enter page, updating the Modulus of Elasticity value (i.e. from 3 to 5) will dynamically adjusts the calculation curve.


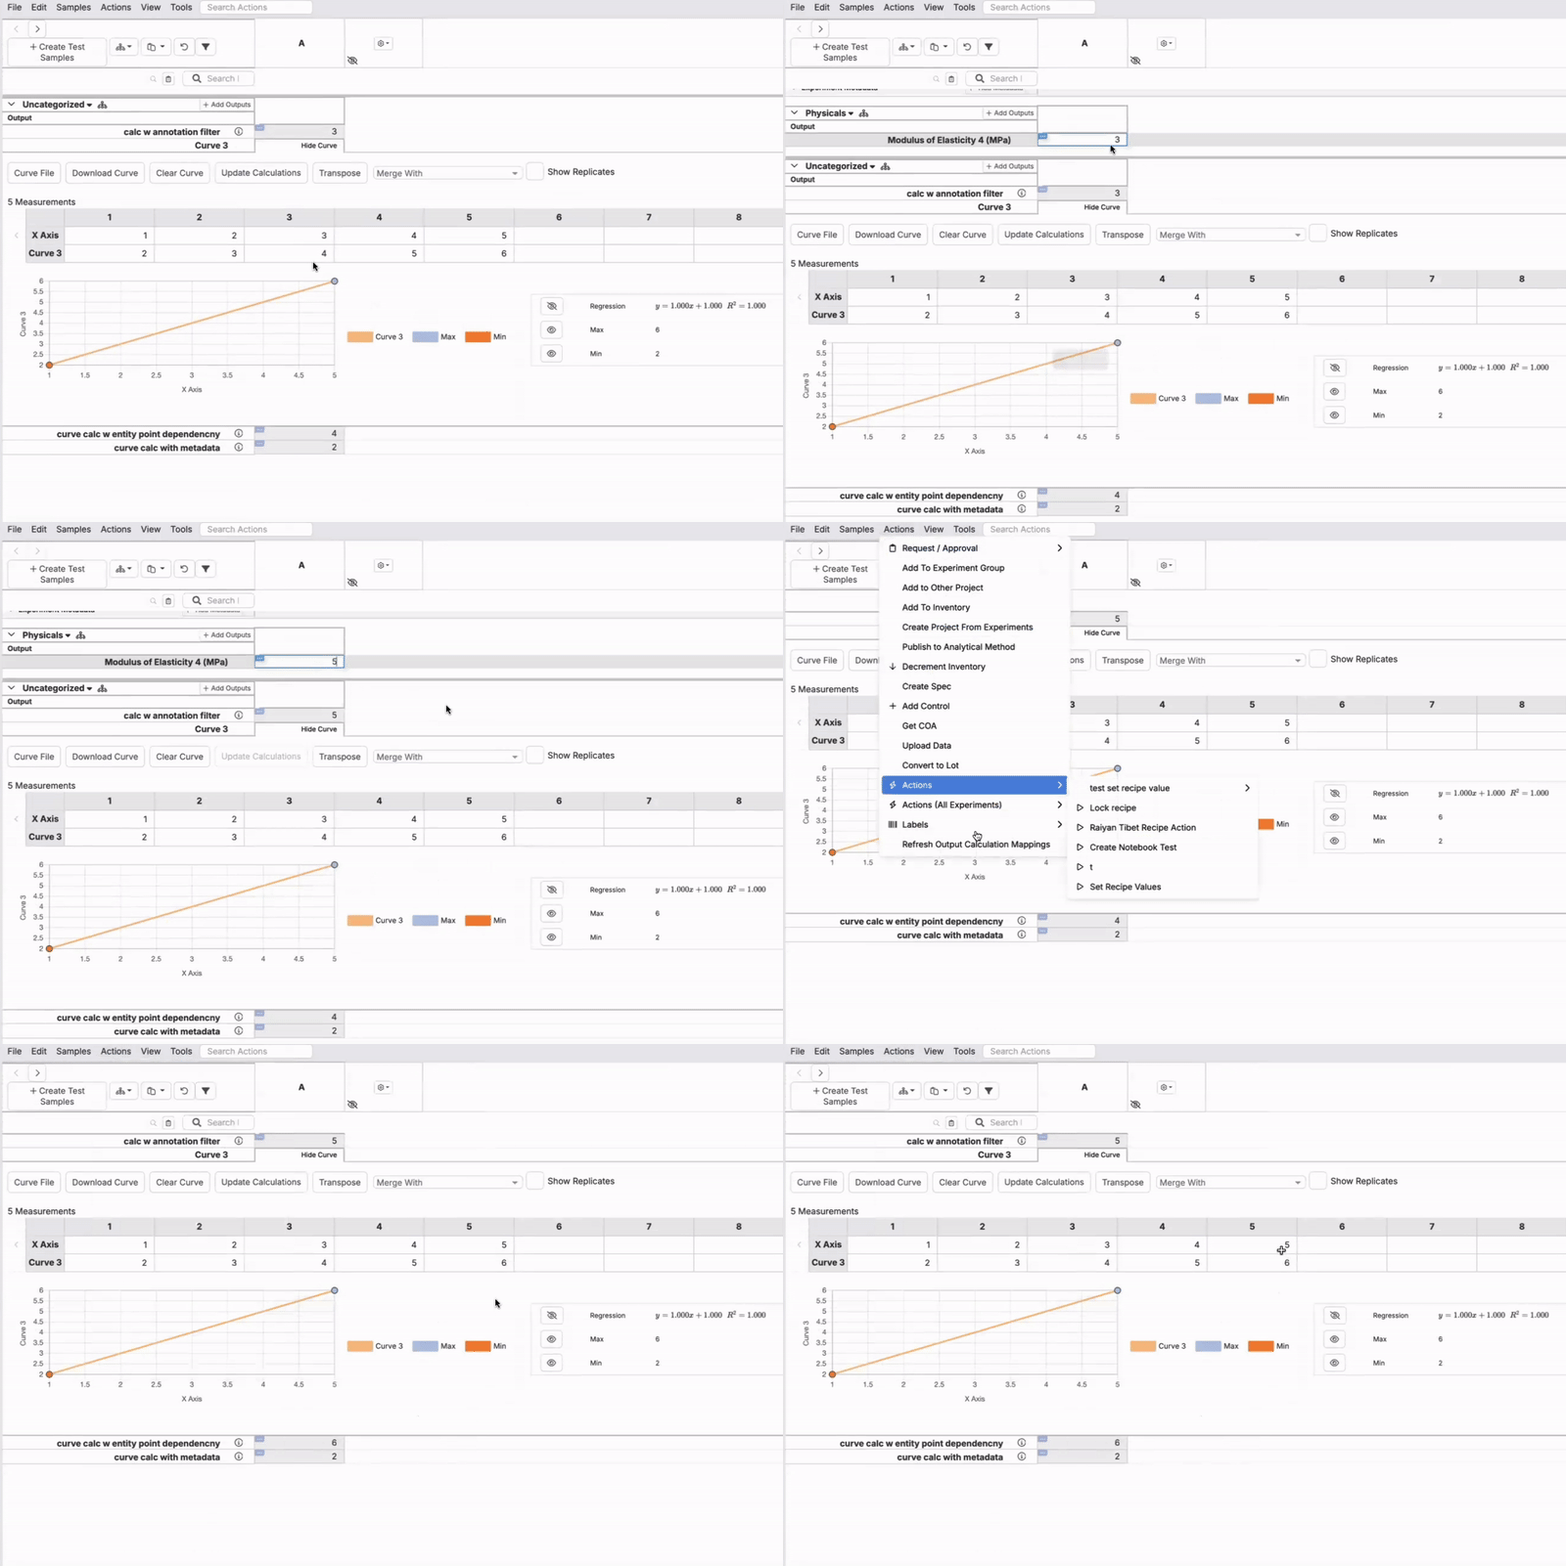
Annotation Filtering for Output Calculations
Uncountable users can now apply annotation filtering to output calculation. This feature helps refine calculations by considering only outputs with relevant annotations or excluding data points like outliers.
To enable annotation filtering, access Annotation Settings within the Edit Calculation modal. Enable Annotation Type Filters and select the annotation types to include. You can also enable Exclude Data with Outlier Annotations to automatically omit any data marked with outlier annotations.
For example, consider five replicates with Tear Strength outputs and various annotations:
- Replicate A: Characterization
- Replicate B: Trusted
- Replicate C: Both Characterization and Trusted
- Replicate D: Characterization and Outlier
A calculation with filtering enabled for “Characterization” and “Trusted” annotations, and outliers excluded, will include only the Tear Strength values from Replicates A, B, and C.


Update to Lab Request Measurement Group Sorting
To improve the layout and usability of Lab Requests, we are introducing a new sorting structure for measurement groups. Currently, there are two types of requested measurements:
- Measurement Groups on the Parent Recipe: These groups are not linked to a split template and typically attach measurements to recipes.
- Measurement Groups on the Test Sample: These groups are associated with a split template ID and generate test samples.
Previously, new measurement groups were added to the end of the Measurements section, which could be confusing, especially with multiple layers of test samples. With this update, on the Lab Request page, measurement groups on the parent recipe will always appear above measurement groups on the test sample.
This change aligns Lab Request UI with how measurements are organized on the Measurements page. For clarity, a header labeled “Test Samples” and a divider will also appear above the test sample groups (if present), visually separating the two types.
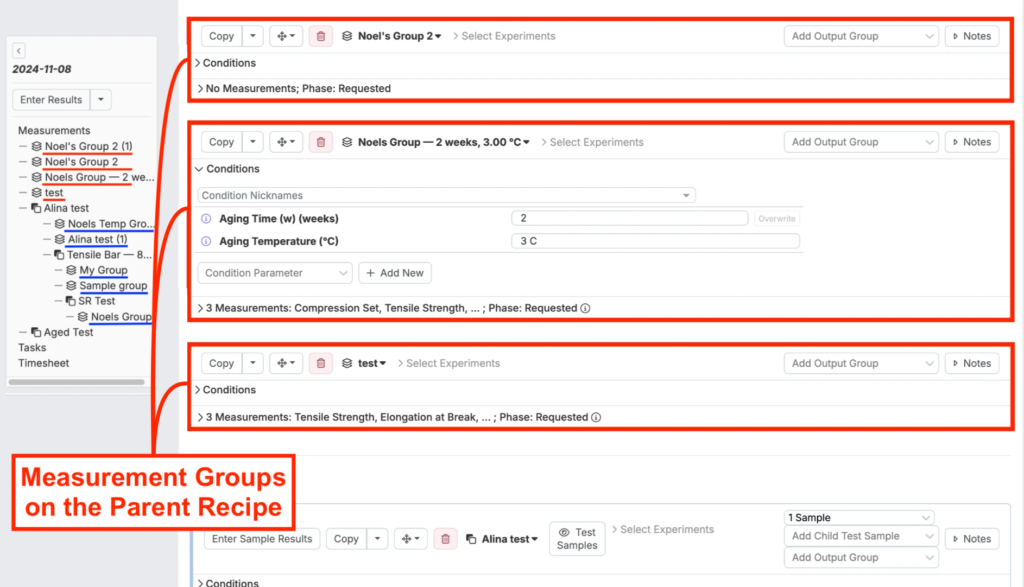
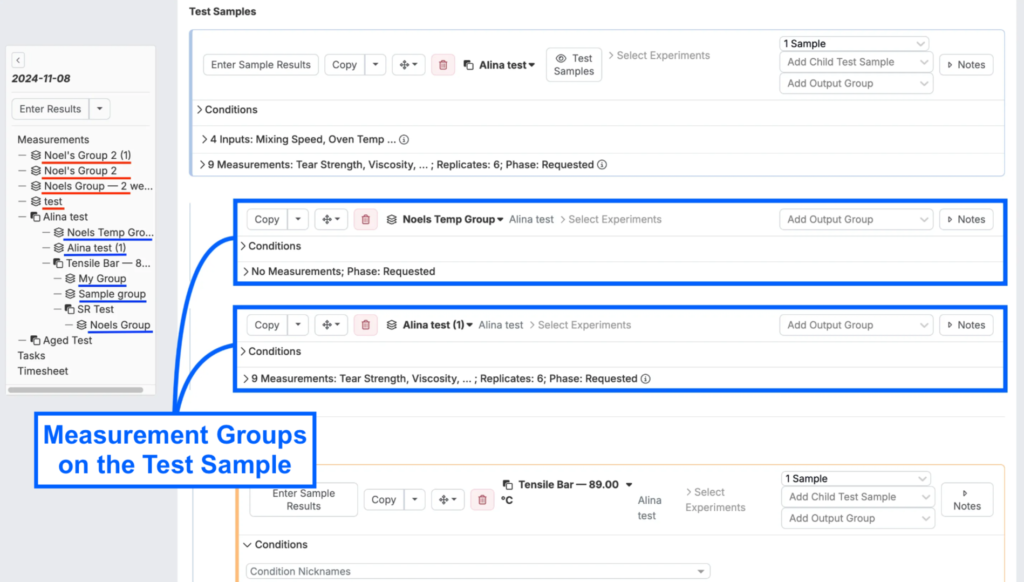
Users will retain the ability to freely reorder groups within each type, but interleaving them will no longer be an option. For groups associated with a test sample, the same sorting rules apply. Raw measurement groups attached to a test sample will display above any child test sample groups. Sorting within each of these lists remains fully customizable.
Lots and Inventory Modals Update
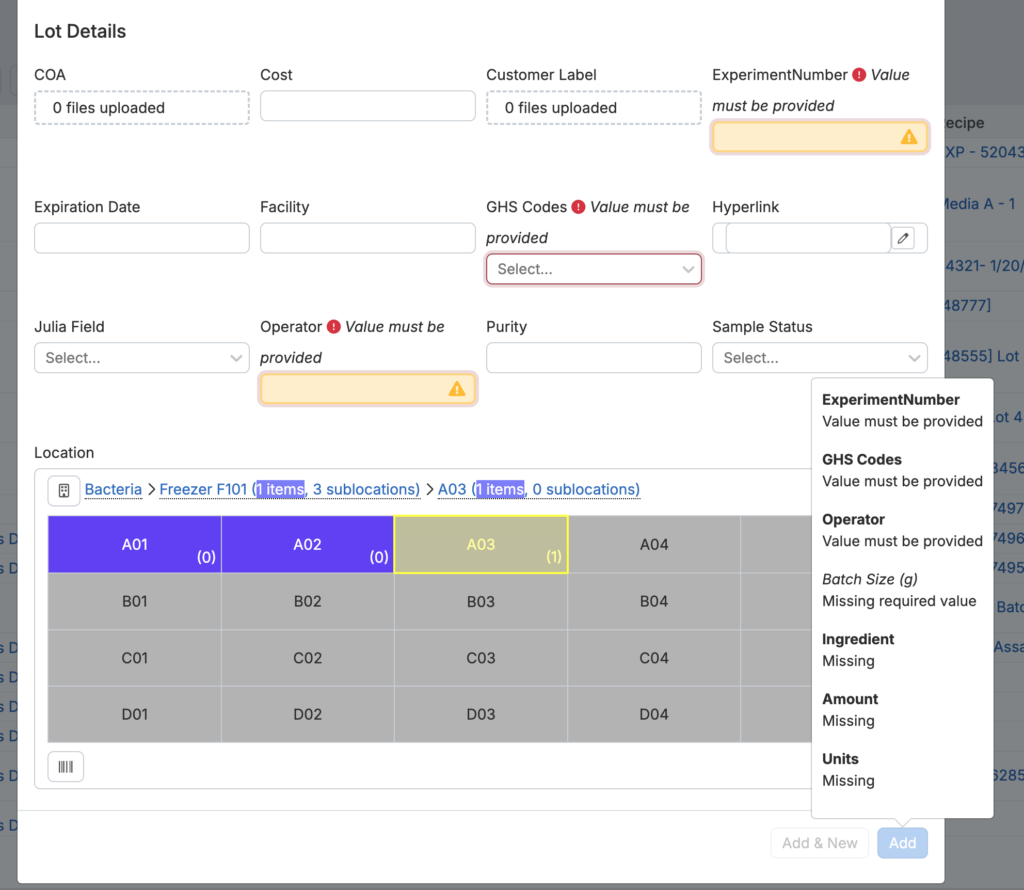
There has been a recent update to both Lot and Inventory modals to increase cross-platform consistency and provide better control over experiment metadata.
Now, when the “Lot” or “Inventory” experiment metadata field is set to “Required for Naming”, users must complete all required fields before submitting. This change mirrors the functionality of the Recipe modal.

Axes Tab Added to Explore Visualizations Settings Modal
The settings modal on the Explore Data page has been reorganized for better usability. Axis-related settings have been moved from the Main tab to a new dedicated Axes tab. This change improves navigation and makes it easier to manage axis-specific settings.
To access the new Axes tab, click the cog icon in the top-right corner of the Explore Data page and select “Axis Settings.” For more details about the Explore Data page, refer to Explore Data.


“Delete Project” Deprecated
To improve data recoverability, projects in Uncountable can no longer be deleted. From the Project List, clicking the cog icon next to a project previously allowed users to delete or archive it. Now, the “Delete Option” has been removed, leaving only the option to archive.


Additionally, while deleting a project previously would also delete its child projects, archiving now gives users more flexibility. Users can choose to archive just the parent project or archive the parent project along with all its child projects.

Projects can be unarchived from the Project List page. First, ensure the “Show Archived” filter is enabled (1). Search for and select all parent and child projects to unarchive (2), then open the selection menu (3) and click “Unarchive Selected” (4).

New Actions Options in the Enter Page Action Bar
There have been recent improvements and additions to the Action bar on the Enter pages, accessible via the Configure Actions sidepanel. Uncountable users can now select from a range of new Action options, including:
- Dropdown Group: The Action bar now supports custom dropdown menus, making it easier to organize Actions. To add a dropdown menu to your Enter page, select “Dropdown Group” and provide a custom name. Once the dropdown is created, you can drag and drop Actions into it.

- View Preference: Add shortcuts to saved views of the Enter Recipe page, including custom column configurations. To add these shortcuts, select “View Preference” and choose from the list of saved preferences. For more information, refer to View Preferences on the Enter Recipe Page.

- Trigger Entity Action (Active Experiment): Add specific entity Actions for the active experiment that execute based on triggers. To add active experiment triggers to your Action bar, select “Trigger Entity Action (Active Experiment)” and choose from the list of triggers available on your recipe definition.

- Trigger Entity Action (All Experiments): Add specific entity actions for all recipes in view that execute based on triggers. To add triggers that apply to all experiments, select “Trigger Entity Action (All Experiments)” and choose from the list of triggers available on your recipe definition.
Note: Adding Actions under the “Admin” section will apply changes for all users, while adding Actions to the “User” section will customize only your personal Enter page configuration.
Streamlined Listing Filters
We have updated the layout of listing filters to save space on listing pages. Previously, filters took up significant vertical height.
The UI change reduces this by aligning the “Filters” button with other listing controls, decreasing the filter area from four lines to three. Quick Filters are also now slimmer and positioned underneath for a more compact look.

Before the update, the compact filter design could be enabled on the Platform Config page by selecting the “Show Compact Listing Filters” checkbox for a schema. This button has been deprecated since the compact filter layout has been implemented globally.

Expanded Metadata Cell Display on Enter Recipe Page
Metadata cells on the Enter Recipe page will now span across multiple columns when additional columns are open per recipe, making it easier to view and interact with detailed metadata information at a glance. Additionally, the dropdown for this section has been improved for greater consistency.
This layout enhances readability and provides a cleaner, more organized display of metadata.

Enhanced Copy/Paste Functionality in Listings
The copy/paste functionality within listings has been refined to offer a more intuitive, Excel-like experience. Now, when pasting a selection of cells into a larger area, the listings automatically adjust to match the dimensions of the pasted data, with visual feedback on the affected cells.
This improvement makes working with data in listings smoother and more efficient, especially for users managing extensive datasets.

New Performant Graphing Options for Notebooks
New Performant Graphing options have been added to Notebook visualizations in an effort to streamline viewing experiences for users handling large datasets. The new settings, available in Company-Wide Settings, enable users to view snapshots of plots as live data loads, minimizing delays.

When enabled, a “View Live Plot” button is added to the plot. Clicking this button allows users to toggle between snapshots and live plots.

Additionally, a “Load Plots on Demand” feature has been added, allowing users to load plots only when needed. By selecting this from the Notebook page File menu, users will see a “Load Plot” button next to each graph, which reloads it with up-to-date information when clicked.


Data Series Filtering for Large Notebook Plots
Notebook users can now filter the number of data series shown in any plot to stay within performance limits. Previously, datasets exceeding the 50-series cap would trigger an error message, preventing display.
With the update, this message now includes an option to filter down the number of series to the first 50. This enhancement, applicable to all plot types, ensures smoother visualization of larger datasets without overwhelming load times.


New ‘Use Variant Definition’ Option for Test Sample Templates
A new “Use Variant Definition” option has been added to Test Sample templates, providing flexibility in defining sample workflows. Accessible from the Test Sample templates listing page, this feature can be enabled by checking the box in the “Use Variant Definition” column next to a template.
When enabled, this option ensures that any new test samples created using the template will follow the associated workflow variant, if available, instead of defaulting to the standard test sample settings. This update supports more customized workflow alignment across test sample templates.

Sort Ingredient Modal for Recipe Organization (Beta)
A new beta Sort Ingredient modal is now available to streamline ingredient organization in recipes, especially helpful when working with a large number of ingredients within a category to limit the view to the current selection. This feature, accessible under “Sort and Organize” options, operates similarly to the Sort Condition Parameter modal.
To access, click the branch icon for “Sorting and Organizing Options,” and then select the cog icon to open ingredient sorting settings. From the Sort Ingredient modal, select a category for grouping, add specific values to sort by, and drag items with the stacked lines icon to manually reorder ingredients.


Table Builder Now Available in Custom Tables
Custom tables now support full Table Builder functionality. Users can simply click the new “Build Table” button associated with any custom table to open the Table Builder modal, providing access to all Table Builder features. For more information, refer to Table Builder.

UI Changes for Section Header and Workflow Step Rows on Enter Pages
We have recently updated the section header row design on the Enter pages to improve visual clarity and create a more user-friendly layout. Changes include:
- Gray Background: Section header rows will now feature a gray background, offering better contrast with the data cells below and making sections easier to identify at a glance.
- Reduced Height: The headers will be shorter, helping preserve more vertical space on the page to improve scrolling and data visibility.

These changes also apply to workflow step headers to ensure a consistent appearance across all headers on the platform. These changes are purely stylistic, with no functional adjustments.

Product Placeholders in the Well Plate Editor
A recent addition to the Well Plate Editor streamlines data entry by allowing users to add Product Placeholders directly within the Data Entry grid.
From the Well Plate Editor’s data entry grid, select a “Product” placeholder and choose a workflow step.

From the Enter Recipe page, view the workflow to see that placeholders are now associated with the selected product.

Alternatively, placeholders and values added to workflow steps from the Enter Recipe page are also visible within the Well Plate Editor Data Entry grid.


This feature provides improved visibility and management of placeholders within workflows, making it easier to organize and track product assignments.
Access Column Calculation Values via API
We’ve expanded our external API capabilities to include column calculation values for recipes. With this update, users can retrieve calculation values for any recipe using the recipe ID and calculation key.
To use this feature, submit a request with the recipe ID (B) and the calculation ID (A). Once submitted, the API will return the specified column calculation values for that recipe.


Pin Header Items on Entity Pages
A new pinning feature has been introduced to help keep important elements visible while scrolling on Uncountable entity pages. To enable pinning:
- Click the “…” (More options) in the top-right corner of an entity page.
- Select “Pin Header Items”.
- Choose whether to pin the Title (which will pin only the entity page header and toolbar) and/or pin the Header (which will also pin the phase diagram, comments, and Advance Phase button).
Once enabled, pinned items will stay in place until you decide to change this setting. This behavior will carry over across the platform and apply to every entity page aside from the Enter pages, which have their own formatting settings.


Enhanced Review Functionality
There have been recent improvements to the review process which make it easier to track comments and approvals. Now, when users comments while leaving a review, the comment thread (A) will automatically update.
We have also updated the Comments sidepanel (B), which can be accessed by clicking the conversation bubble icon in the top-right corner of the page header. This panel now offers a unified history of reviews, with supplementary text. For example:
- If an admin leaves a review and clicks “Approve”, the supplementary text “Approved on behalf of Administrator group” will appear alongside any comment made.
- If a user withdraws a review (by clicking “…” > “Withdraw Review”), this will also be recorded in the unified comment log.
These updates make it easier to manage and track feedback during the review process.

Override Enter Recipe Set Totals using “Set Calculations”
We’ve added new functionality to the Enter Recipes page to enhance how users work with ingredient calculations and totals. Now, in addition to setting calculations on regular ingredient cells, users can also manually override workflow Step Totals using the “Set Calculation” tool.
Here’s how it works:
- To set a calculation for a regular ingredient, right-click on the ingredient cell and select “Set Calculation.” This will link the cell to a calculation, ensuring that the value updates automatically.

- For total override rows, right-click on the “Set Total” cell and select “Set Calculation.” This links the total to a calculation, enabling you to override the workflow step total. When editing the Set Total value in this way, it will automatically adjust the corresponding ingredient masses, keeping everything aligned.

Enhanced Duration Process Parameters in Advanced Screen Design
Building on a previous update for Duration-type process parameters, Advanced Screen Design now supports the ability to vary durations.
Previously, only “fixed” duration parameters were available, limiting users to static time entries (such as a fixed duration in days or hours). With this addition, users can now define variable duration process parameters, allowing for a range of time options to be applied across different experiments.

Display Curve Process Parameters on Compare Page
The Compare page now supports input curve process parameters, providing platform users with a more complete view of data visualizations. Previously, only output curve models were available. Now, users can also view input curve process parameters.
Clicking “View Curve” for an output curve parameter (B) opens the curve in a separate modal. Selecting “View Curve” for an input curve parameter (A) will open the curve in a similar “Input Curve” modal.
Additionally, users can export input curve process parameter data by clicking the “Download Curve” button, which downloads the data directly into an Excel spreadsheet. This feature allows for easy offline access and further analysis of curve data, making it easy to work with curve data outside the platform.


Customizable Row and Column Labels in Inventory Grid
Users can now rename rows and columns on Inventory location grids. Previously, rows and columns came with autogenerated labels, which couldn’t be changed. Now, click on any row or column label to enter a custom name.
These changes will automatically reflect across all inventory grid location selectors, ensuring consistency wherever the grid is used. This update allows users to align row and column names with internal naming conventions, making it easier for team members to locate and manage items efficiently.

Updates to the New Enter Page Headers
Recent updates have added functionality to the newly updated Enter page headers. For more information on the new Enter page headers, refer to New Enter Page Header Change. Updated features include:
Improved Notes Window:
- The recent update introduced a new Notes window, which can be accessed by clicking the note icon in the top-right corner of the header.
- Users can now move and resize the Notes window by clicking and dragging its header.

- Users can also dock the Notes window by clicking the Dock icon in the top-right corner of the window. This turns the window into an adjustable Notes sidepanel.

Pinned Entity Header:
- Users can now pin the new Enter page header by clicking “…” in the top-right corner and selecting “Pin Entity Header”. This setting keeps the header visible while users scroll the Enter pages.

- To pin Enter page headers for all users, navigate to Company Wide Settings → Platform Config and select “Pin Recipe Header”.

Archiving Test Samples
Test Samples are now archived instead of being permanently deleted, providing a more flexible approach to managing sample records.
To archive a Test Sample, navigate to the Test Sample listing page, click on the “…” menu next to the desired sample, and select “Archive.” This option, which previously showed as “Delete,” now updates the sample’s status in the listing.

On the Test Sample listing, a checked box in the Archive column indicates an archived sample. Click the pencil icon to manually check or uncheck the box to update its status directly from the listing page.

Archiving/unarchiving a Test Sample from the listing column
Automatic Entity Name Translation in Value Spec
Value Spec now supports automatic translation for entity names. Previously, entity names would only display in English, regardless of the user’s selected language.
From an entity listing, users can click edit or add translations for entity names. In the modal, click “+ Add” to modify translations. In the example below, “2024-10-11” (A) is entity (English) and “le 11 octobre 2024” (B) is its French translation.

To view the Value Spec for an entity, navigate to the Value Spec tab on the Form Admin page. Set Entity Type to “Custom Entity” and choose an entity from the dropdown menu. Entering “ref:fields” into Value Spec will now display the entity with the correct translation.

