Test Samples are a very useful feature in Uncountable for customers who wish to add an extra layer of precision and traceability in the way results are entered into the platform. While there are several use cases for utilizing Test Samples, you may find that they are appropriate for your team’s usage of Uncountable if any of the following points are true:
- You would like to individually identify and track samples made and collected as part of running specific tests, characterizations, assays, etc. of a particular experiment.
- After making (mixing, formulating, synthesizing, etc.) your experiment, you will then often further process it by aging, conditioning, or treating it in a certain way, such that there may be multiple different types of samples all derived from the same original experiment.
- Your experiments often include multiple steps (processing, synthesis, multi-part formulations, etc.), and you would like to prescriptively record results from tests conducted at each of those various steps.
- Your own team is highly specialized in a way that certain individuals are responsible for conducting specific tests, and you would like them to have a simplified view of an experiment when recording results, which only includes data they are responsible for entering.
- You often collaborate with other groups within your organization (e.g., Analytical department) who will perform specific types of tests on your samples at your request.
- You are part of a team supporting other groups across your organization, and while you would like all the results of tests you have conducted to be directly available to these other groups, you also want those results to be accessible to you in a single location for ease of searchability and analysis.
- The experiment you are running generates samples associated with timepoints, and you would like stricter organization and the ability to delegate testing of measurements at each timepoint.
Note that there are certainly other reasons to utilize Test Samples, and even if some of these points apply to your team, your Uncountable Account Manager may recommend that Test Samples are not necessary to properly organize your data in the platform. With that said, the following article provides a high-level summary of how to set up and utilize Test Samples.
Setting Up Test Sample Templates
It is possible to use Test Samples without pre-defining a set of templates; however, it is recommended that you utilize Sample Templates once you’ve determined that Test Samples will be utilized. Doing so helps to drive greater adoption within your team and standardization in the way results are entered into the platform.
To set up a Sample Template, navigate to the Inputs / Outputs > Outputs > Sample Templates page. Note that you will need Write Outputs permissions within the current material family in order to create new and manage existing Sample Templates.

Sample Templates themselves are composed of Input Groups and Output Groups; to learn more about configuring Input and Output groups, visit the corresponding articles for both. To create a new template, select the “+ Add Test Sample Template” button:
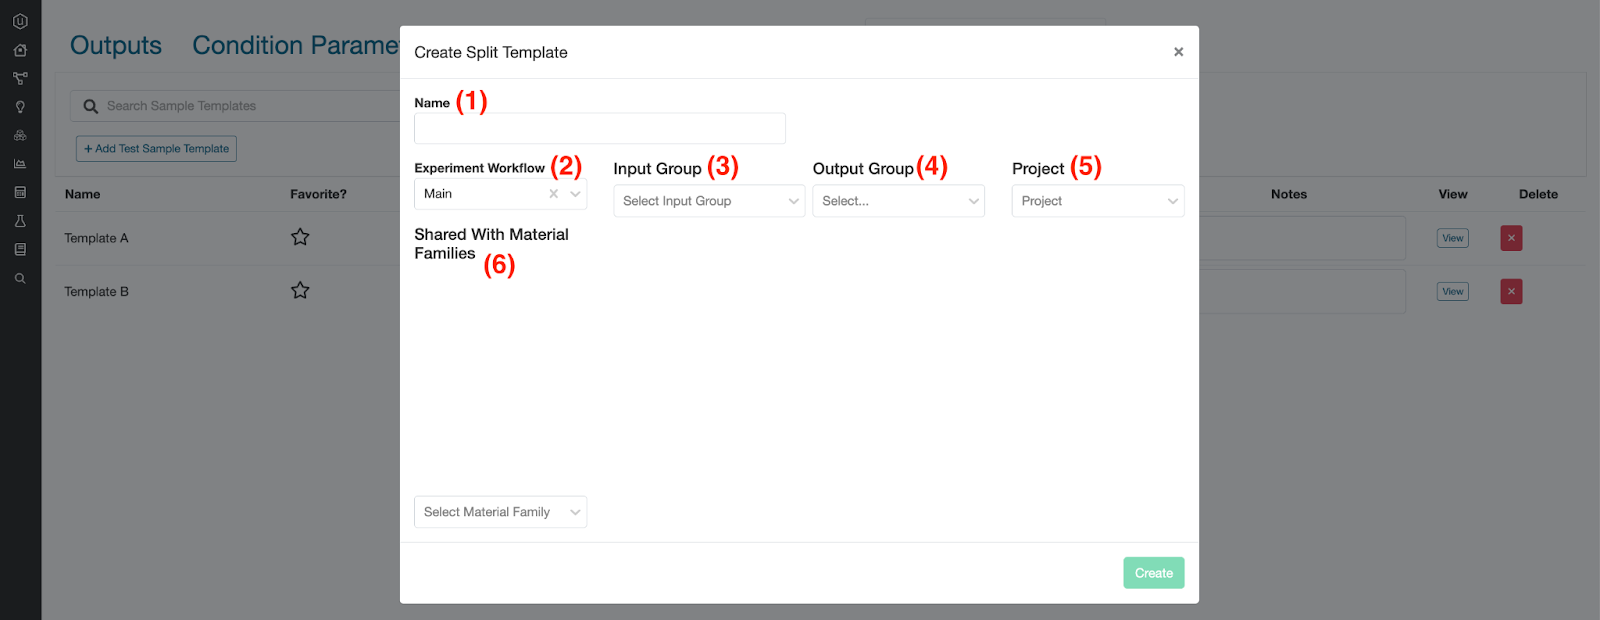
- Name – Give a name to the Test Sample Template. When Test Samples are created, they will be “sub-experiments”, nested underneath the parent experiment from which they were created. Their name will be in the form: [Parent Experiment Name] – [Test Sample Name] – [Suffix #]. As a result, it is important to select a Test Sample name that is relatively succinct and clear to users. Typically the name will be related to the actual test that the test sample represents (e.g., Tensile, Tear, Impact, etc.).
- Experiment Workflow – Specify the workflow that will be used when the Test Sample is created, which could be a simple 1-step workflow or multi-step workflow.
- Input Group – Select the Input Group that you would like to be automatically included when creating the Test Sample. While this is optional, the Input Group will typically include Process Parameters describing the additional conditions to which the sample was subjected as part of preparing it for the particular test that will be conducted. For example, the Input Group might include various aging or conditioning related conditions. Note: If you have selected a workflow with multiple steps, it is recommended that you specify the Input Groups relevant to each step directly within the Workflow editor, rather than within the Test Sample Template.
- Output Group – As the most important piece of a Test Sample Template, make sure that you select the Output Group that will be included when using the template. The same Output Group settings (default or user-prompted Condition Parameters, number of replicates) will apply when using the Test Sample Template.
- Project – Once created, Test Samples will appear nested underneath their parent experiment on the Project dashboard. If you would also like the test samples to appear in their own dedicated project, perhaps as a repository for all samples subjected to a particular test, you can specify a target project in which you would like them to be added. This can be useful for organizational purposes, in particular if you are working in a cross-functional team where you are conducting tests on behalf of other teams, and you would like all your Test Samples to be easily accessible in one place.
- Shared With Material Families – This option is primarily relevant when you are working with different groups who operate in their own material families. Say for example that you are part of an Analytical department, receiving samples from multiple different R&D groups across your organization. You would in thie case create your Test Sample Template within your own Analytical material family but share them with all other material families, so that other teams can utilize the same template when requesting these Analytical tests from you (or your team). The “Shared With Material Families” option is often used in conjunction with specifying a target Project (#5).
Once created, in addition to the fields described above, you may also add Notes to your Test Sample Templates for additional context, as well as Favorite Test Samples that you use frequently. Favorited templates will appear at the top of the Sample Templates page and within selection dropdowns (on Measurements page and Lab Requests).
Depending on your workflow in Uncountable, you may opt to add Test Samples directly from the Measurements page of your Experiments, or from a Lab Request in which your Experiment(s) is/are included.
Adding Test Samples from the Measurements Page
If your team is not currently utilizing the Lab Request features in Uncountable but you do wish to utilize Test Samples, you will add them via the Measurements page of your experiments. In this workflow, once you are on the Measurements page, you will select the “+ Create Test Samples” button available in the ribbon. Note: The exact location of this button may vary depending on customizations in place in your environment.

After selecting the “+ Create Test Samples” button in the ribbon, a window will appear below on the Measurements page with several options:
- Test Sample Template – If you’ve already created Test Sample Templates, they will appear in this dropdown list (with any favorites at the top of the list).
- Number of Test Samples – If you would like to create more than one Test Sample per Experiments you can change this number, creating up to 50 Test Samples per Experiment at once.
- An additional option appears in the dropdown: Condition Matrix. This option is designed to help create multiple test samples with varying inputs. Each input in the input group will now provide a field with an ‘Add’ button below, which when clicked will add another blank field underneath the selected input.
- Once you’ve added all the desired conditions and selected the ‘Add Test Sample’ button below, Test Samples will be generated for every possible combination of options chosen. In the below example, four test samples would be generated with the following combinations of Resin Mix Speed and Temperature: ([2,25] , [2,50], [4,25] , [4,50]).

- Workflow – If you’ve selected a Test Sample Template, this field will auto-populate with the workflow associated with the template; otherwise, you can manually select a workflow here.
- Sample Name – If you’ve selected a Test Sample Template, this field will auto-populate with the name of the template. However, you can manually override this name if you would like. If you have not utilized a Test Sample Template, you will be required to enter a name in order to create the Test Samples.
- Inputs – If you’ve selected a Test Sample Template, this field will auto-populate with the Input Group associated with the template. For inputs with default values set in the Input Group, you will see those appear here, and you can modify those default values and enter in values for other inputs present within the group.
- Outputs – If you’ve selected a Test Sample Template, this field will auto-populate with the Output Group associated with the template. Alternatively you can Add Outputs manually to the Test Sample that will be created.
- Conditions – Any conditions that apply across all outputs included in the Output Group selected in #6 will be displayed here. You can also add additional Condition Parameters to all outputs directly from this section, if for example you would like to specify the Equipment that will be used for the particular test.
Adding Test Samples to a Lab Request
If you are part of a team already utilizing the Lab Request features in Uncountable to manage your sample submission and testing activities in the lab, then it is likely most appropriate to create Test Samples as part of the Lab Request process itself. In the same way that traditional Output Groups can be added to a Lab Request, Test Samples can also be added to indicate that a particular set of tests should be done on samples originating from a Parent Experiment.
In order to use the Lab Request method for creating Test Samples, you must create Test Sample Templates, unlike the “on-the-fly” creation method that is available from the Measurements page. Once you’ve created a new Lab Request for your experiment(s), you will be able to add Test Samples directly from the Measurements section of the request:

Once you’ve selected a Test Sample, you will be prompted to fill in values for Condition Parameters tied to the Output Group (1) and Process Parameters present in the Input Group (2). Depending on your desired logic for creating Test Samples, you may also choose to only create the Test Sample(s) for a subset of the Experiments included in your Lab Request. To do so, choose the “Select Experiments” (3) option and specific for which experiments the particular Test Sample should be created. If you do not select any experiments, the Test Sample will be created for all the Experiments included in the Lab Request.

Additionally you may choose to add a Test Sample (4) to the already created Test Sample, thus creating two layers of Test Samples for your Experiment(s). This hierarchy of Test Samples can be extrapolated to multiple layers, depending on your desired implementation that best represents the various stages of sample processing that takes place as part of tests you conduct in the lab.
Finally, you can also simply add more Output Groups (5) to the Test Sample, if you would like additional results to be collected other than those included by default in the Test Sample Template. Note: Some customers opt to include only Input Groups in their Test Sample Templates, with Output Groups individually selected in this way via the Lab Request process.
Viewing Test Samples
On the Project Dashboard
Once Test Samples have been created for your Experiments (using either of the two approaches outlined above), they will be displayed on the Project dashboard in a nested fashion underneath the associated Parent Experiment. You can select the expand icon (1) to the left of the experiment name to expand the nested Test Samples.

By selecting the Parent Experiment itself and navigating to the Measurements page (2), you will see the Test Samples displayed below any outputs present on the Parent Experiment itself (see next section). Alternatively, you may also select the “View Test Samples” button (3) to navigate directly to a side-by-side view of all the Test Samples associated with a particular Experiment.
On the Measurements Page
On the Measurements page of your Experiments, Test Samples will be displayed similarly to Outputs recorded directly on your Experiments. Test Sample Output can be easily identify by the darker and thicker horizontal lines separating the individual Test Samples, as well as the headers indicating both the Test Sample name (e.g., RM Demo – 1” and the More Info button allowing you to view the Recipe details of each Test Sample.

In addition, there are several options in the ribbon allowing you to toggle between different views or display additional test sample related information. In the screenshot below, these options have been pre-filtered by searching for “test sample” in the Search Actions field.

- Create Test Samples – Key button used to create new Test Samples directly from the Measurements page of an Experiment.
- Test Sample Request – Shortcut to create a Lab Request specifically for the Test Samples currently displayed on the page.
- View Test Samples – Allows you to switch to a side-by-side view of the Test Samples for the currently selected Experiment, rather than having the Test Samples listed one after another vertically on the Measurements page of the Parent Experiment.
- Test Sample Header – Allows you to display test sample Inputs or Metadata directly in the header of each Test Sample on the Measurements page of the Parent Experiment. For instance, if you would like the Aging Temperature (Process Parameter) or Technician (Metadata) to be displayed directly on the Measurements page, you can select those using this button. The selected options will persist once you’ve made the changes and left the page.
- Reorder Test Samples – Allows you to reorder test samples if for whatever reason the order in which they were created does not align with the order you would like them displayed on the page. This order will persist once you’ve made the changes and left the page.
- Show/Hide Test Samples – By default Test Sample output rows will be displayed on the Measurements page of the Parent Experiment; however, you may choose to hide them if you have a large number of test samples associated with every experiment.
- View All Test Samples – If you are viewing the Measurements of multiple Experiments at once, all of which have their own associated Test Samples, you may select this option to switch to a view with all Test Samples associated with the respective Parent Experiments displayed side-by-side.
Further Templatization in Workflows
As you begin leveraging Test Samples further and in more advanced ways, you may determine that you would like to further templatize your workflows to include Test Samples by default. In the Workflow Editor (Inputs / Outputs > Workflow), it is possible to associate Test Sample Templates with specific Steps within a Workflow. After selecting a Workflow and a specific Step within the Workflow, you may associate one or more Test Sample Templates with the Step, using the Test Sample Templates field on the right side of the Workflow Editor.

This further level of templatization for Test Samples using Workflows is ultimately most beneficial when you have a standard process with the same experiment and associated tests are conducted repeatedly in the lab (or perhaps in a QC setting). In fact, this particular Test Sample to Workflow Step association is a key part of the Technician View feature in Uncountable. For more information, please reach out to your dedicated Account Manager.