The well plate editor is a powerful tool in Uncountable that can be used to capture and compare data across multiple experiments in a matrix-style view. Common use cases for the well plate editor include biological assays, biofermentation experiments, and exposure panel testing in the paints and coatings industry.
There are several functions built into the well plate editor including but not limited to creating new recipes or test samples, assigning control experiments, capturing results via uploaders, and accessing quick visualizations for results comparison.
Accessing the Well Plate Editor
The Well Plate Editor can be accessed in two ways on the platform.
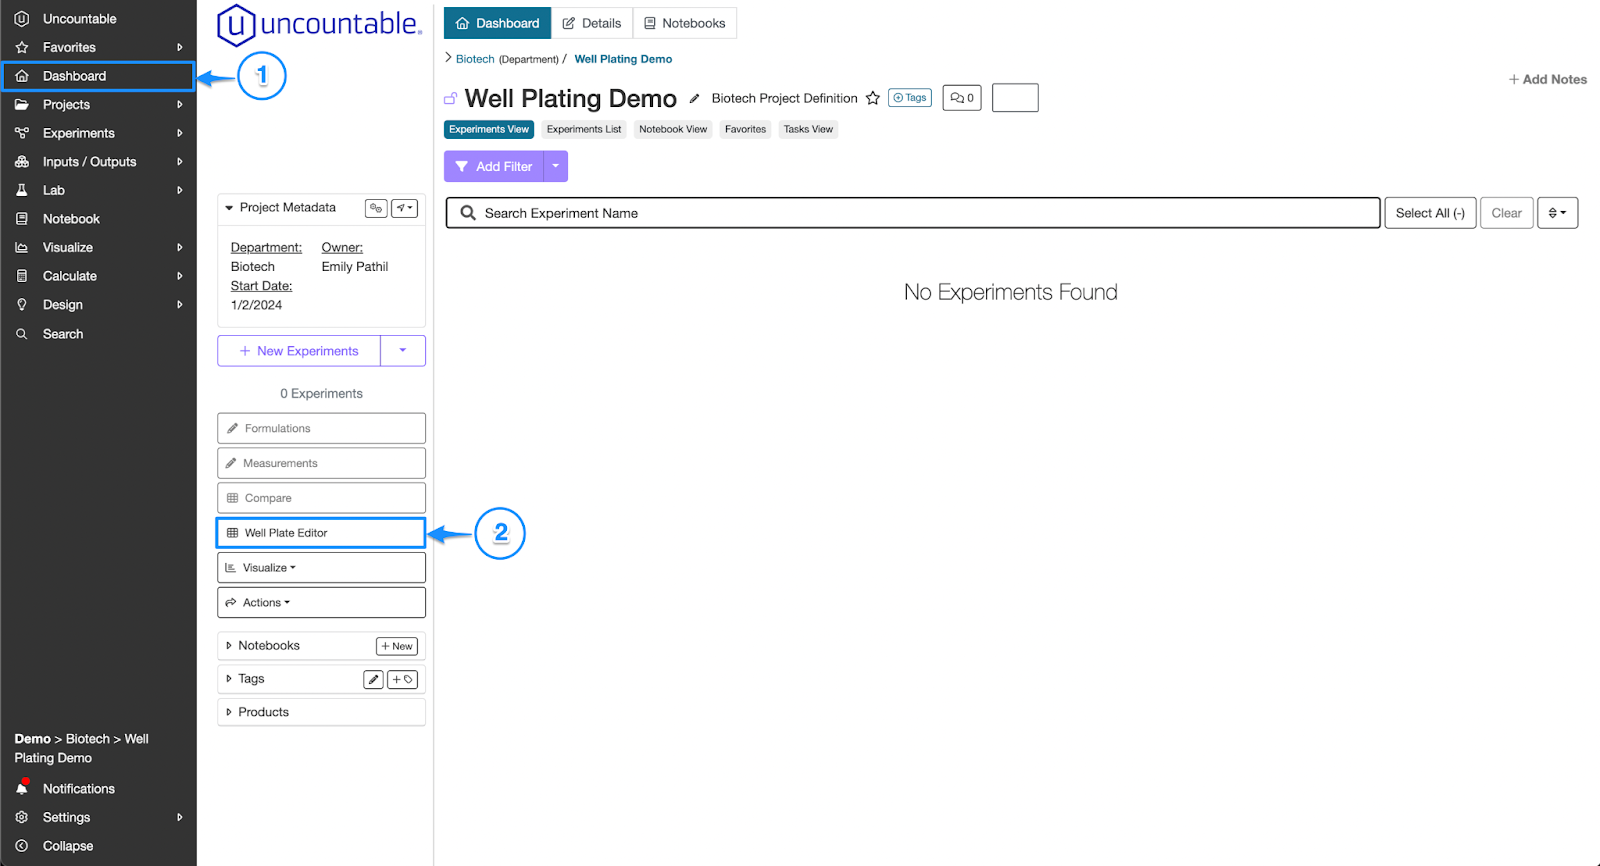
Your Uncountable contacts can enable the Well Plate Editor to show on your Dashboard page. The Button will appear on the left hand side of your screen between your navigation bar and your experiments listing.
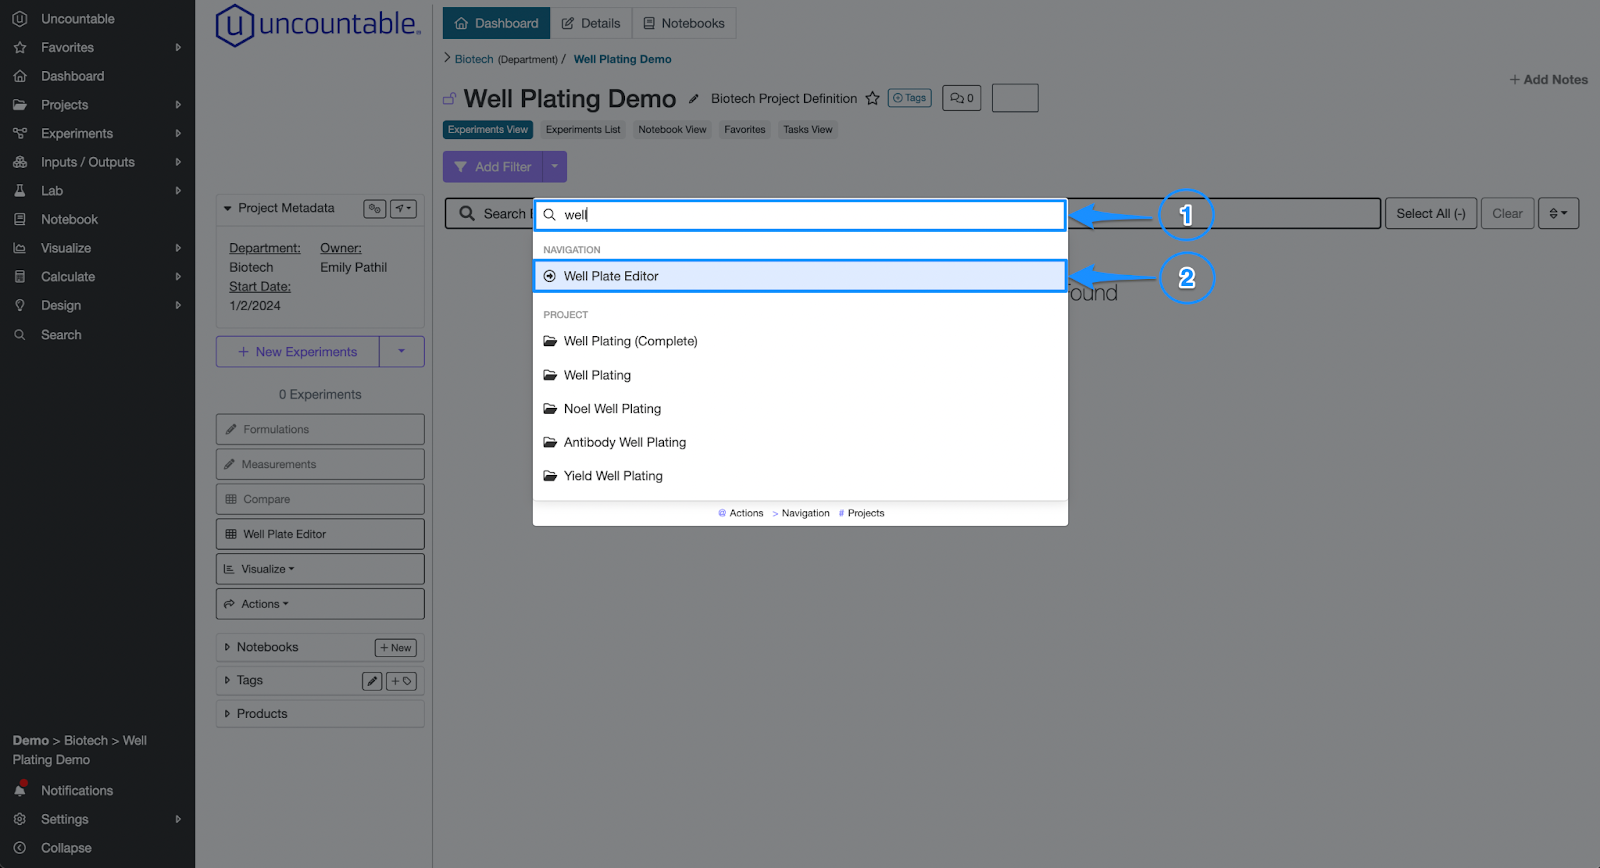
You can also use our quick search feature to access the well plate editor. Click CTRL+K (or CMD+K on a Mac) to surface the quick search tool. Then, enter “Well Plate” in the search bar and select “Well Plate Editor” in the results that appear.
Creating a New Well Plate
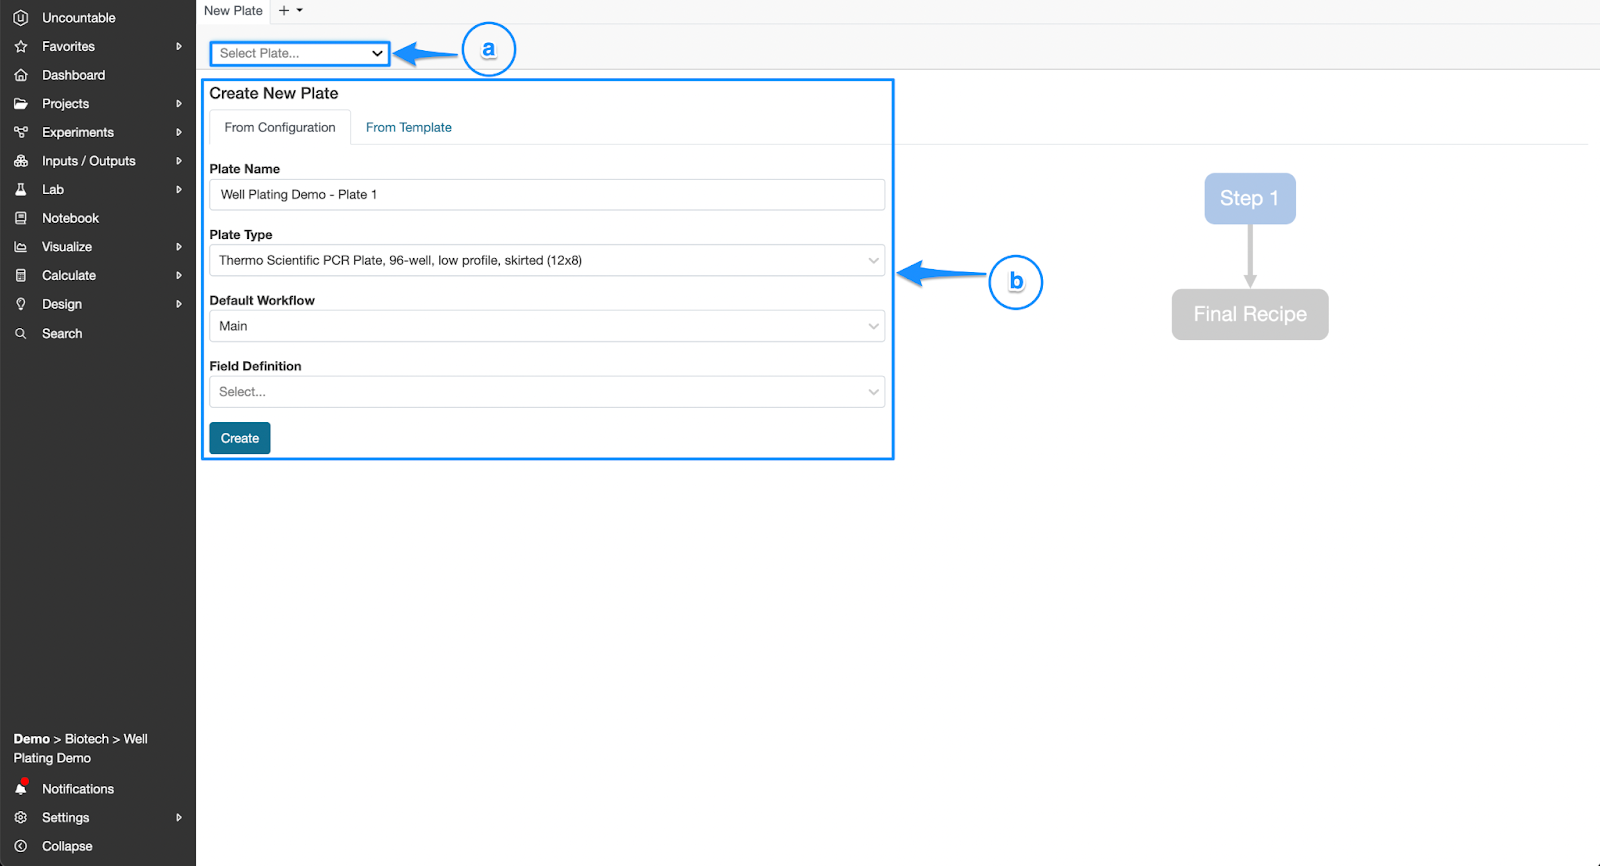
Once you select “Well Plate Editor”, you will be directed to a page where you can either select an existing well plate from the dropdown (a) or create a new plate (b).
To create a new plate,
- Plate Name: Assign a name to the plate. A name will be auto-generated for you, but this is editable.
- Plate Type: Select the type of plate you will be using. There are several options available including 96-well plate, 384-well plate, and 1×8 panel.
- Default Workflow: Select the experiment workflow and variant you’d like to use if you’re setting up your experiments in the well plate editor.
- Field Definition: Select whether you’d like to create an experiment group linked to your plate. This step is optional and can be left blank in most cases.
Once all 4 fields are filled out, click the blue “Create” button.
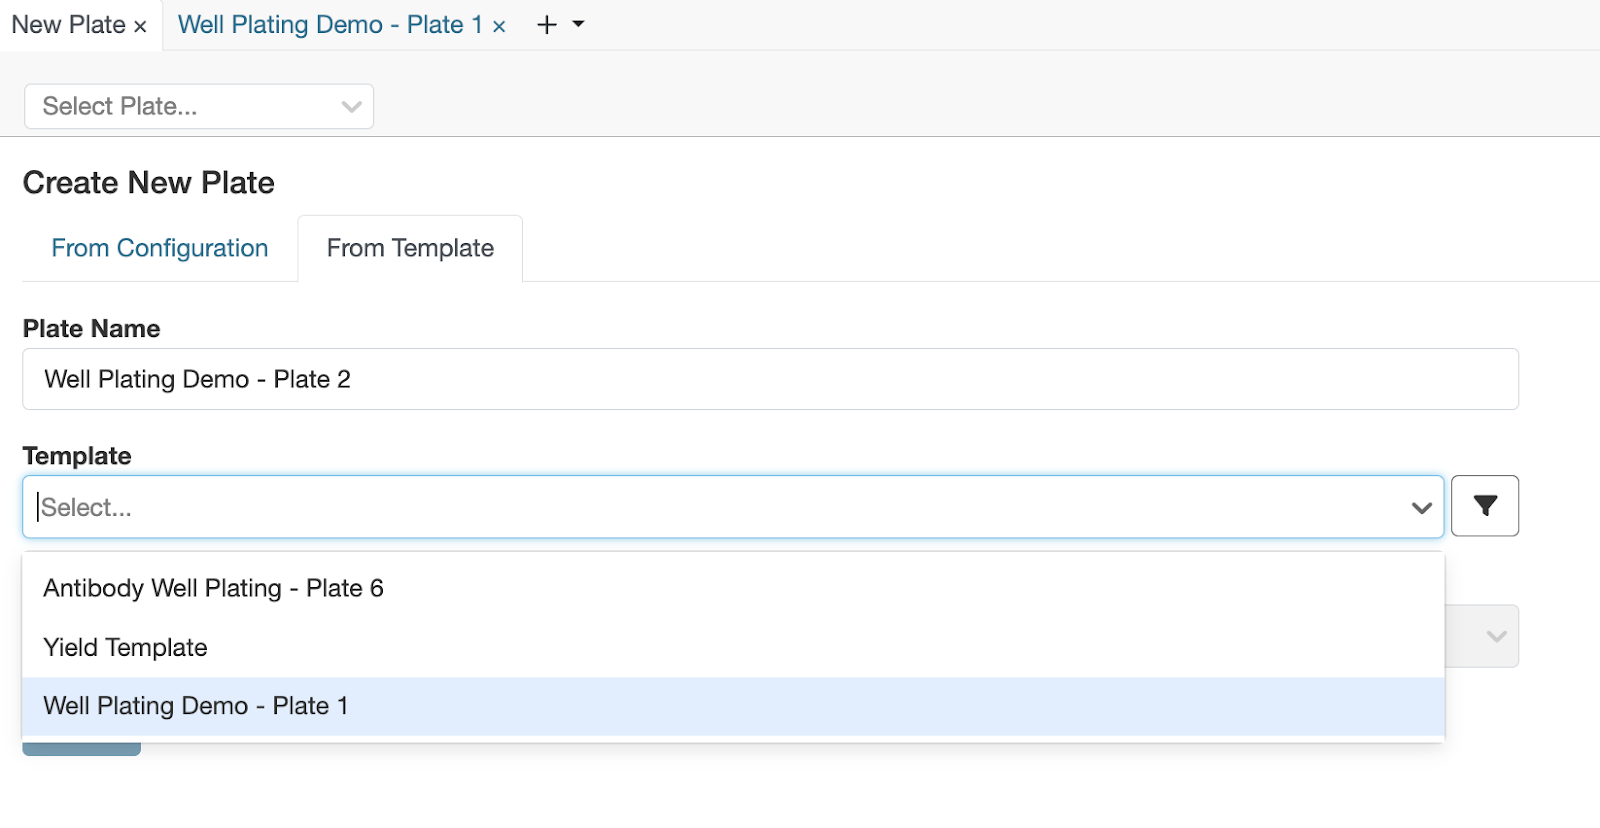
We do have the ability to create Well Plate Templates in cases where similar plate set-ups will be run several times. To create a plate from a template, you can select the “From Templates” tab.
Setting Up your Well Plate
For this example, I’m setting up a basic 96-well plate with only one step in the workflow, as you can see above.
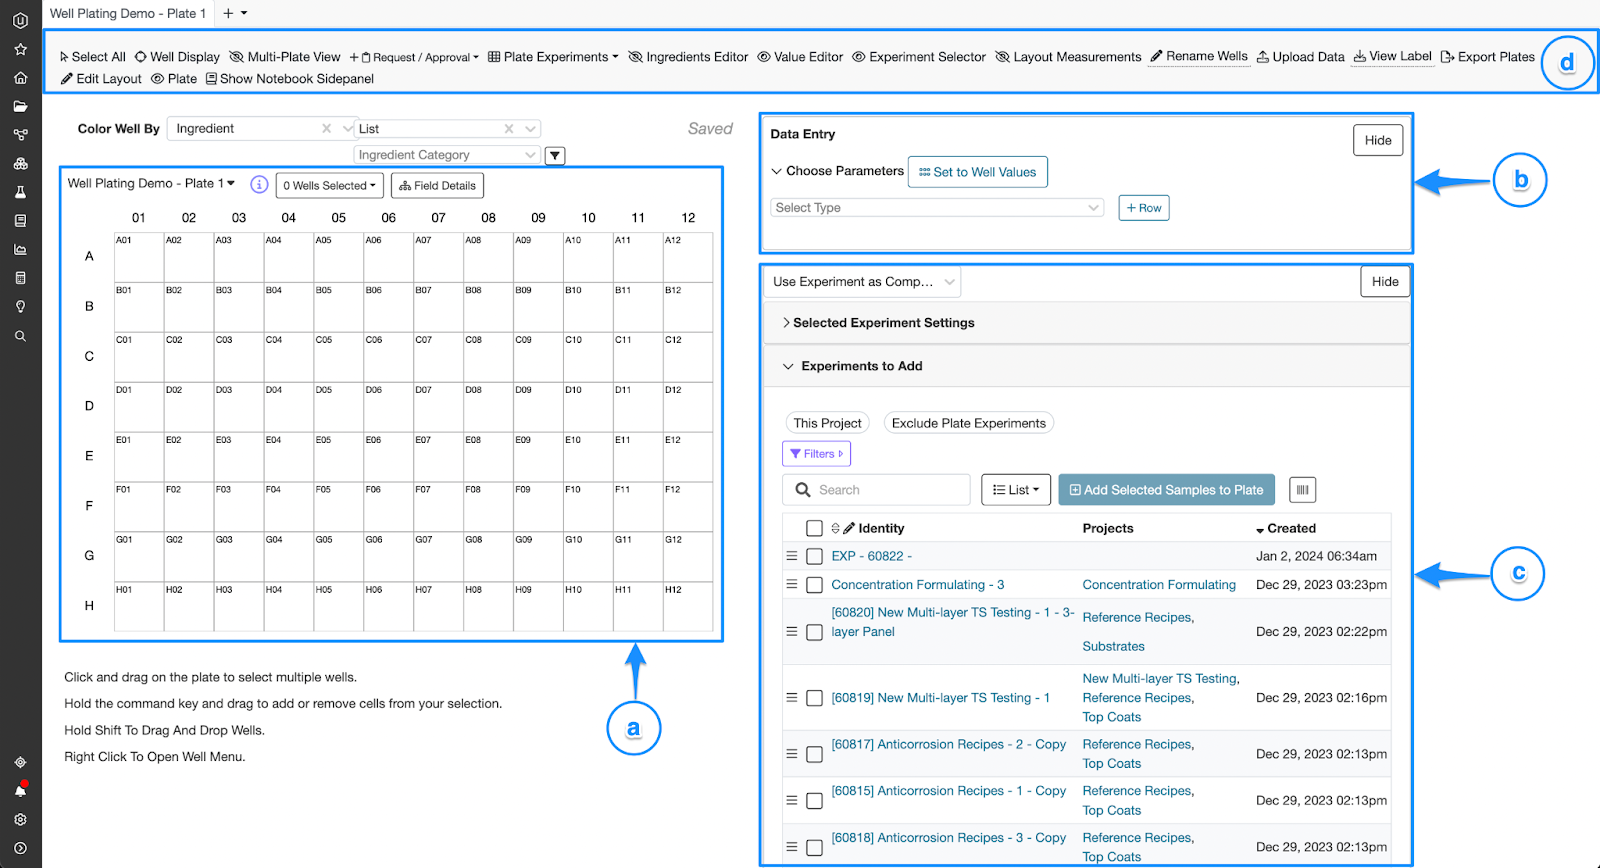
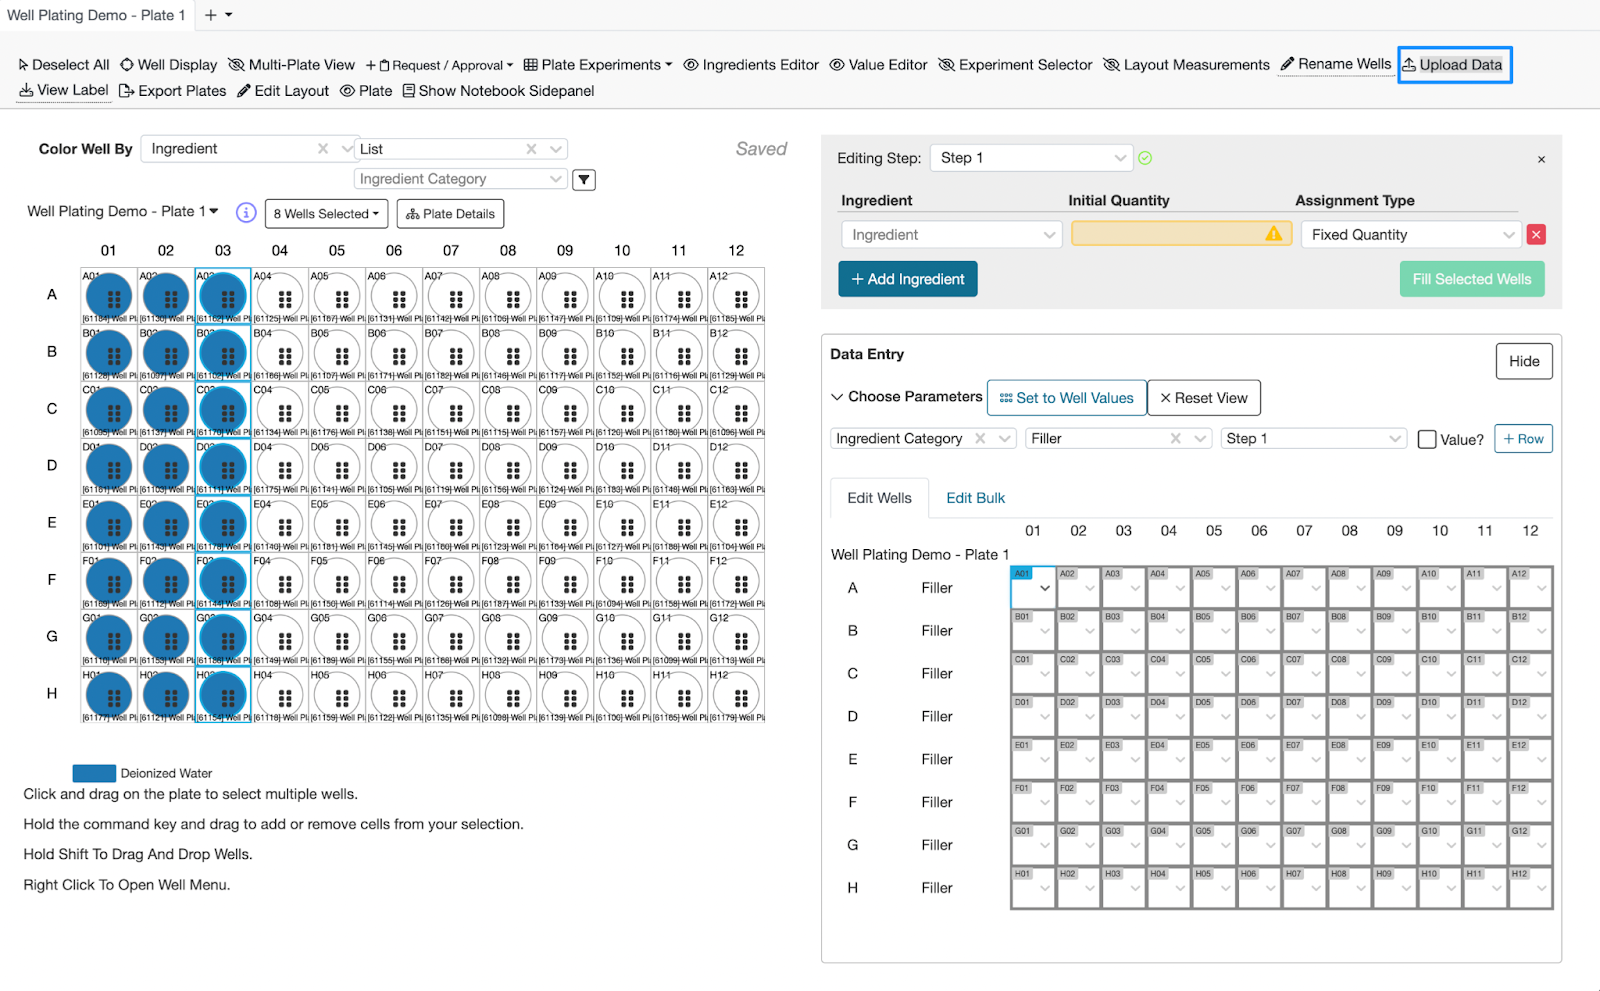
Once you click the “Create” button, you will be directed to a page with the well plate diagram on the left hand side of the screen (a) and two menus on the right: the Value Editor (b) and the Experiment Selector (c). This is our default view for the well plate editor, but the various menus can be shown or hidden using the gray toolbar at the top of the page (d).
Assigning Existing Experiments to your Well Plate
There are generally two ways you can set up your well plate: assign existing experiments to the well plate or create new experiments in the well plate editor itself. Let’s explore the first option.
To assign existing experiments to the well plate, you will use the Experiment Selector menu (Section c from the previous screenshot).
First, you will need to decide how you would like to bring experiments into the well plate. There are 4 options in the dropdown at the top of the Experiment Selector menu:
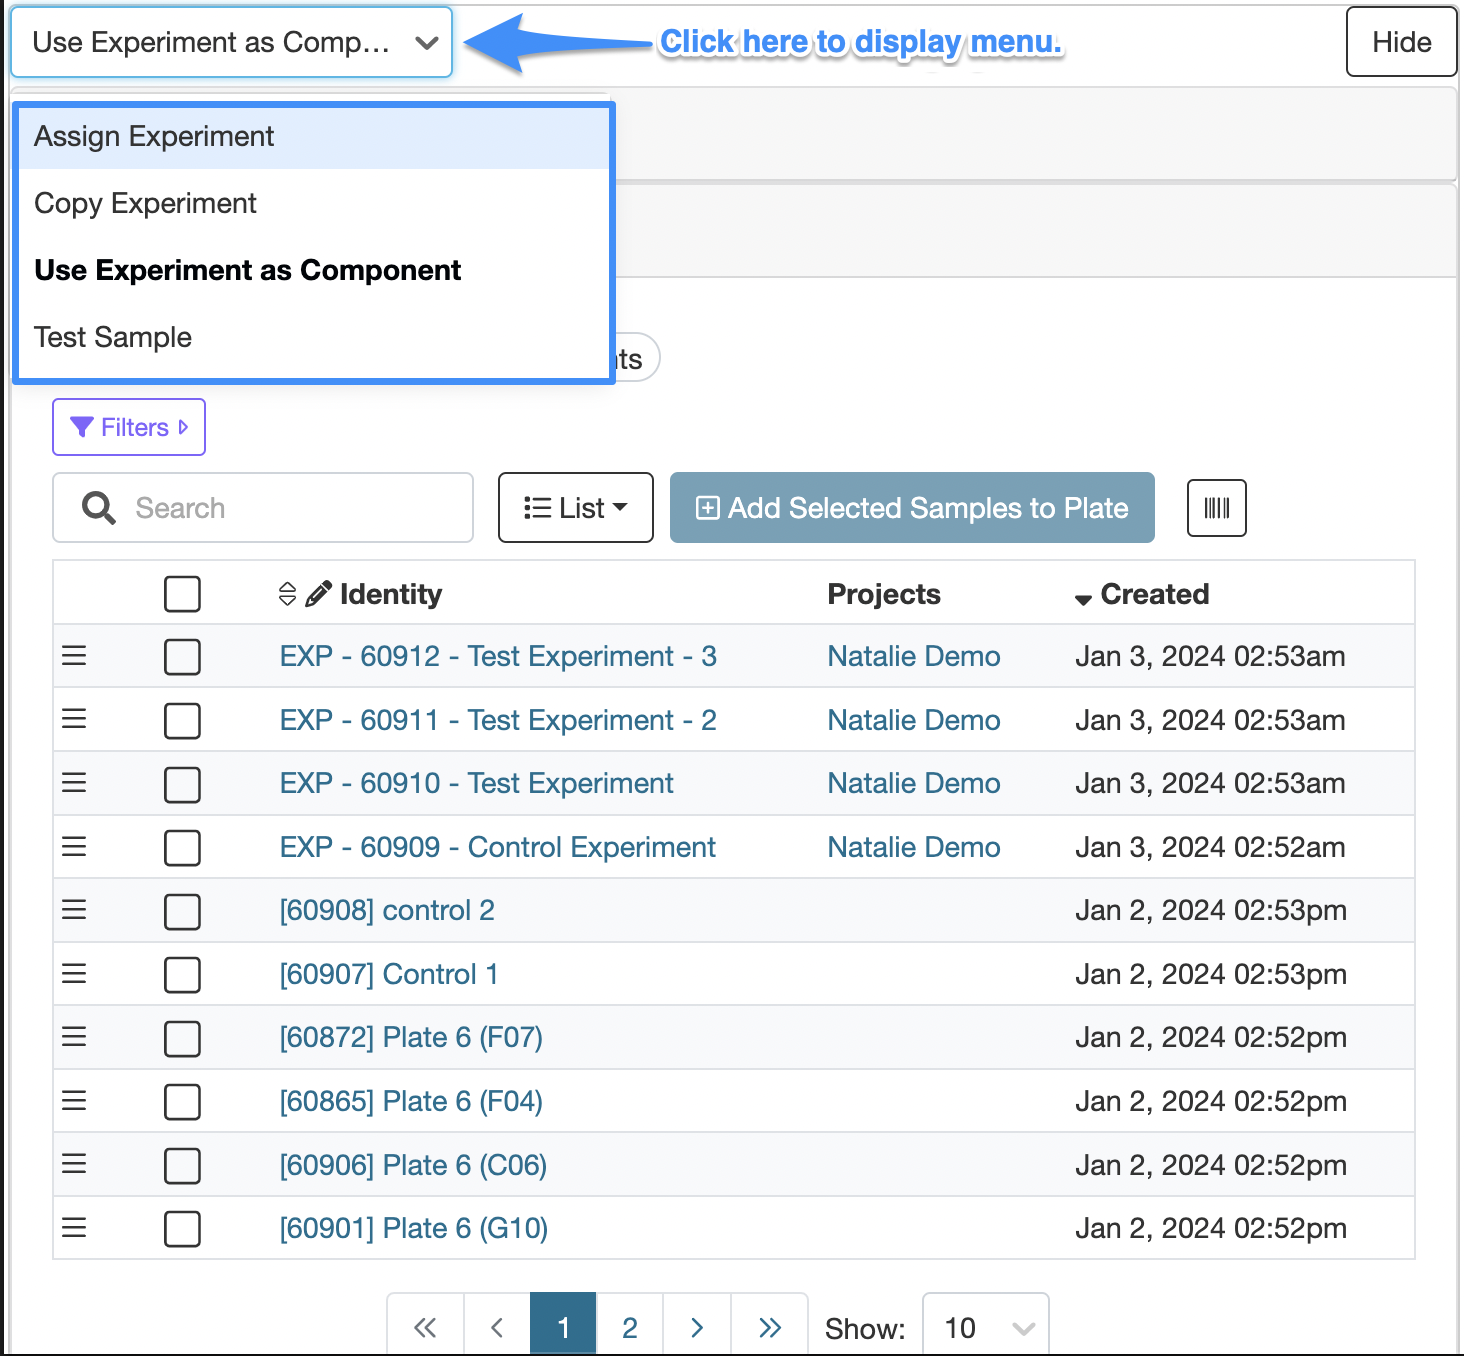
- Assign Experiment: This option will simply assign an existing experiment to a well. Any outputs or ingredients that are recorded will be written directly to that experiment. If the experiment is placed in multiple wells, any outputs that are recorded will show as replicate measurements.
- Copy Experiment: This option will create copies of the experiment placed in the well.
- Use Experiment as Component: This option indicates that the experiment you dragged into the well is one component of the ingredients in the well. This is useful in cases where you have an experimental sample and a prepared buffer or dye (with a separate recipe) that you’d like to combine in the well.
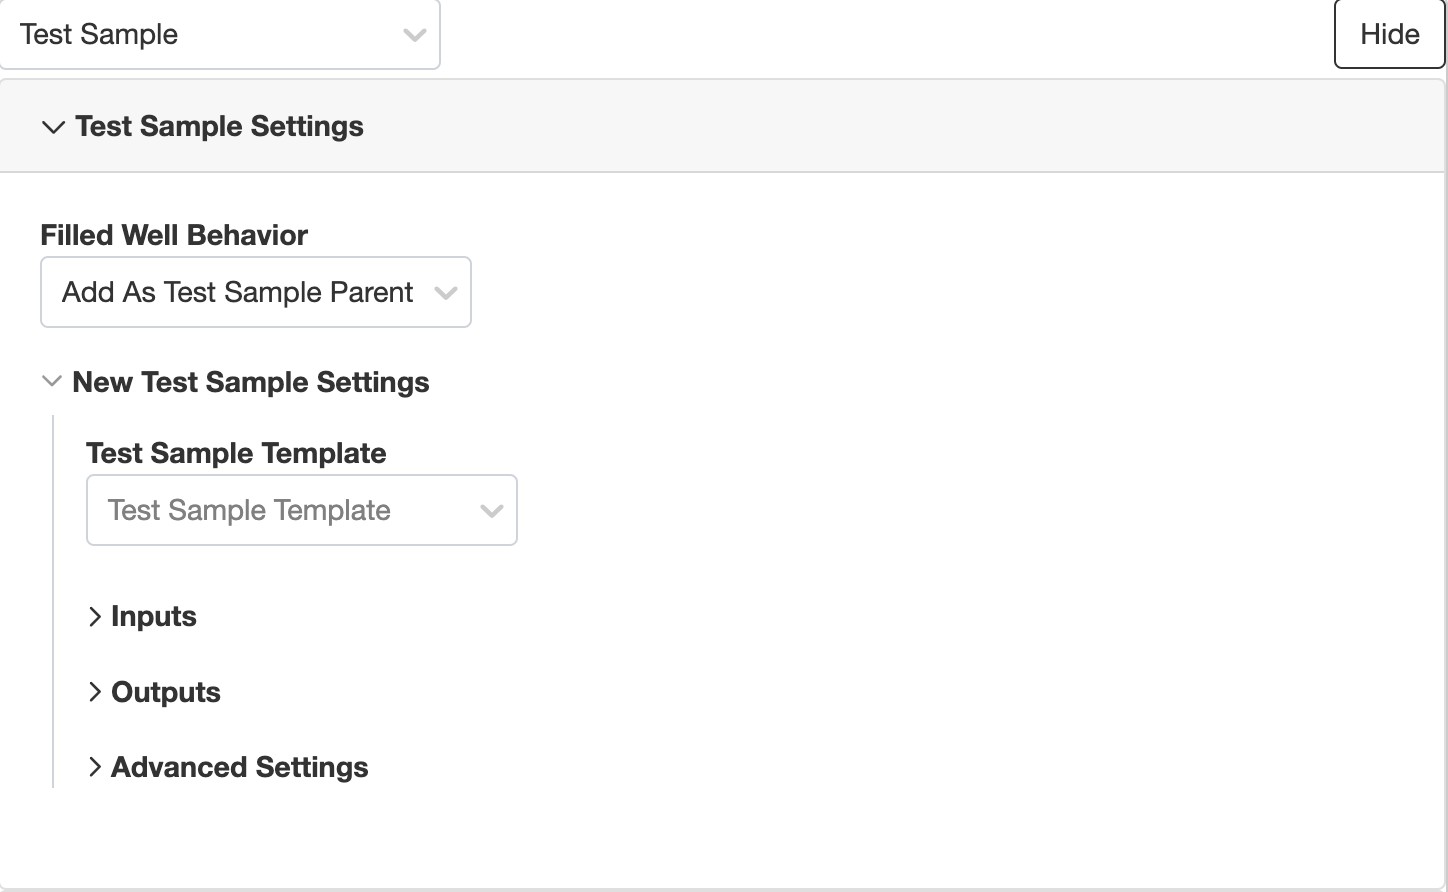
- Test Sample: This option creates a test sample on the experiment that you have dragged to your well. This is often the most recommended method as it allows you to repeat experiments in different well plates with clearer separation of results. If you select this option, you can choose a specific test sample template or specify input and outputs. Additionally, you can specify the filled well behavior for test samples. Check out this article for more information on test samples.
- Add As Test Sample Parent: This option takes the experiment in the well and assigns a parent to it. This option is particularly useful in well plating templates as it provides a single experiment that you can reference for future analysis. No new experiments are created, but a parent-child link is created between the test sample and the parent experiment.
- Overwrite Well: This option simply creates a test sample in an empty well or overwrites any existing values or experiments in the well. A test sample is created for the experiment you dropped in. Unlike the previous option, a new experiment is created in addition to the parent-child link between the experiment and the new test sample.
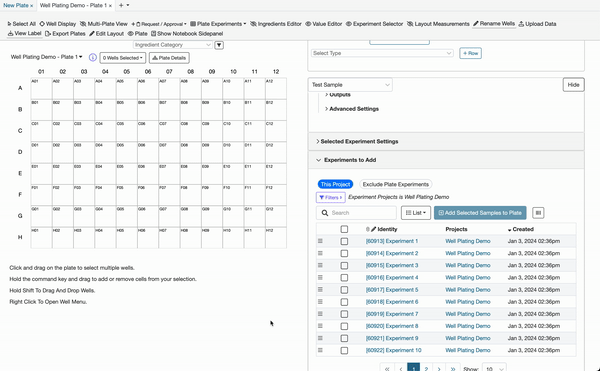
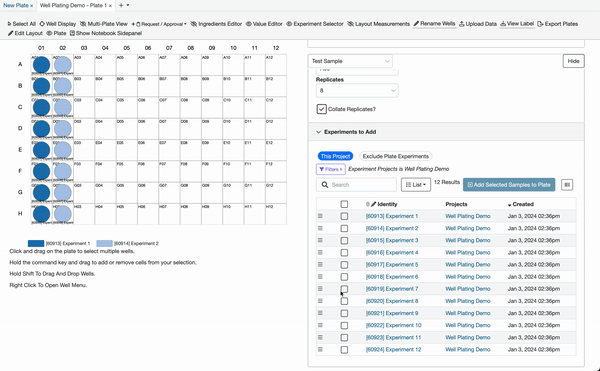
Once you’ve selected the method for adding experiments, you can choose the experiments you’d like to add to your plate. We highly recommend using the quick filters (a) and additional filters (b) to narrow down the experiments you can choose from, especially in cases where you may have hundreds of experiments in your material family.

To add an experiment to the plate, highlight the wells you’d like to place the experiment in and use the three horizontal lines (c) to drag and drop the experiment into the highlight cells. To select an entire row or column, you can click on the row or column header.
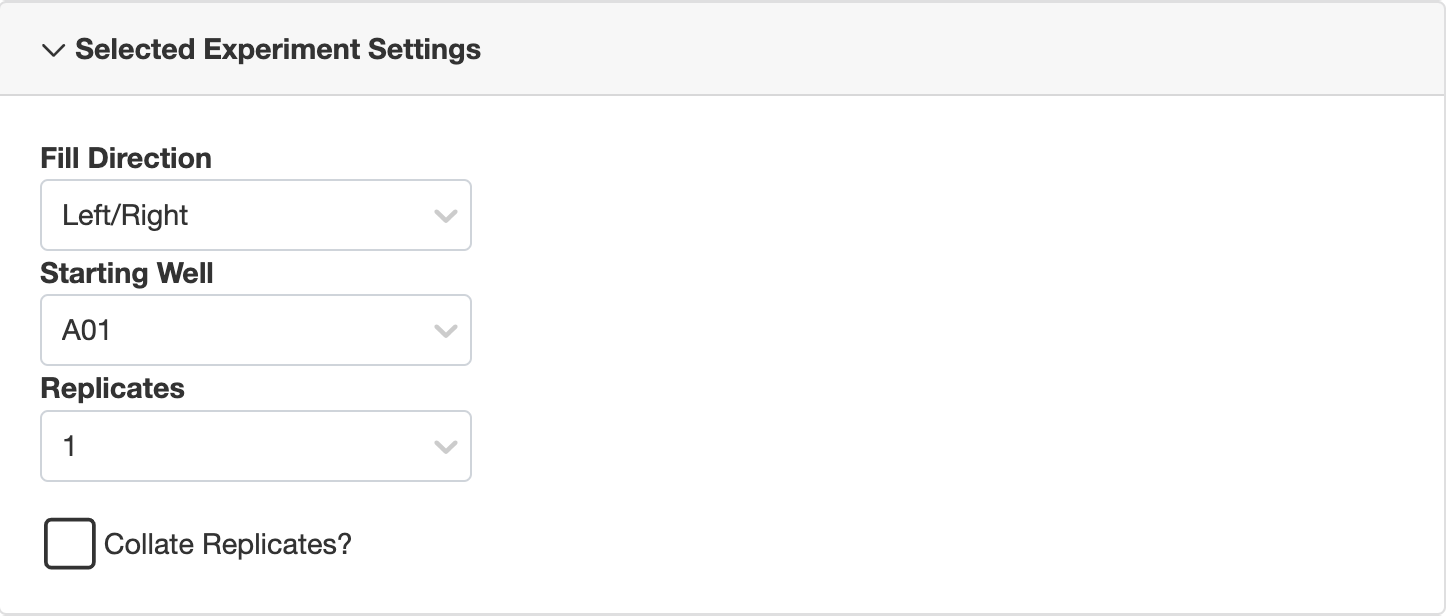
To add multiple experiments to the plate at once, you can select the checkboxes (d) next to multiple experiments and use the “Selected Experiment Settings” menu to determine Fill Direction (Left/Right, Up/Down, Randomize), Starting Well, Number of Replicates, and whether you’d like the replicate wells to be collated. Click “Add Selected Sample to Plate” to fill the wells.
Creating Recipes in the Well Plate Editor
You also have the option to create recipes from scratch directly from the well plate editor.
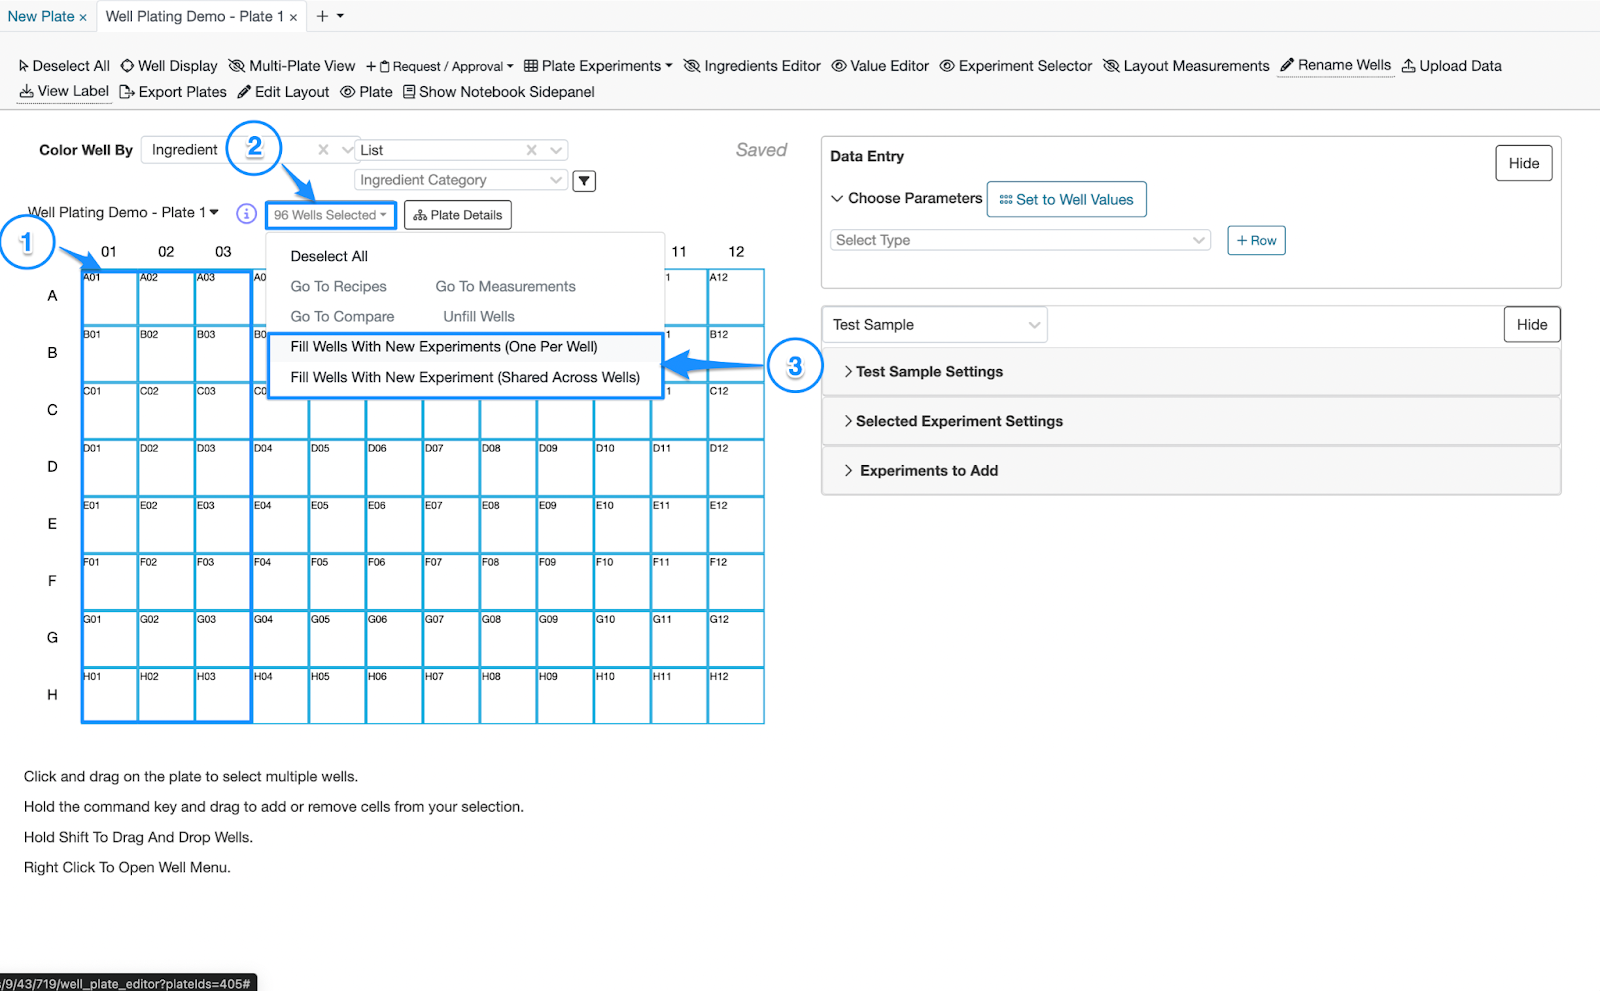
To get started, you can fill wells with new experiments. The new experiments will be created with the workflow and variant that you selected when you created in the plate. First, highlight the wells you’d like to fill. Then select the button above the well plate that says “X Wells Selected”. Finally, choose how you would like to fill the wells.
- Fill Wells with New Experiments (One per Well): This option will create a unique experiment in each well that you’ve highlighted.
- Fill Wells with New Experiment (Shared Across Wells): This option will create a single experiment and place that experiment in the wells you’ve highlighted.
In this case, let’s fill all the wells with a new experiment. We can see below that there is a unique experiment in each well. Now, we’ll use our Ingredient Editor and Value Editor menus on the right to assign different inputs to our wells. As mentioned previously, these menus can be shown and hidden from the gray toolbar at the top of the page.
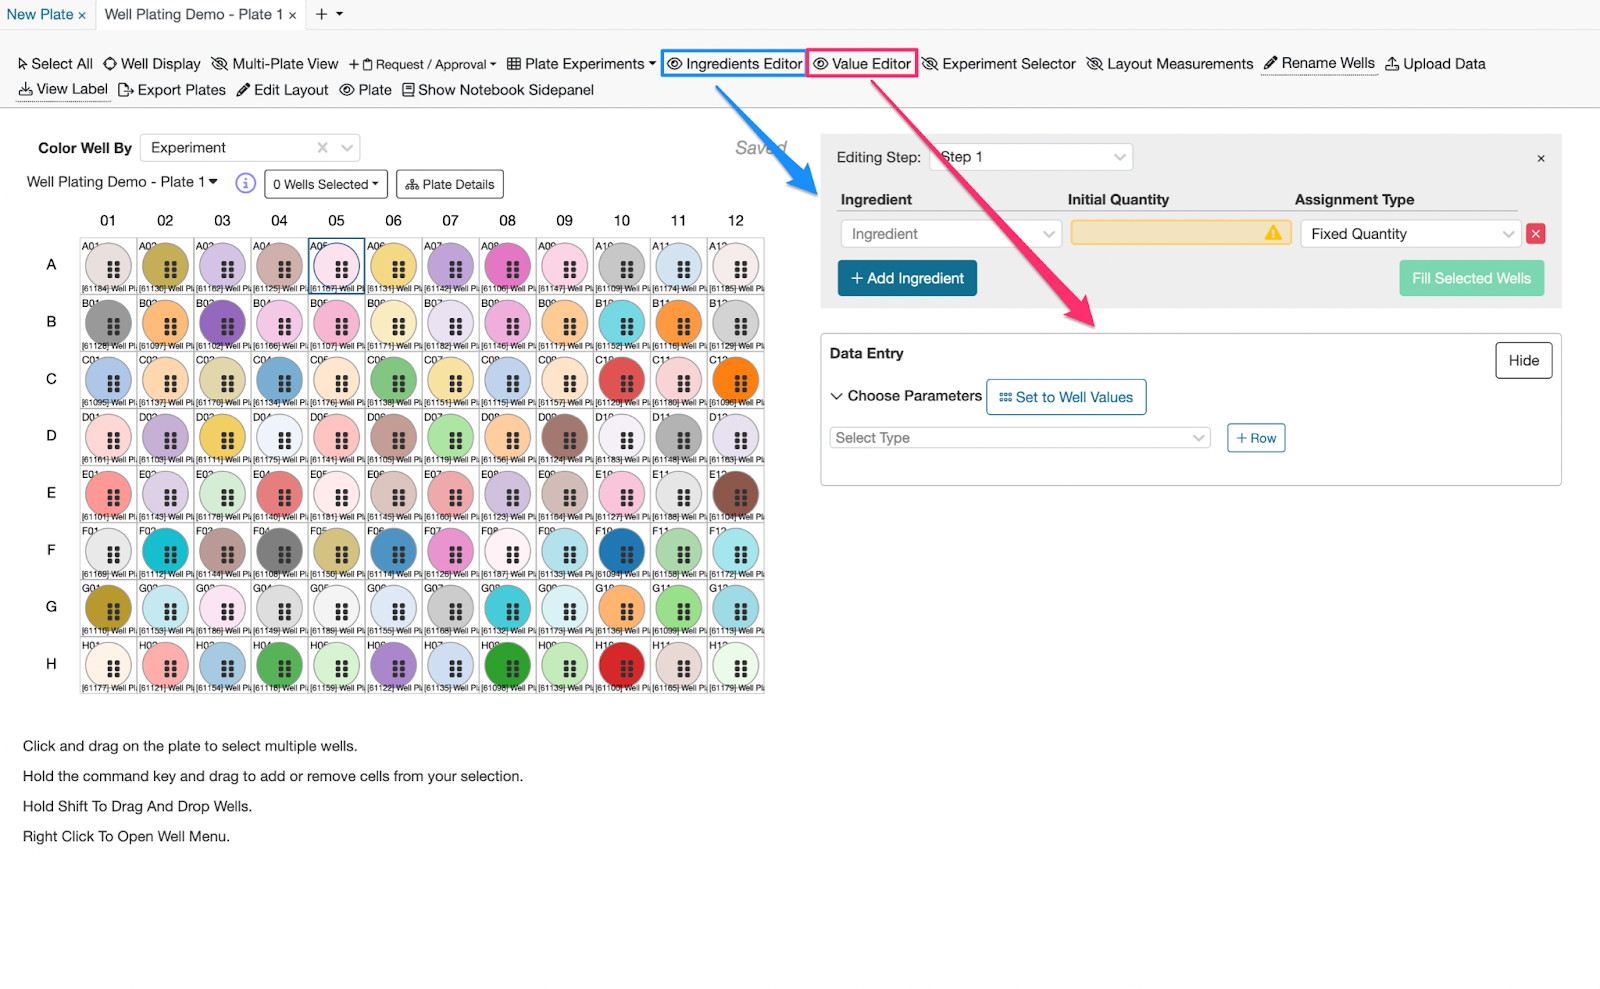
Ingredients Editor
The ingredients editor allows you to assign specific ingredients with quantities to the wells of your choosing.
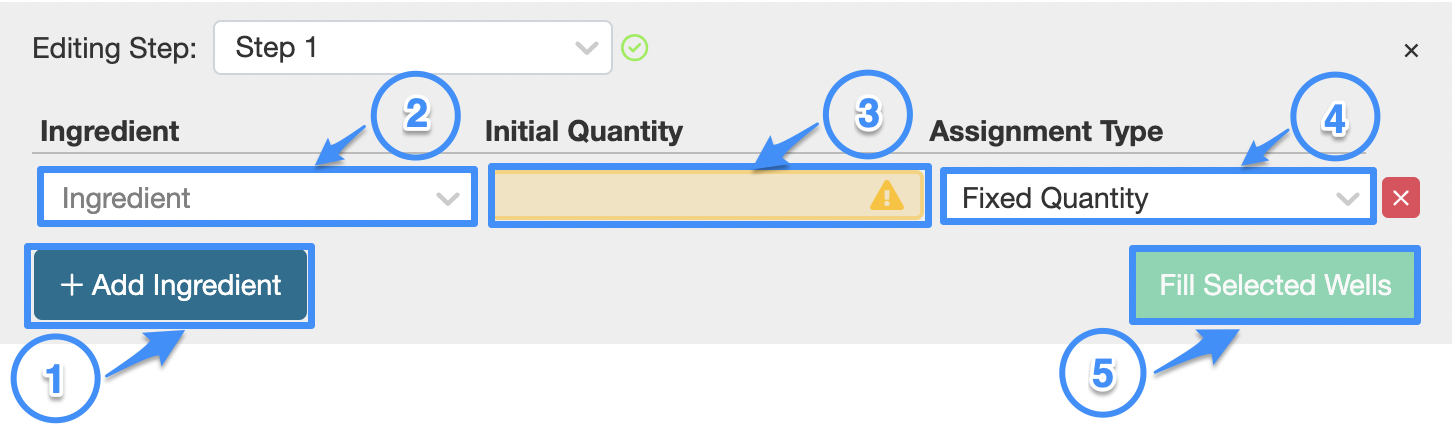
- Click the “+ Add Ingredient” button.
- Select an ingredient from the Ingredient dropdown menu. This includes intermediate recipes. For example, if you have a recipe in Uncountable for a buffer, you can select that recipe.
- Specify an initial quantity. This quantity will assume grams as the unit unless you are using a workflow that specifies otherwise.
- Select an Assignment Type:
- Fixed Quantity: Assigns a constant value as the quantity
- Linear Steps: Adjusts the quantity in each well by the specified step size. For example, if the initial quantity is 1 and the step size is 2, the first highlighted well will have a value of 1g for that ingredient, the next well will have 3g, then 5g, and so on.
- Multiplication: Adjusts the quantity in each well by the specified multiplier. For example, if the initial quantity is 1g and the multiplier is ½, the first highlighted well will have a value of 1g for that ingredient, the next well will have 0.5g, then 0.25g, and so on.
- Click “Fill Selected Wells” to add the ingredient to the well.
Using these options, you can design recipes directly from the well plate editor with a great deal of flexibility.
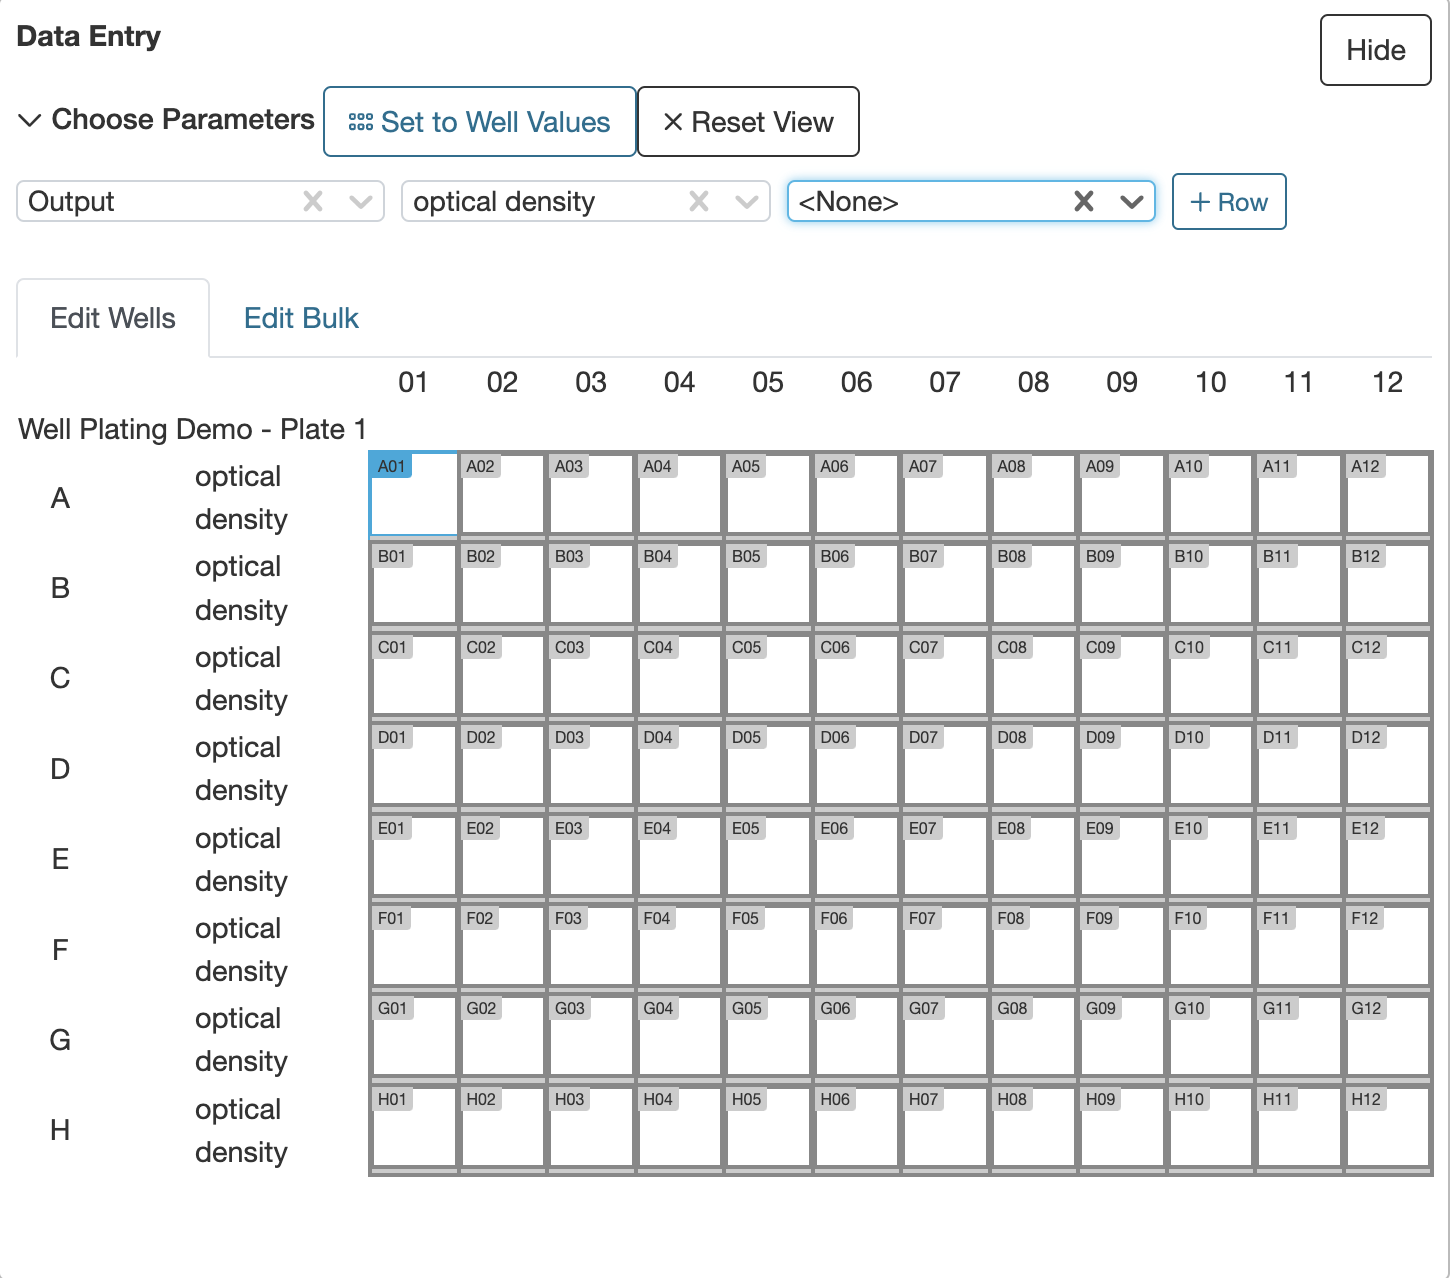
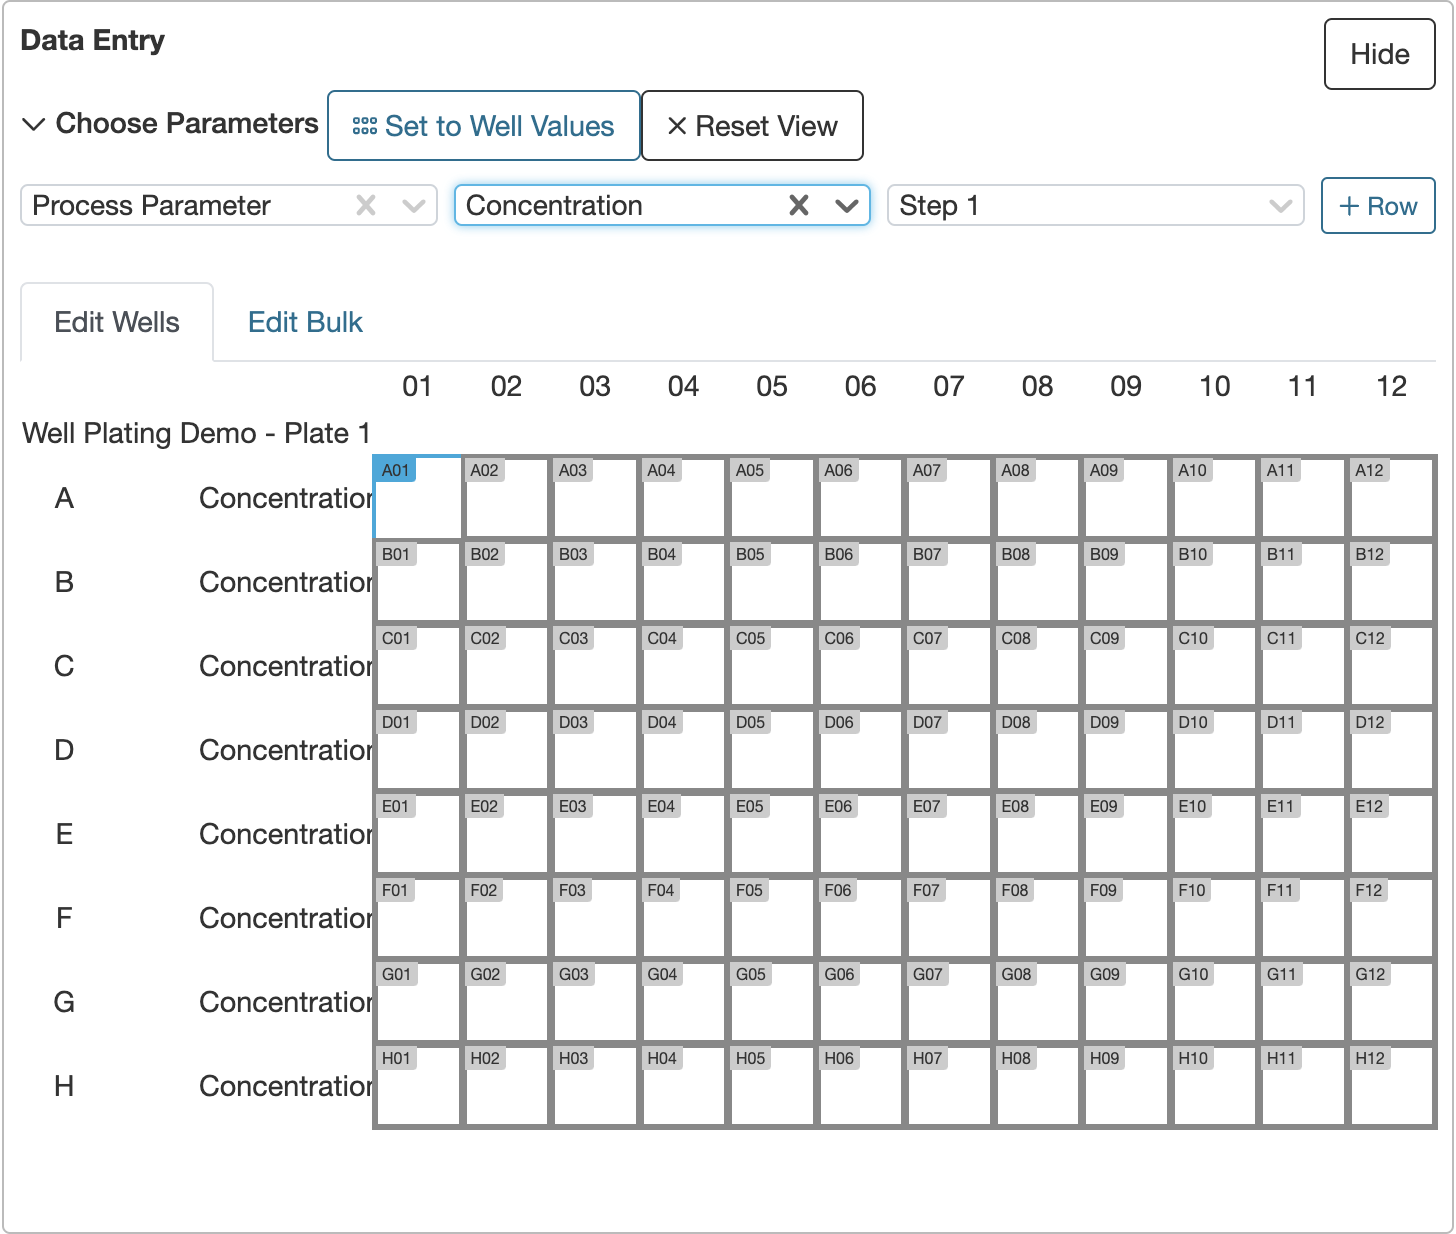
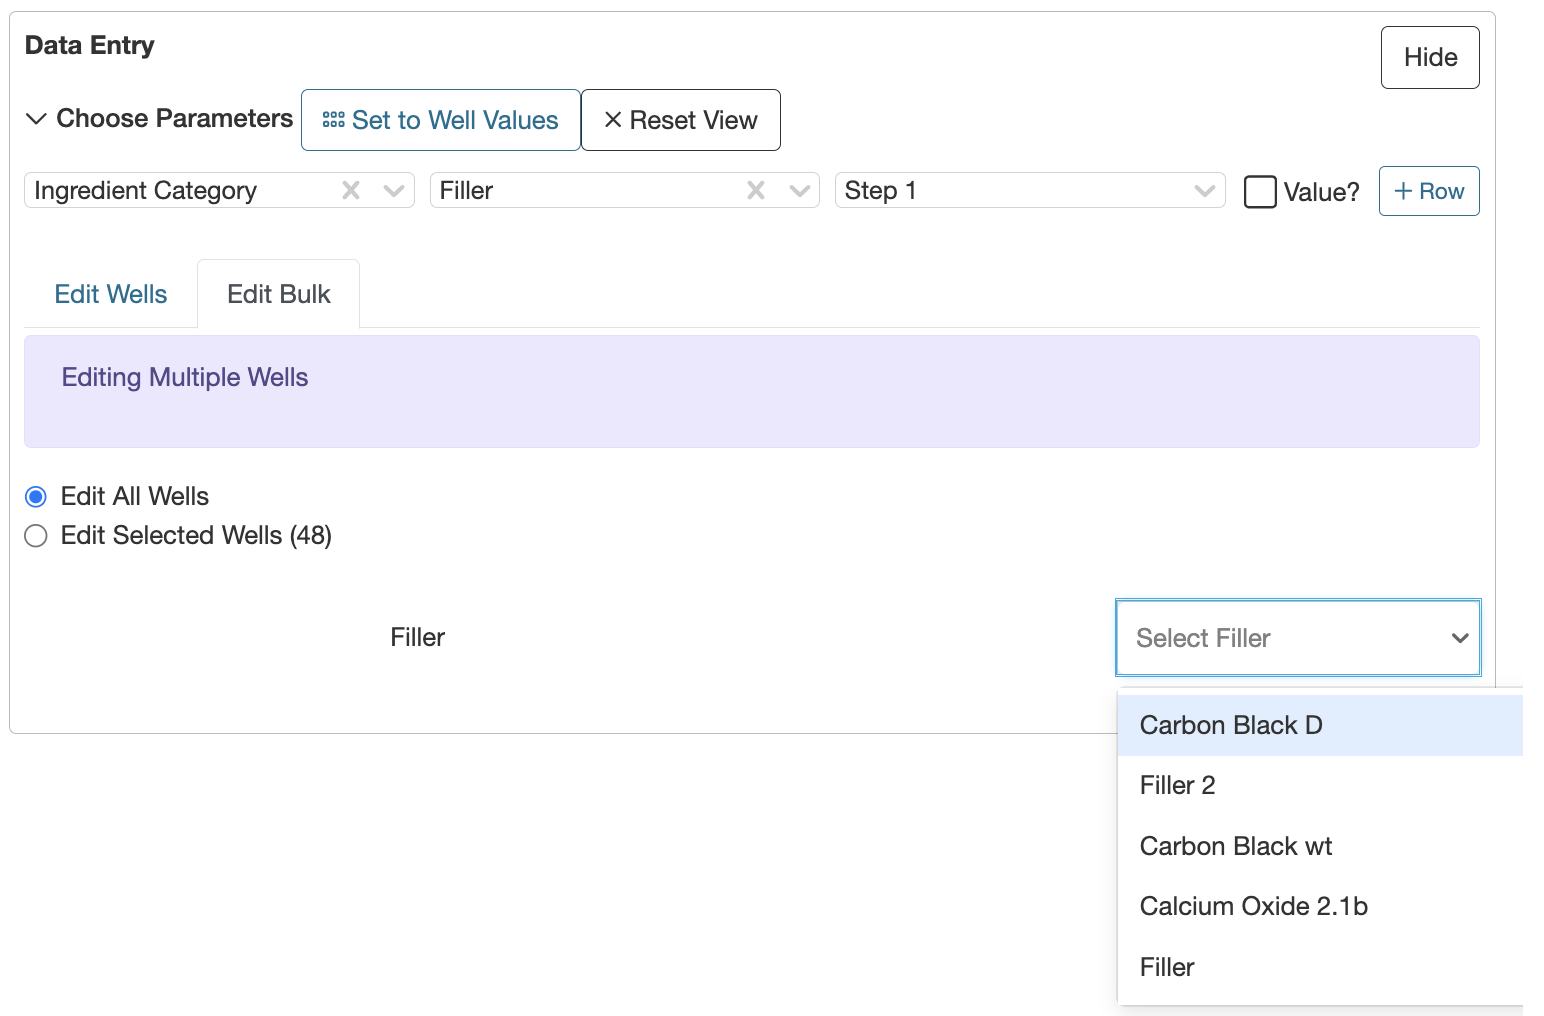
Value Editor
The value editor allows you to update the wells with specific values for outputs, process parameters, and specific ingredient categories.
The “Set to Well Values” button will auto-populate any outputs, process process parameters, or ingredient category values that are already saved on the experiments you’ve added to your well plate. This information often comes from the workflow and variant you selected when you created the plate.

Outputs: If you’d like to add outputs to your experiments, select Output in the first dropdown, choose the output in the second dropdown, and optionally, choose condition parameters for that output in the third dropdown.
There are two tabs under the dropdowns:
- Edit Wells allows you to enter values into specific wells using the plate map.
- Edit Bulk allows you to enter a single value across all wells or selected wells.
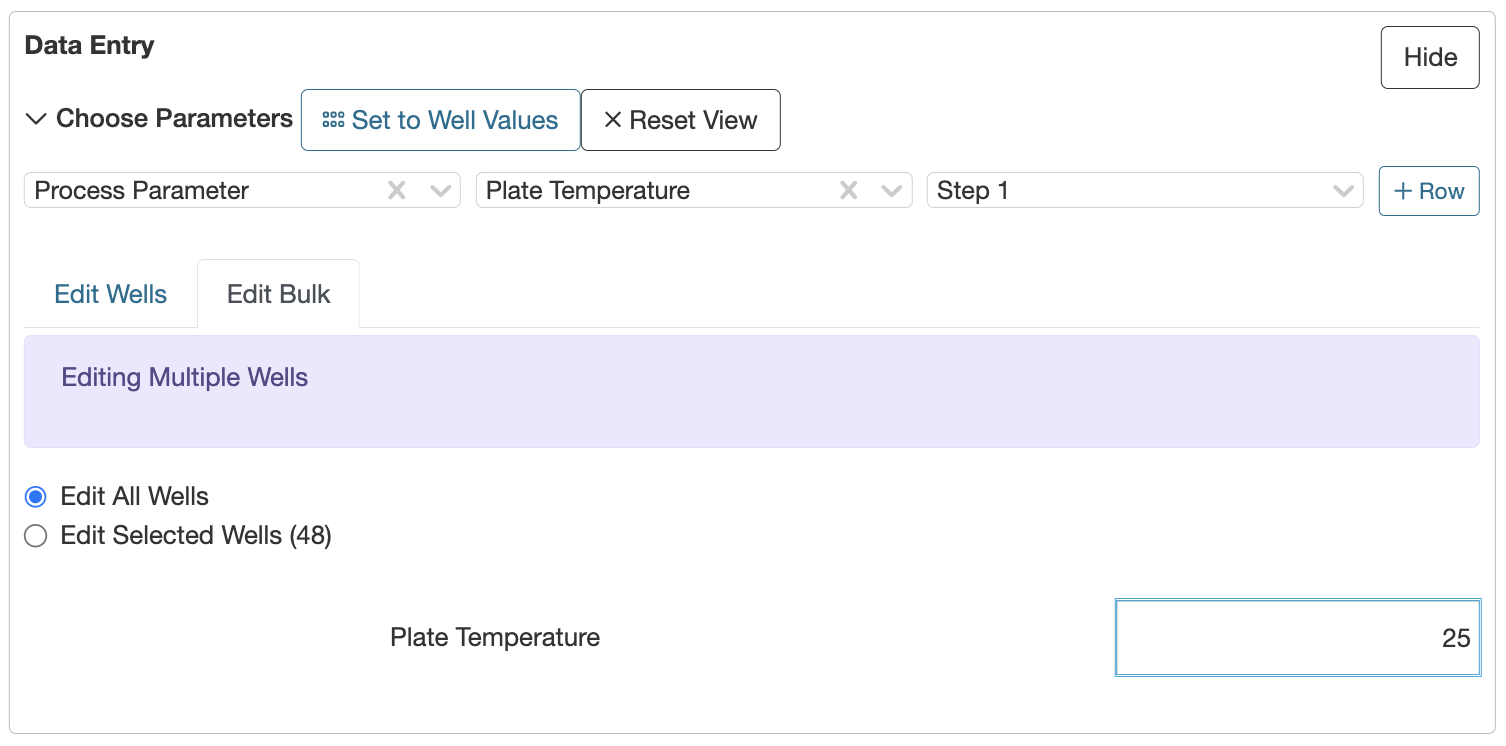
Process Parameter: The same logic applies for process parameters. Simply select the Process Parameter you’d like to add and specify the value of the process parameter using the Edit Wells or Edit Bulk tabs.
Ingredient Category: You can also fill wells with a specific ingredient category, and then specify the ingredient (of that category) in each well or all wells. You can also choose to specify a value using the checkbox to the right of the dropdowns.
Uploading Results
Similar to the uploaders on the Measurements page of an experiment, you can configure and use uploaders on the Well Plate Editor to upload results like Optical Density or Absorbance readings.
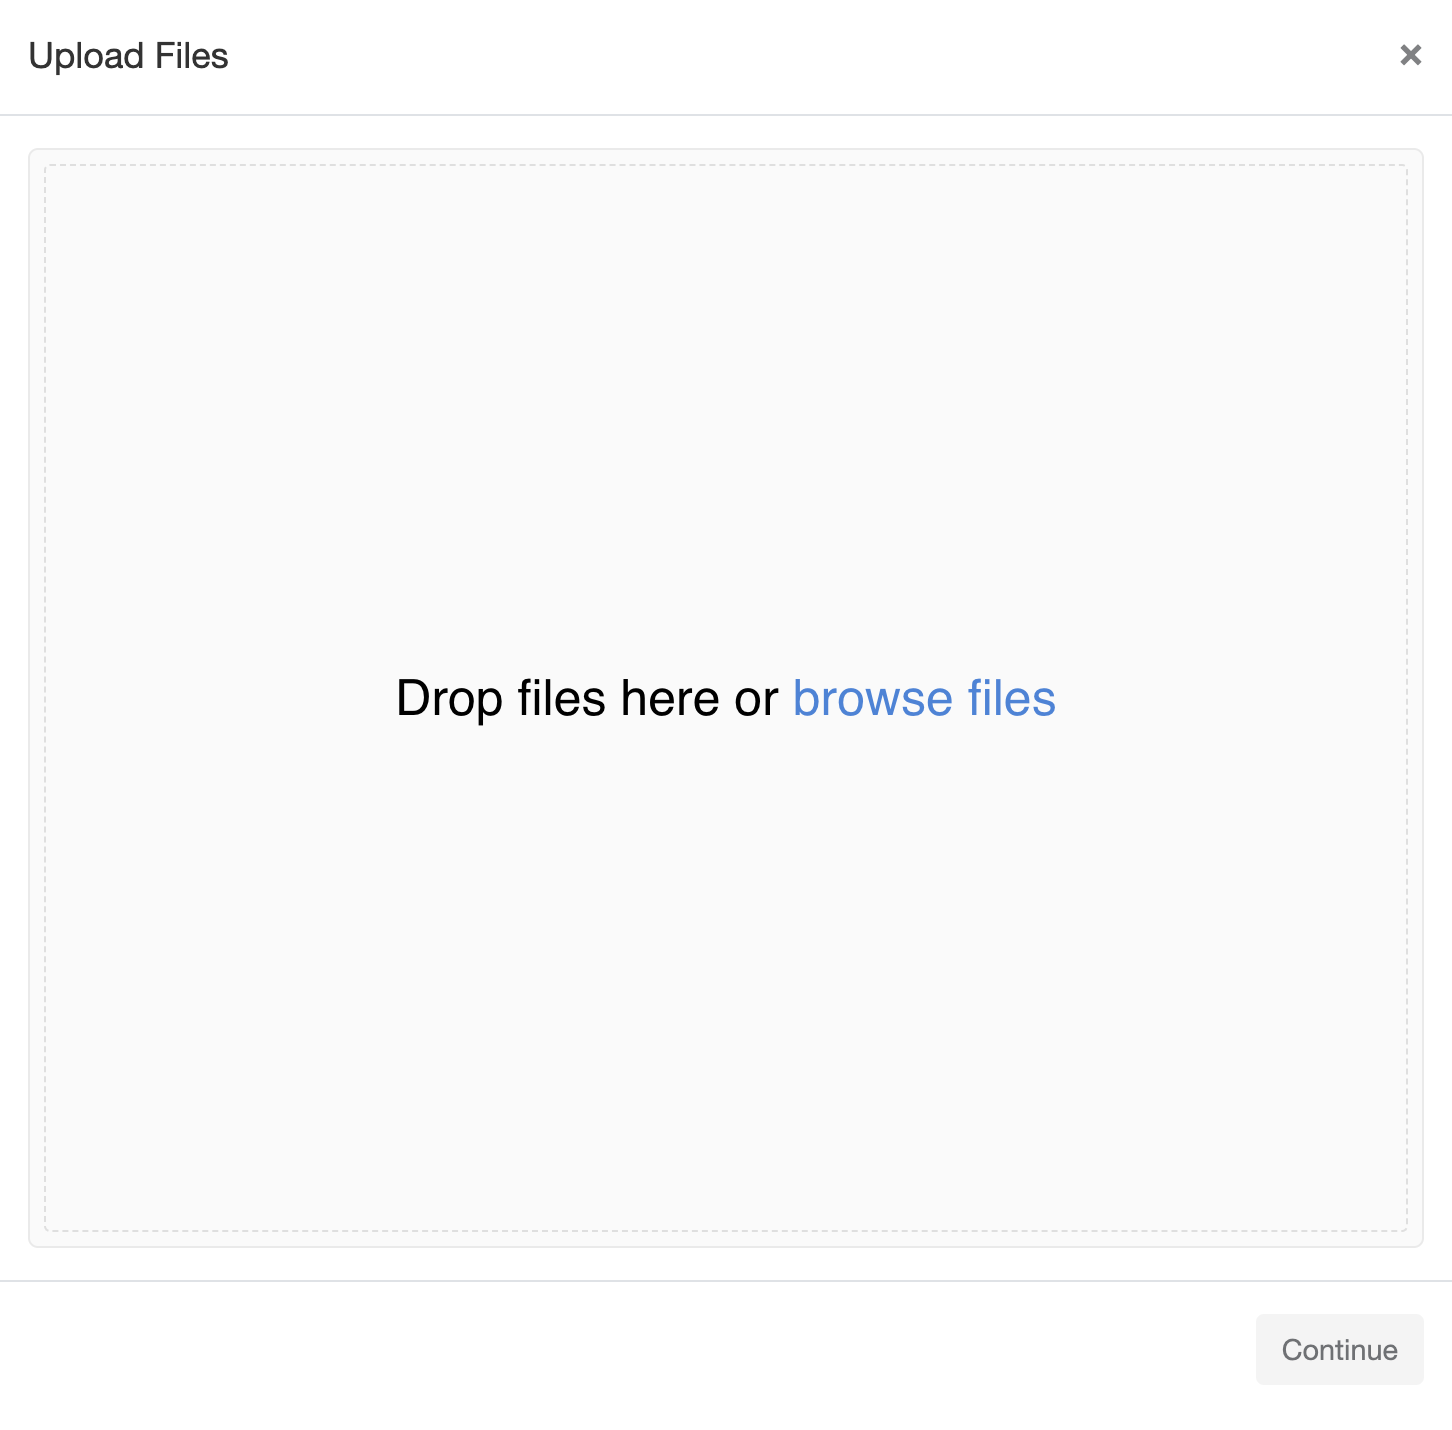
To use an uploader, select “Upload Data” from the gray toolbar.
You will then be prompted to drag and drop your file or browse your computer for the raw data file from your well plate instrument. The results in the file (which ideally should have row and column headers) will be written to the experiments in your well plate.
For help setting up an uploader, reach out to your Uncountable contacts.
Visualizations
The well plate editor allows you to visualize the wells based on experiment, ingredient, output results, controls, and more! These visualizations are controlled using the dropdown menu above your plate map.
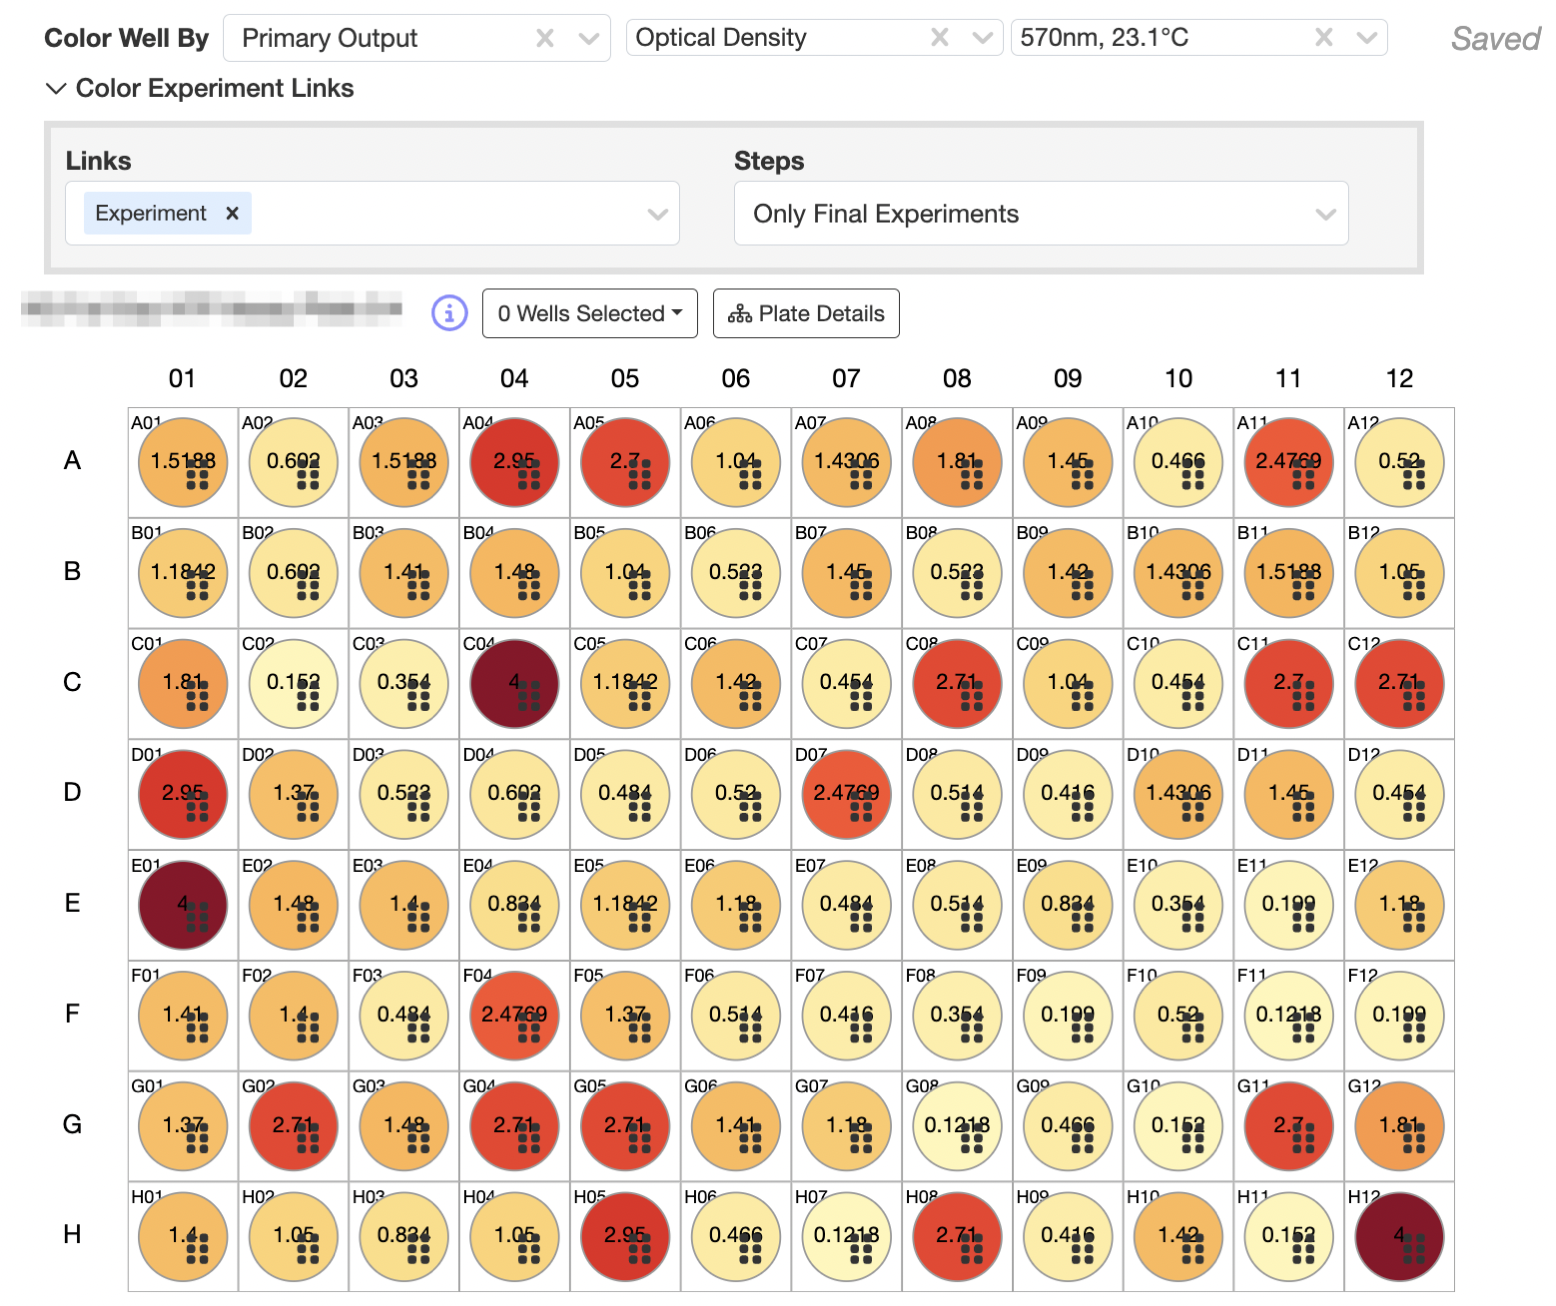
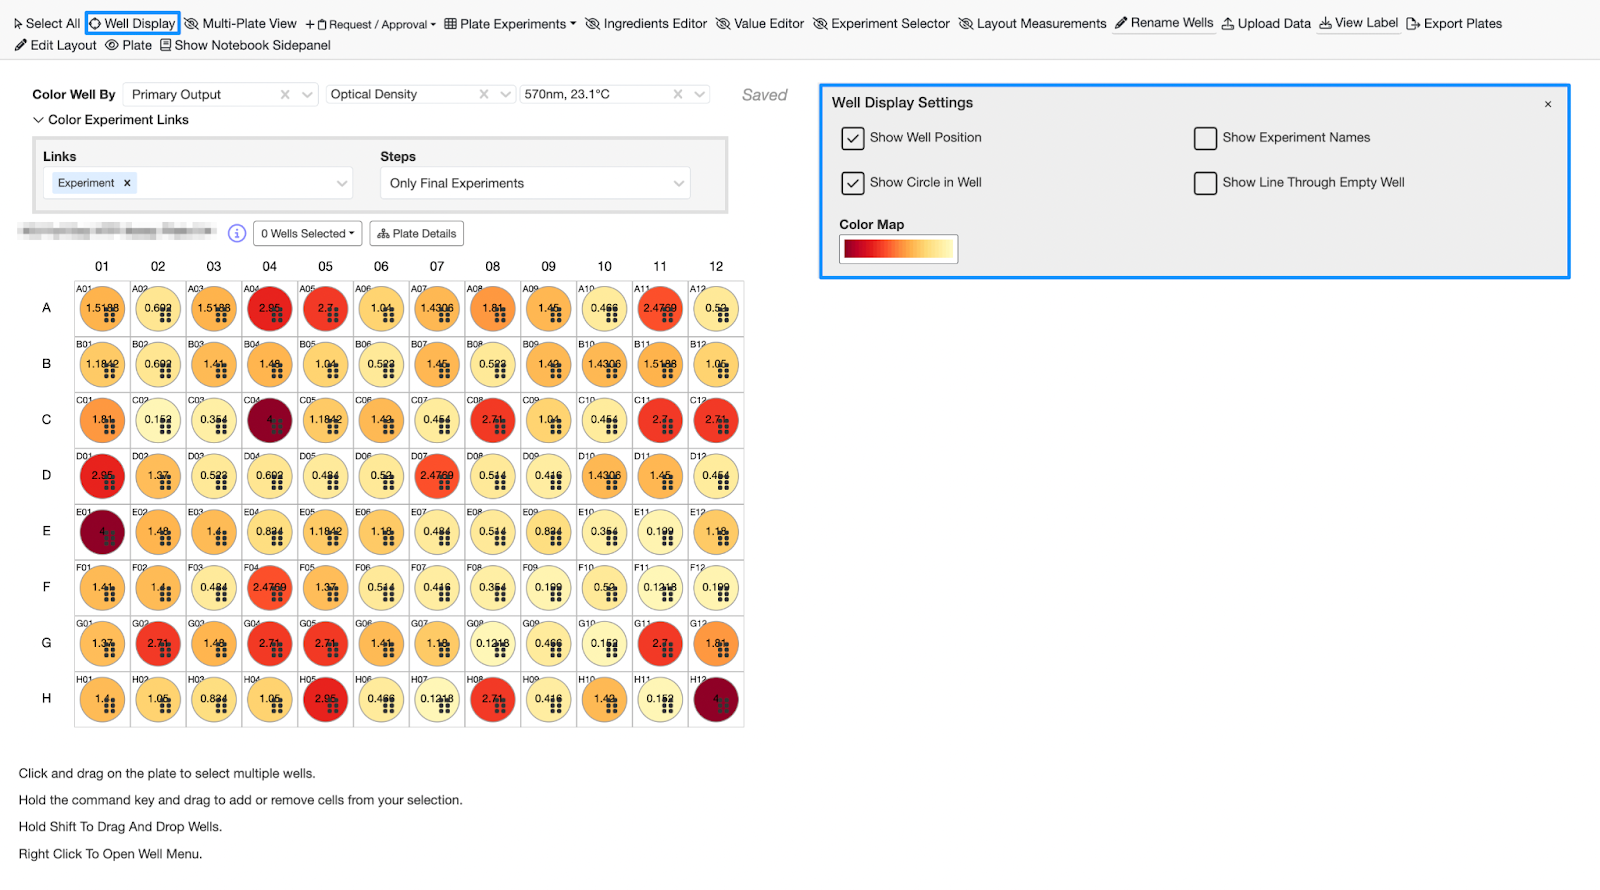
In the example above, I specified that I wanted to color my wells by the Primary Output, Optical Density. I can create a heatmap-type visualization using the output values that I populated using my uploader. You can change the colors and customize how your wells appear using the Well Display menu in the gray toolbar:
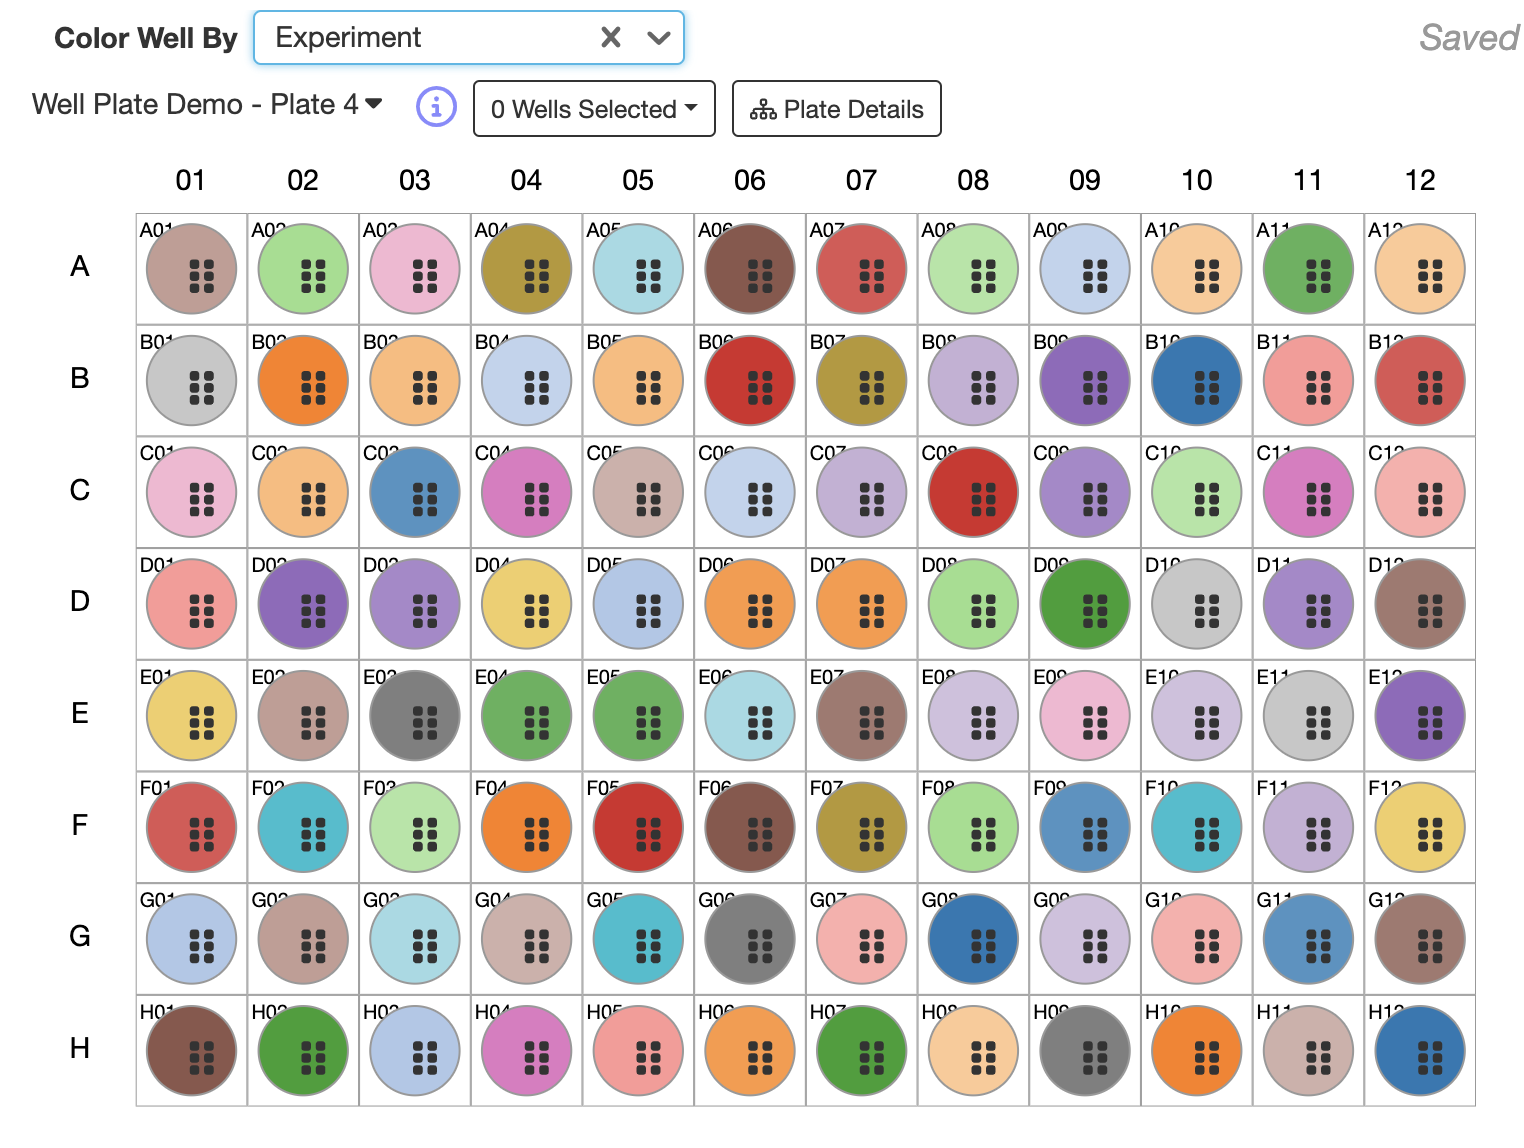
Coloring my wells by experiment shows me how many unique experiments I have on my plate:
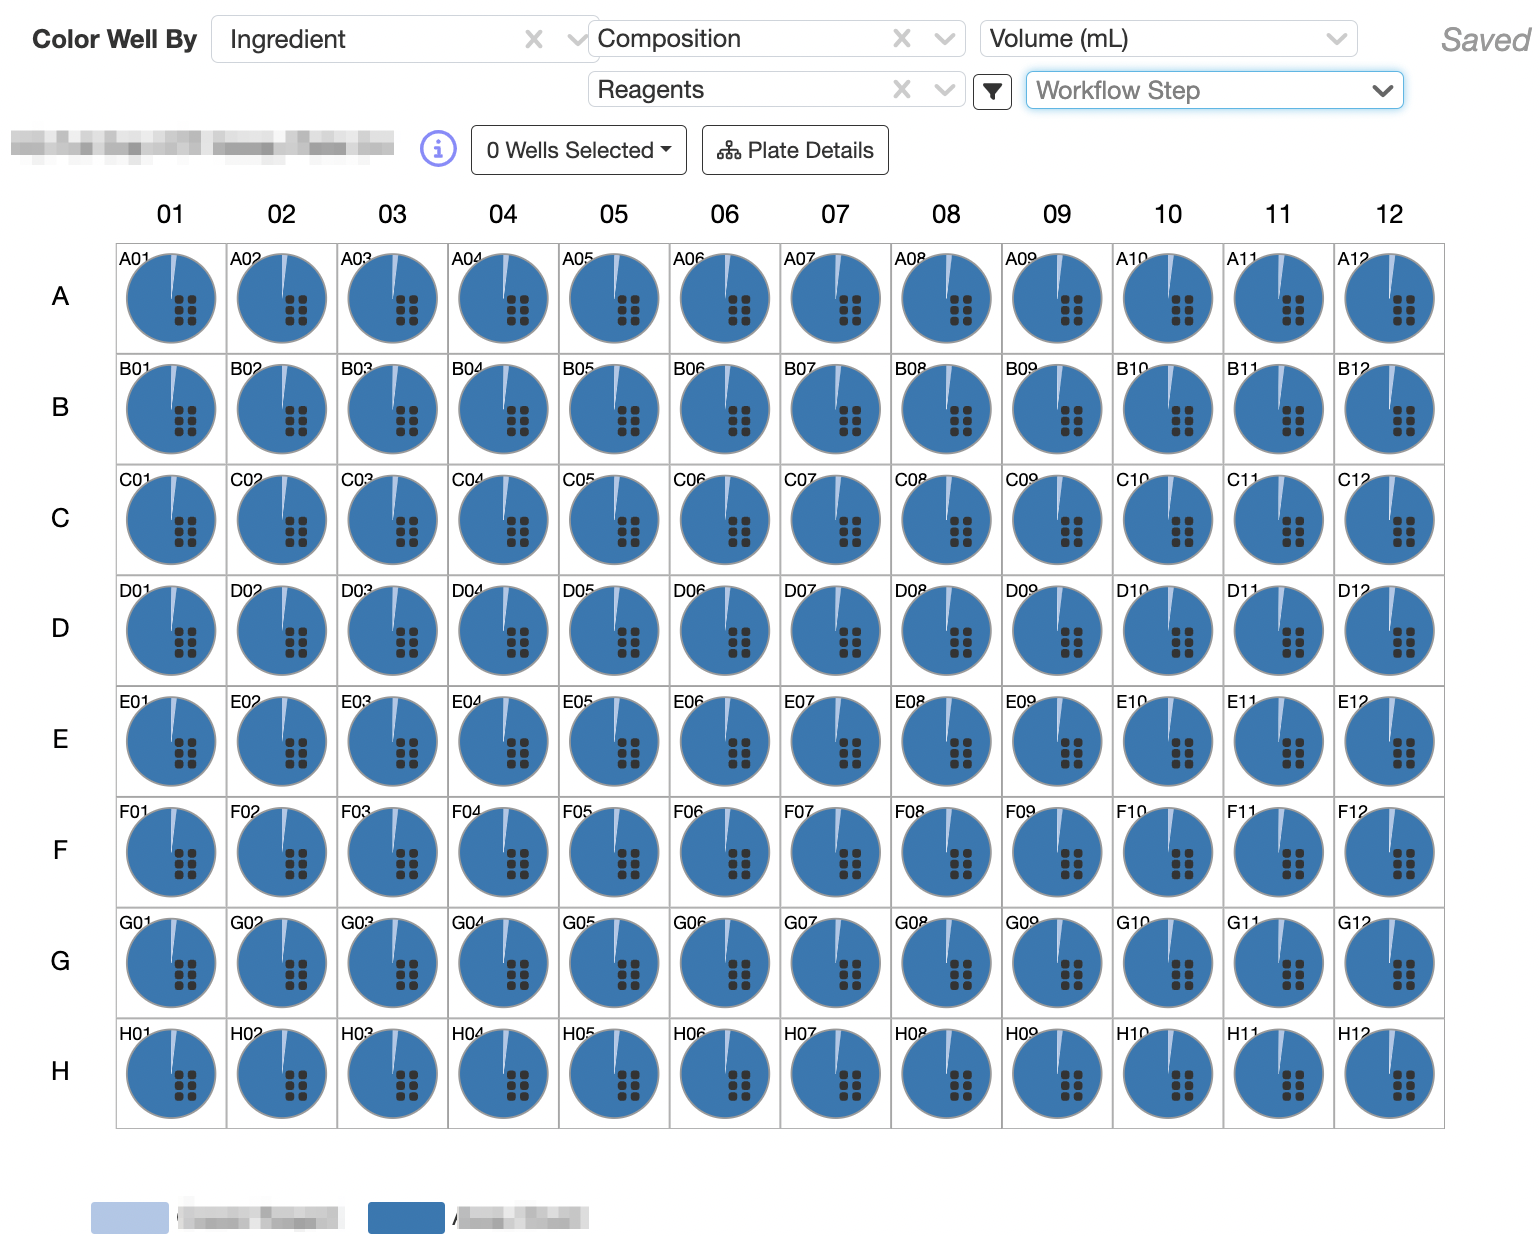
Coloring wells by Ingredient can show me the ingredient breakdown in each well with the option to separate out ingredients by different workflow steps:
Templating
In cases where you are running experiments that follow a consistent plate set-up multiple times a week, it can be extremely useful to set up a well plate template. A well-plate template conserves relationships between experiments on a plate, simplifies the data entry process, and most importantly, saves time.
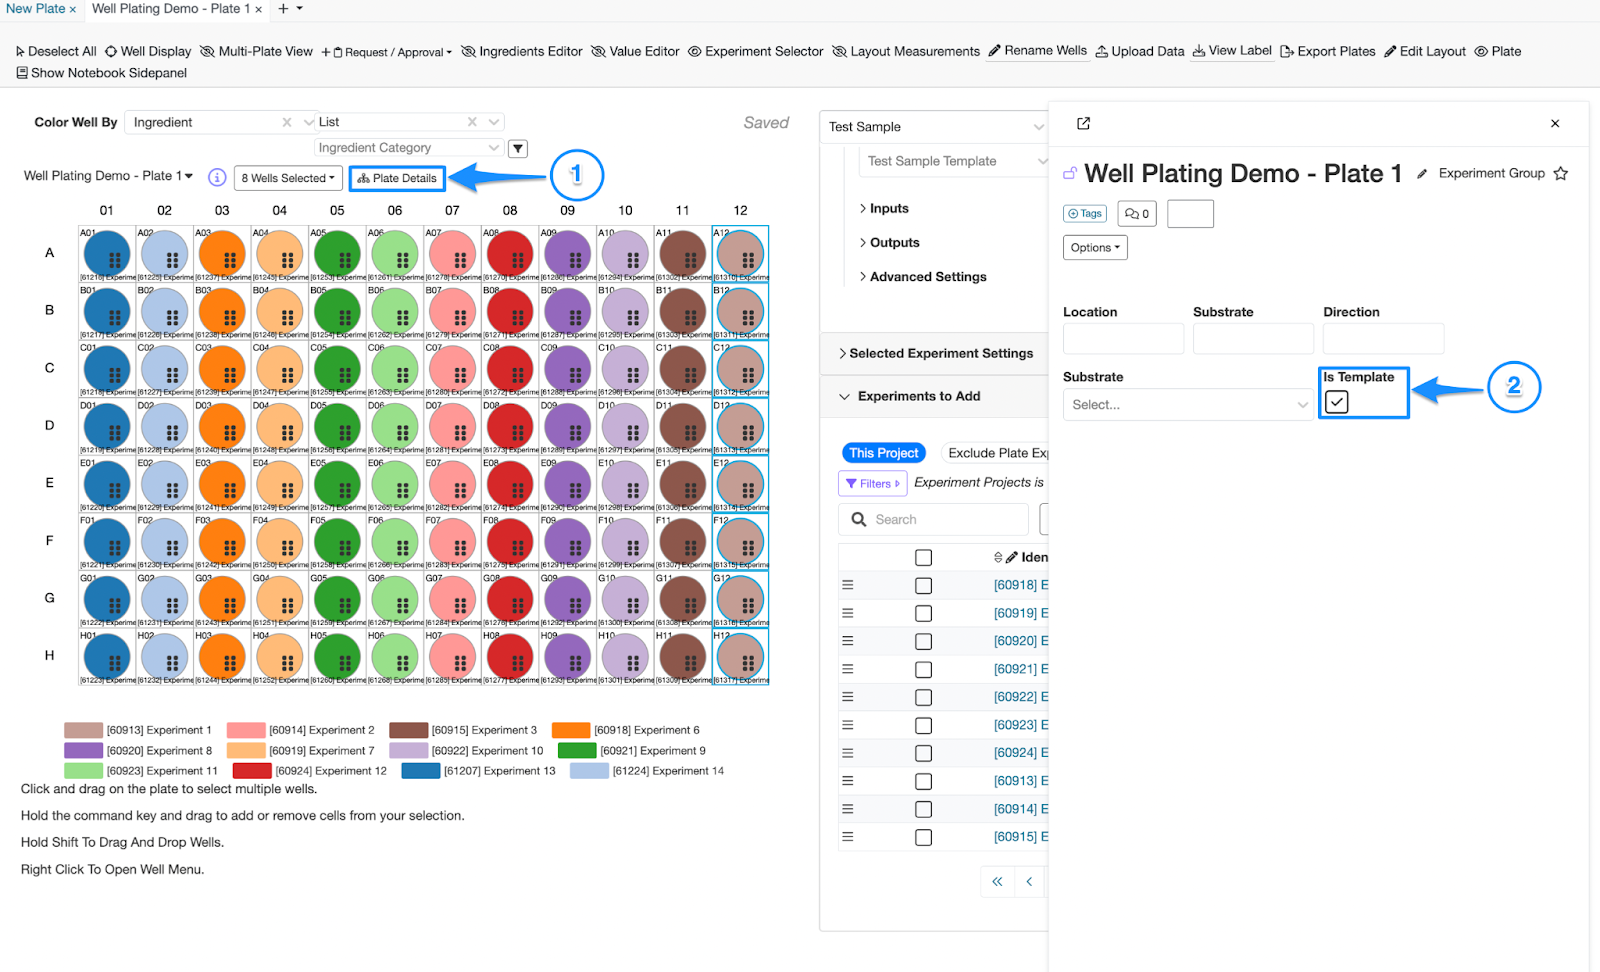
To set up a well plate template, set up your well plate with the necessary control experiments and plate layout. It is useful to include positive controls, negative controls, and metadata (any information that will be consistent when you run this assay). Once your plate is set up, select the “Plate Details” button and select the checkbox for “Is Template”.
Once this is done, your well plate template will appear in the Template dropdown when you dry to create a plate: